Chapter 7: Microsoft® Word®
What We’ll Cover >>>
- Word Processing Software
- Microsoft Word
- Documents
- Text / Paragraph Formatting
- Document Formatting
- Inserting Items
- References/Citations
- Review and Distribution
A word processor is software or a device that allows users to create, edit, and print documents. Software enables you to write text, store it electronically, display it on a screen, modify it by entering commands and characters from the keyboard, and print it. Of all computer applications, word processing is the most common.
Word processing has evolved into much more than words typed on a piece of paper. It is a means to communicate with others through letters, flyers, essays, articles, research papers, books, and reports. It lets a user create content for websites, graphic design materials, blogs, and publications. Modern word processing software and applications are integrated into the cloud. If you save your documents to your cloud-based storage, you can retrieve them from any device and continue to work with and share your documents.
Word Processing Software
Word processing software can be part of an integrated suite of tools, or be stand-alone. It can be installed on a computer for full and robust features and integration with other resources; it can be accessed on the web in a light format, and it can be a basic utility tool, like text editing applications. Some programs/suites are payware, such as those used in many workplaces; others are shareware or freeware. Information in this chapter should offer you transferrable skills for use in any word processing application.
Common word processing software:
- Apple Pages: Included with most Apple devices. Real time collaboration for creating, modifying, sharing, and distributing word processing documents.
- Google Docs: Integrates with other Google Apps, Q&A feature, has advanced word processing features.
- MS Word: Available across many platforms including mobile devices for ease of use. Integrates well with MS Office.
- Smartphone apps that allow for quick use and editing on-the-go.
- Word processing apps in free/open source office suites.
Since Microsoft® Word® (MS Word, Word) is widely used in industry, and many of us are using Microsoft® Windows® at the school level, we will focus on Word going forward. There are many similarities across word processing software, so the skills we are learning can be translated to other software and apps. The following Try Me activities are designed to be completed using the full downloaded version of Microsoft Word in Office 365 on a PC with Windows 10 or higher (or on a Mac). While MS Office Online is a great free app, it won’t provide all the support and built-in options the full version does.
Microsoft Word
Microsoft Word is a productivity word processing program. It is primarily used for text-related tasks, like correspondence, lists, reports, publications, etc. It can have added visual communication items like tables, clipart, images, and SmartArt hierarchy graphics. It has support for use in a MS Office workflow with Excel, Access, PowerPoint, and Outlook. It will translate well into SharePoint spaces, and between colleagues/students working on projects together.
DEMO EXAMPLE follow-through
- In your Computer desktop area, look for and use the relevant start menu to navigate to your activities files.
- Per the Using this book as a course section, you can create, then save activities files in your BUSTECH directory, Activities folder, MS_Word subfolder. If you plan to use a provided file, make a copy for your working subfolder so that the original file will remain untouched. Otherwise, use the instructions for file management your instructor requests.
Accessing Word
- On your computer, use the relevant start menu to open MS Word (look for little blue icon). On a PC this is a start button on the keyboard, and/or menu on the lower left of the screen. On a Mac, this should be in the top-screen Menu option.
- Word will open with options to create a blank file, open an existing file, and use templates.
The User Interface (UI) menus
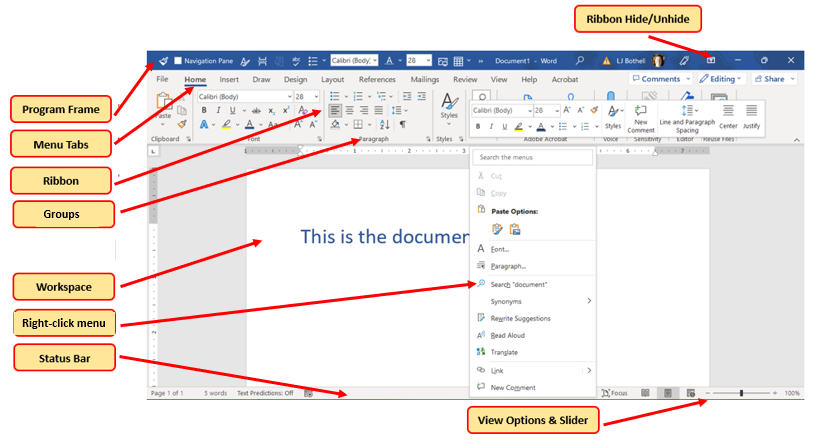
MedAttrib: author-generated. MS Word user interface with context dropdown menu.
In Word, the user interface contains several menu tabs (tab, menu), with ‘Ribbons’ (ribbon) that display icons (like buttons) with text descriptions of various activities related to a task. On a ribbon, you will often see groups (group) of icons for tasks that relate to one another, like the Home ribbon’s Font group, Paragraph group, etc. Some of these icon buttons will do a simple task in one step, while others may open a panel (panel) which is a detailed, multi step or tab window of options. Sometimes you may instead see a context dropdown (dropdown) menus of options, or a dialog box (dialog) with a couple of fields to complete.. Shown (in the program’s order) are:
- File: Accesses the program backstage area for various options. Set your preferences for workflow and productivity.
- Home: Basic text functions like formatting, positioning, styles.
- Insert: tables, images, shapes, charts, page sections.
- Design: themes and related items
- Page Layout: Layout of the pages, including margins, positioning, indents, etc.
- References: Used for research papers needing footnotes, endnotes, tables of contents, etc.
- Mailings: Allows mail merge from spreadsheet or database table data (like names and addresses).
- Review: Spelling, language, document change tracking, etc.
- View: screen views, rulers, gridlines, windows.
- Additional add-in/specialty tab menus: These are dependent on having MS Word-related add-ins like Acrobat, a reference manager, etc.
- Contextual tab menus: These are contingent on a specific item in the program’s workspace being activated. For instance, clinking on an image, table, or header / footer will activate a context menu/ribbon on the right side of the UI menu bar that shows a menu dedicated to actions that can be done specifically for the active item (like picture editing).
We’ll cover more detail on specific Menu toolbar ribbons in the following demo sections.
Documents
Documents are made up of pages with content. This whole book is a document. Their common MS Word file extension is .docx, and when you save a file, Word will automatically add this extension to the file name for you. They can contain:
- Text paragraphs and lists
- Images, tables, SmartArt, shapes, and clip art
- Headings, subheadings, captions, and paragraph text
- Page and section breaks, columns, and header / footer information
- Tables of content, footnotes, citations, chapters, and sections.
Views – View Tab
- You can see different views as part of the main interface – lower right-hand side of the user interface, and also from the View tab’s ribbon.
- You can set rulers to be visually on or off.
- You can also set guides for aligning text and images, and tabs for paragraph starts.
- You can choose the window view you like to work in, such as draft, outline, and print layouts.
Preferences – File tab
You can set your Word program preferences for documents and program workflow, for smoother productivity, in the ‘backstage’ area of the program. These preferences may be found in different places on a Mac.
- Same overall layout as PowerPoint, Excel, and Access
- Allows personalizing, print, save, and publish settings
- Preferences: Word Options:
- Customize editing, saving, and other program options
- Personalize a mini-toolbar so you can minimize the ribbon
Text / Paragraph Formatting
Paragraphs
In word processing “paragraphs” refer to batches of text, with headings, paragraphs, lists, etc. Paragraph formatting includes indenting, spacing, and alignment. For instance, the alignment of text can be left, right, centered, or justified alignment; this particular paragraph is in Left alignment and is made up of all the words, spaces, the line spacing, the font type and formats, etc.
Creating new text
If you don’t yet have text to work on yet when creating a document and setting paragraph formatting to use later as a saved style, consider using Lorem Ipsum, or one of its variants. Fun text fillers can include KittyIpsum, BaconIpsum, or ZombieIpsum. You can find Ipsum generators free online and copy/paste gibberish paragraphs into your document so you can play with some chunks of text. Let’s try some KittyIpsum now!
[Nap all day cat dog hate mouse eat string barf pillow no baths hate everything but kitty poochy. Sleep on keyboard toy mouse squeak roll over. Mesmerizing birds. Poop on grasses licks paws destroy couch intently sniff hand. The dog smells bad gnaw the corn cob.]
And, yes, there is Dog ipsum: [dog ipsum fluffer derp cronch gib nuggs fluffer heck noods blep zoomies fluffer tippy taps bacon toe beans woofer smol nuggs woofer chonky bork zoomies derp]
Home tab – Clipboard Group
At the very left of the Ribbon is the clipboard group, which is a small set of tools you can use in relation to when text, images, and styles have been saved to the clipboard as you work. Clipboard-related activities include:
- Copy
- Cut
- Paste
- Redo
- Undo
- Paintbrush
- Moving info by dragging
Format Painter – Home tab clipboard group
- Allows you to “capture” an existing style and apply it to any object you click on
- Single-click applies once
- Double-click locks so you can reuse it
Understanding the clipboard
See the Clipboard Pane by clicking Home tab/Clipboard section expander icon
- Can “store” numerous pieces of text and images.
- Items are stored temporarily (in RAM) until the program is closed.
- You can also delete items off the clipboard.
- You can store them and then choose which one to paste.
Home tab – Font Group
“Fonts” refer to the letters (characters) used in text. Font formatting includes resizing, changing the font family (Arial, Times New Roman, Calibri), adding bold or emphasis, adjusting spacing between letters, and more. You can right-click on a word or cluster of words for the contextual menu, or use the Home Tab’s font group options. These include:
- Style (font family)
- Size
- Color
- Bold, italics, underlining, strike-through
- Changing text case
- Effects like highlighting
- Advanced formatting, like spacing
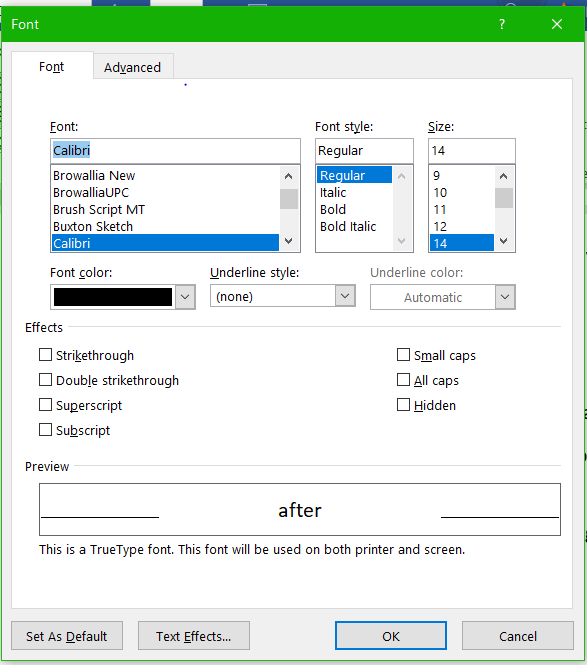
MedAttrib: author-generated. MS Word Font panel.
Home tab – Paragraph Group
You can modify your paragraphs in several ways. You can right-click on a selected piece of text, and choose “Paragraph” from the contextual menu. You can instead select some text, and use the Home ribbon’s one-touch paragraph group icons. You can also select some text, and choose the Home Tab’s paragraph group panel opener. With any of these, you can do:
- Alignment: Determine how text will appear in a document: left, right, centered, justified
- Spacing: Single, double, and other-width spacing between lines in a paragraph
- Indenting / Tabbing: Set tabbed indents, or pre-set first-line or full paragraph indents
- Call-out: Use bullets or numbers in lists
- Shading: Paints background coloring behind a paragraphs of text
- Borders: Applies lines above, below, and/or around paragraphs of text
Paragraph panel
The paragraph panel, which you can open from the lower right corner of the Home ribbon’s paragraph group, reveals a panel with several tabs of options.
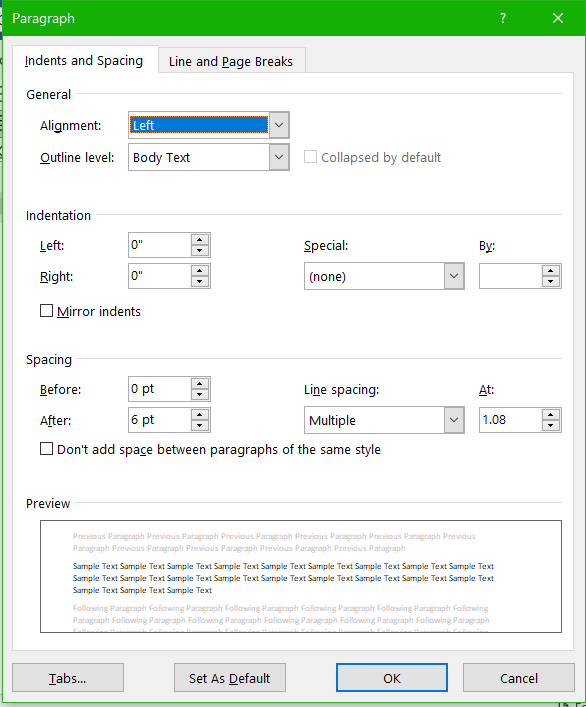
MedAttrib: author-generated. MS Word Paragraph panel.
- Spacing before and after
- Specific indentations
- Line spacing
- Tab stops
- Line and page breaks
ACTION: MS Word Try Me Activity #1
Let’s do a few basic text formatting tasks. If you have Word open, let’s use the Word_textbasics.docx file that should be in your DataFiles folder.
- If Word isn’t open yet, open MS Word.
On the start screen, or from the File tab, choose to open a file. You will likely need to navigate through your computer to find the file. You can do this from the File tab’s Open screen by selecting Other Locations/Browse, then browsing to wherever you stored your file. For this book, we suggested you create a BUSTECH directory, then the DataFiles folder, for files to work on.
- Look there for the Word_textbasics.docx file, then open it.
- Next, and this is important: Use the File tab again, but choose SAVE AS. In the navigation window, back out of your DataFiles folder, then enter the Examples folder then into your MS_Word folder.
- Then, save your file as Word_textbasicsWork The Word program should add the .docx extension for you.
This gives you a saved copy of the file to work on, while still leaving the original copy of the file in the DataFiles folder.
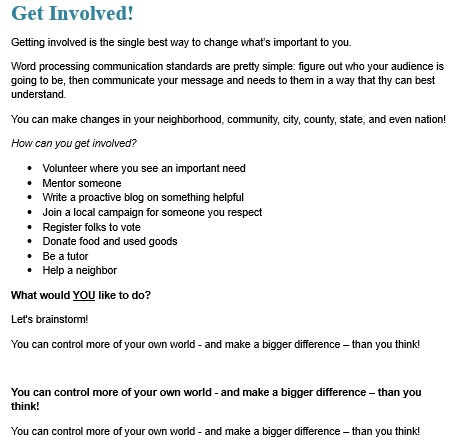
With your Word_textbasicsWork.docx file open, you should see plain text that starts with Get involved! We’ll use this for basic text formatting practice. Our goal is to simply use several Home tab Font group and Paragraph group options to make the document look more readable. Just follow along!
- Select the text Get involved! This is at the top, and is the title.
- Use the Home tab’s Font group to find the font size, and change the Get involved! text to 24, This represents 24 points (a point, in text sizing, is just the character size).
- Then, use the Bold icon to make the text bold.
- Next, use the Font color icon to choose a dark color you like, such as dark blue, dark orange, etc.
The title should now be larger, bold, and a different color.
- Click away from the title, then select all of the rest of the text, so that we can change the font type (font family, font face).
- You can select text by double-clicking a word, triple-clicking to grab a full line or paragraph, or by placing your cursor at the beginning of the text you want, holding the Shift key down, then clicking at the end of the text selection you want.
- With the text selected, use the Home tab’s Font group Font selector, and look at the existing font. Depending on your computer, it is likely Times New Roman (or a variant of Times).
- Choose Arial from the Font dropdown list (click the arrow to activate that).
Next, let’s adjust the spacing of the lines from each other. In the Home tab’s Paragraph group, choose the Line and Paragraph Spacing icon, then choose 1.15. This gives a little more space between text lines.
- Choose the Line and Paragraph Spacing icon again, and click the Add Space After Paragraph option. That doesn’t affect all lines within a paragraph (clump) of text, but between the paragraphs.
However, this doesn’t look much easier to read, because there are a lot of one-line paragraphs. Several are actually a list of things for the sentence How can you get involved? Let’s make those bulleted list items (which indents and places a little text graphic or number icon at the beginning of each line).
- Select only the 8 lines, then in the Paragraph group, click the Bullets icon. The 8 lines will close up together and show a little round bullet in from of each of them.
TIP: List Items. Bullets in a list tend to be for listing things in no order of importance. A Numbered list is for if you have steps in order, or a list with items already in order of priority.
Now, let’s add just a bit more emphasis to the document’s text.
- Select the line How can you get involved? – which should not be in the bulleted list.
- Use the Italics icon in the Font group to italicize the line.
- Select the line What would YOU like to do? – which should not be in the bulleted list.
- Use the Bold icon to bold the line.
- Select only the word YOU in the line, and use the Underline icon in the Font group to underline it.
Now, let’s establish an important habit for any work you do – in Word, Excel, PowerPoint, and any other program you produce work in.
- SAVE your work as you go: In Word, Use the File tab’s Save command, or the Quick Access Toolbar disk icon. The keybind shortcut is CTRL S / MAC Users: CMD S.
- Keep this file open for the next steps.
MedAttrib: author-generated. MS Word user font formatting.
Let’s practice with the Home tab’s Clipboard group.
In your currently open Word_textbasicsWork.docx file, select the last line of text.
- Copy it by using the Home tab’s Clipboard group Copy icon.
- Press Enter twice to add space to the bottom of the page.
- Paste the line of text by using the Home tab’s Clipboard group Paste icon.
- Press Enter once to add a paragraph space.
- Paste the line of text again by using the Home tab’s Clipboard group Paste icon.
- Using the bold icon, make the first of the two lines Bold.
- Then, select the newly bold line, and then click on the paintbrush icon in the Home tab’s Clipboard group. The icon will change color a bit, which shows you have ‘loaded’ the format painter paintbrush with the bold style of the line of text.
- Then, with the paintbrush loaded, select the 2nd line of text. This should turn bold as well.
- To undo the last step, you can use the CTRL Z shortcut/ CMD Z for MAC.
Keyboard Shortcut > UNdo. The Quickbar usually has the Undo icon on it (looks like a backwards curved arrow, but if it doesn’t, learn this keybind: CTRL Z shortcut (CMD Z for MAC users.)
Keyboard Shortcut > REdo. The Quickbar usually has the Redo icon on it too (looks like a forwards curved arrow, but if it doesn’t, learn this keybind: CTRL Y shortcut (CMD Y for MAC users.)
- You’ll be using these skills all through learning Word, so we’ll pause here.
- SAVE your work: CTRL S / MAC CMD S. Close the file. MS WORD ACTIVITY #1 FINISHED.
Document Formatting
Text and paragraph formatting are parts of what happens in a document. This section is about the overall document itself – how it will present when printed out and consumed by users. Document formatting is characterized by actions that can affect the whole document, and in so doing, add efficiency and steps-saving to general text and paragraph formatting. These include document layout, themes and styles, headers and footers, and some use of sectioning.
Setting up documents – Page Layout tab
The Page Layout tab allows you to set the physical format of your page, which is a good starting step in word processing work. This determines how large the paper used will be, the margins, the orientation of the document, etc. In the Layout tab’s ribbon, you can use the page setup group icon dropdowns, or the group’s panel activation arrow, to accomplish (in order of page setup group):
- Page margins: the white space around the edges of a page that won’t be printed on , and also which adds white space around a document’s content for viewability. Normal gives a printed document lots of white space at the top, bottom, and sides of the sheet of paper, and is often used for papers and business documents. Narrow gives less, and isn’t very effective for business documents. Moderate is somewhere in between and is useful for casual use.
- Page orientation: the height and width direction of a page. Default and common use is Portrait, in which a document is taller than wide. Horizontal can be useful in reports and presentation style formats like brochures, flyers, and documents which might import wide tables and graphs.
- Page size: the paper size of a document, even if it never is intended to be printed on paper. Users may choose to print the document, print a PDF, and or take a screenshot image for later printing/pasting into another document. The default is 8.5 x 11 inches, with other common page sizes being legal (8.5 x 14 inches), and ledger (11 x 14inches). Other listed sizes may be legacy for office documents.
- Columns: A page’s content defaults to being one-column – page wide from the left to the right margin. It can be changed to two or three or multiple column numbers. If it is, it will reflect through the entire document unless special column breaks, or special unlinked document sections are created, and the different column number used in only a section.
- Breaks: You can create a new page break, a break to begin and end a different column style, or wrap text around an inserted image, and add new section breaks.
Designing documents – Design tab
Themes apply decorative styles to your Word document, such as fonts, colors, effect options, paragraph spacing, etc. They can give a set of documents a consistent and attractive appearance and make your word processing efforts look more professional. In business, they are best used as part of a “package” of documents, such as a letterhead and envelope set or as part of a report style. They can enhance what you want to communicate by adding company branding colors and fonts. You can also:
- Make your document more readable than just black-and-white text
- Tie consistent inserts, like shapes and borders, together with the rest of the document’s “look”
- Use different colors and font styles to punctuate headings from text
- Help your reader respond and/or act in the way you need, and
- Easily update the whole look of your document just by changing the color or font variants
Design: Theming / Design Tips
Using themes can be a double-edged sword. While they can add attractiveness to your documents, they can also, if misused, make your work look confusing, be hard to read, and muddy your communication message. Certain types of work should not use themes, like cover letters and resumes, which are routinely expected to be plain and standardized and which the receiver will likely scan into a program for database acquisition.
- Choose theme colors that make sense for the product, service, or idea(s) you are trying to communicate.
- Choose theme backgrounds that have good contrast and allow text to be very easy to read.
- Choose fonts for readability, based on need for headlines, lots of paragraph texts, easy bulleting, etc.
- Remember that less is more – more colors and font variations in one document can look unprofessional and take away from your message.
- Use themes only when you have full control over your own document – if you have an instructor or employer who does not want them used, then instead focus on using a template of the required styling.
Design: Theme Variants
Theme variants let you change aspects of a theme you select to apply a different core font family to it, or to change the color palette it will work with.
- Fonts: Font families in themes are designed and sized to be readable and hopefully scannable by screen readers for accessibility use. The style will offer a font for titles/subtitles, and another for general text. Available font families come installed with the computer’s operating system, and may also be accessed from the word processing software’s installation or cloud-based accessories.
- Color Palettes: Like fonts, color palettes are included in a style, and can also be changed independently to modify and create a new style. For instance, the overall design style of a theme may work for you, but the color palette assigned to it may not have enough contrast for your audience, or your company may focus on a different rage of core colors.
- Effects: These are subtle styles that can be attached to some inserted items, like image borders, shapes, SmartArt, etc.
Theme Additions
- Paragraph Spacing: This allows you to modify a theme’s look of document line formatting between paragraphs.
- Page Color: This allows assigning a color to a full page of a document, and acts as if the paper itself would be that color.
- Page Borders: This allows assigning a border to a full page of a document.
MedAttrib: author-generated. MS Word Design/Themes.
ACTION: MS Word Try Me Activity #2
Let’s do a few document formatting tasks. Let’s use the Word_resumestarter.docx file that should be in your DataFiles folder.
Before you start, you should use your file manager utility to make a copy of the Word_resumestarter.docx file that is in your DataFiles folder, then paste the copy into your Examples / MS_Word folder.
- If Word isn’t open yet, open MS Word.
- In the File tab Backstage area, choose to open a file. Use the browser dialog panel to locate the Word_resumestarter.docx file that should be in your Examples / MS_Word folder, then open it.
You should see a couple of pages of plain text that starts with information about cover letters. We’ll use this for document formatting practice. Our goal is to simply use several Word options to modify this document:
- Home tab Font and Paragraph group options
- Design tab Document Formatting group options
- Layout tab Page Setup group options
In creating/inheriting a plain document, it is efficient to go from the big changes down to the small ones. The big changes tend to be those that affect the whole document, like its margins, page size, and theme, while smaller changes affect parts of the document, like a paragraph, a word, an image, etc. We’ll take this approach, rather than using the Word tab ribbons in order that they appear in the user interface.
Let’s learn about document layout in practice. A word processing document is going to be distributed in some way so that it can inform others – as a cover letter, a brochure, a report, a research paper, etc. For others to get at the information – whether printed or by email attachment – it needs to be readable, accessible, and not visually confusing. Layout options help structure the content of a document into a useful format.
- Click anywhere in the Word_resumestarter.docx file. Layout settings are not depended on choosing specific text. Use the Layout tab Page Setup group for the following tasks.
- Select the Margins tab, and consider the options. Moderate is somewhere in between, and we will use it. Using the Margins icon, choose Moderate.
- Select the Orientation icon; the document is set to landscape, which is too wide for cover letters and resumes. Choose Portrait, which we will use for a standard taller-than-wider document appearance.
- Select the Size icon, which is set to default to Legal size. This is also too large, so choose the Letter (8.5×11 inches) option for standard paper size.
There is one more layout change we should make, but this one does require you to place your cursor specifically. We need to formally separate the cover letter page from the resume page, and we can use a Section break to do this.
- Click just before the first word of the line that begins A resume is one required… With your cursor just before the word A, use the Layout tab Page Setup group Breaks icon and choose the Page break option.
- SAVE your work as you go: The keybind shortcut is CTRL S. MAC Users: CMD S.
Now, Use the Design tab Document Formatting group for the following tasks. Again, you can be anywhere in the Word_resumestarter.docx file, since Design isn’t dependent on selecting specific text.
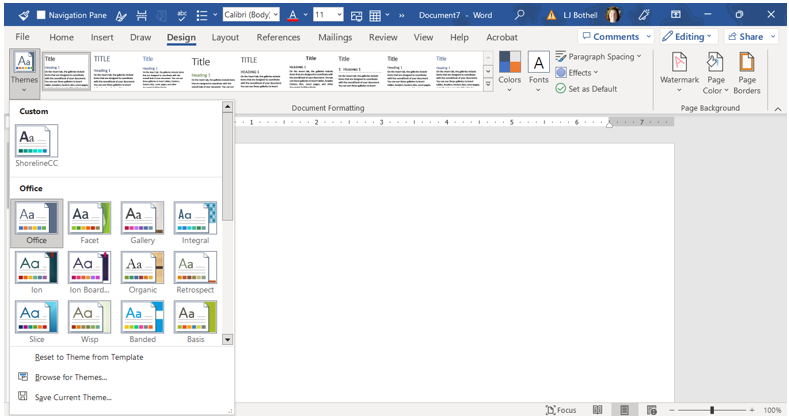
- Click the Themes icon, which opens a panel that has icon examples of a bunch of themes. The document is using the default Office theme, which you can identify because it seems to have a gray selection shadow around the theme icon.
- Let’s choose the Basis style ( Macs may not have this; if not, choose something else that looks easy to read.)
- The color palette for the Basis style might not appeal to you. For cover letters and resumes, colors are not good. Click the Colors icon to see a dropdown list of color batches (palettes) to choose from, and select Grayscale.
- The fonts palette for the Basis style also might not be something you like. For a cover letter or resume, fonts should be easy to read.
- Click the Fonts icon to see a dropdown list of Font combinations (palettes) to choose from, and select one you like better.
- Cover letters and resumes don’t usually use effects, but you could click the Effect icon to see what options are available for adding a little pizzazz to items you can insert into a document, like shapes, images and their borders, etc. Pick one if you’d like.
- SAVE your work: CTRL S / MAC CMD S.
Let’s deal with paragraph formatting using the Paragraph panel. You do not need to select text for this, just click anywhere in the document.
You can access this from the Home tab’s Paragraph group, which has a small arrow in the lower right corner of the group that opens the Paragraph panel. There are two tabs; we will focus on the first – Indents and spacing.
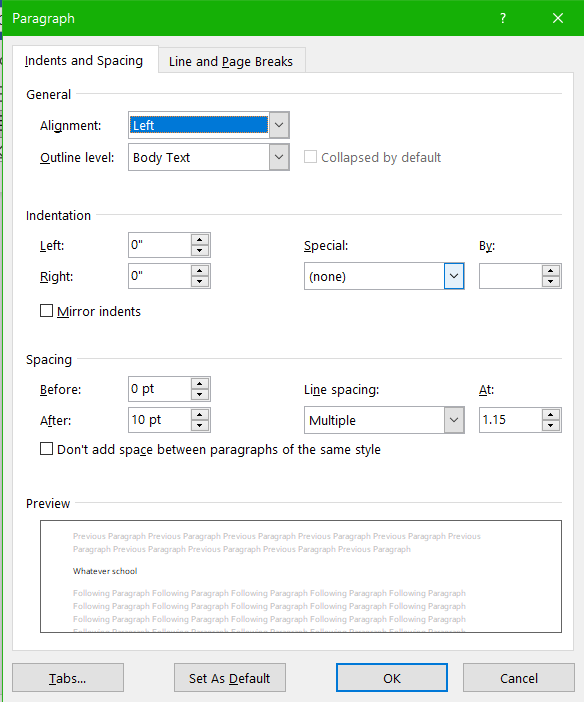
MedAttrib: author-generated. MS Word Paragraph panel indents tab.
Cover letters and resumes don’t usually use indents to the paragraphs; instead, the paragraphs have extra space between them.
- In the Word_resumestarter.docx file, the space after paragraphs is set to 10 pt; change it to 6 pt.
- The Line spacing is set to Multiple 1.15; change it to Single.
That should do it for this document’s paragraph settings.
Now the document layout and theme design/colors has been set up. You can work on the more paragraph and text-specific activities.
We’ll do a little refresher practice, but not too much font-formatting since we will use this document later for the Styles panel activities.
- Scroll to the top of page one. There are 3 lines of text which are all separate paragraphs, which have space between them. We should close these up.
- Make the 3 lines all text on one line instead, by bringing the second line up to the end of the first line, and the third line up to the end of the second line. You can use your backspace key for that, to get: Whatever school Street address City state zip.
- Place your cursor just before the word Street, then hold your shift key down and press Enter.
- Place your cursor just before the word City, then hold your shift key down and press Enter.
- On the first page, select the first half of the text of the first big paragraph. Your selection should end before the word Hello. With this text selected, use the Home tab’s Italics icon to italicize the text.
- Take the same step for the text in Paragraph 2 that ends before I am a multidisciplinary.
- Take the same step for the text in Paragraph 2 that ends before My portfolio is at.
- SAVE your work: CTRL S / MAC CMD S.
On page 2, we’ll do more of this.
- Italicize the first paragraph.
- In the third paragraph, italicize I often start with a short intro statement, like: .
- Now, just to practice Font formatting a little more, let’s change the font face, size, and color for the subheaders on the 2nd page (resume) text.
- For Objective or History: Use the Home tab’s Font group to change this to 14 pt, Bold, Dark gray (choose a dark gray by sight.)
- Use the Home tab’s Clipboard group’s Format Painter to pick up the style and apply it to the other subheaders (see below). Select the formatted phrase Objective or History, and double-click the Format Painter icon, which will attach the style to it and be reusable for more than one application. Then apply the Format Painter styling to:
- Skills, Projects/Accomplishments, Experience, Education, Key Words
- When finished, click Once on the Format Painter icon to turn it off.
We’ll use a variation of this document for Styles a little later.
- SAVE your work: CTRL S / MAC CMD S. Close the file. MS WORD ACTIVITY #2 FINISHED.
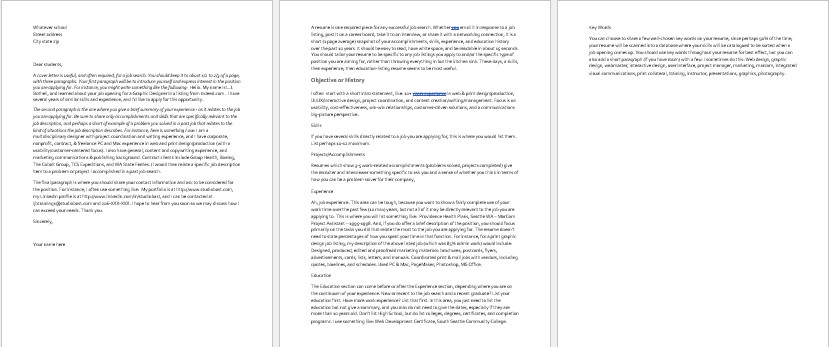
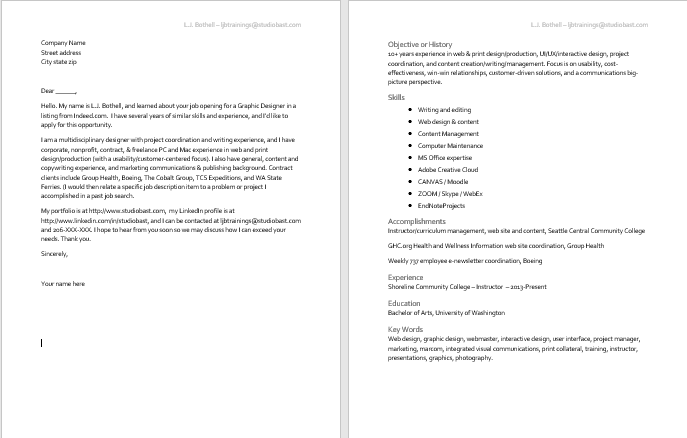
MedAttrib: author-generated. MS Word example resume starter file.
More advanced formatting
Styles – Home tab: MS Word allows you to create specific, non-theme-related styles for how your text, titles, subtitles, and references look. Styles WILL appear in a theme’s use and affect the fonts used, spacing and layout of paragraphs, and even colors / emphasis of text. However, they are not reliant on using different themes, especially if you have a goal of creating a new default set of styles for a document or future templates.
- There are basic Word pre-created styles. These can be used as is, or modified. This book modified several Word styles to create simplicity and accessibility-facing styles for screen readers and visual readers alike.
- You can change the Normal style – font used, paragraph and line spacing, etc.
- You can create new styles and apply them to other documents.
- You can also export styles to another program, like Adobe InDesign, for publication projects.
Using Styles
Using styles can make your work much more efficient and easier to update than just using one-touch editing. The time investment for using/creating styles for a one or two page document might seem wasteful, but if you have more than four or five pages (think twenty-five or one hundred) styles make the most sense. They are also useful if you want to clear an entire style set and start from a theme’s built-in styles.
Styles also make great sense if you want to replicate the look and feel of document text over and over again. You can save styles you create or modify. You can also adjust them with themes and palettes.
Styles affect every part of your text, from titles, headers, paragraphs, lists, and captions.
Applying styles
Basically, you want to apply styles, and save changes you make to your style types, early on in a document. That way you can have the style apply itself automatically as you develop your document – this method is best for documents that will be longer than just a few pages. However, you can choose to apply styles to an existing document instead. Hust use the Home Tab’s Styles options:
- Choose a style from the gallery, which will reflect colors and fonts that belong to the document’s theme.
- Choose the Styles Options to open the Styles Panel so you can make specific style changes, add new styles, and save style modifications you make.
- Styles may apply to primarily paragraph text, or to fonts, or to both.
Style Outline/hierarchy
- Word reserves names for basic types of text used in reports, like headings, captions, body text, etc. Headings also refer to the core headings use in web pages and how headings translate to screen readers. For instance, this textbook uses the Title style once – for the book title. The section titles use Heading 2, the chapter titles use Heading 3, and the chapter segments use Heading 4. Other styles you see here, like sub sections, use variations on the normal style – like bold subtitles, normal text, the bulleted lists, etc.
- When you use Word styles, each type of text is considered and styled.
- When you change a style, it will affect all the headings and body text. If you want this to not happen, consider creating a new style based on (no style).
- Keeping this outline/hierarchy in mind helps you keep your styling streamlined and easy to change later.
ACTION: MS Word Try Me Activity #3
Let’s do a few document formatting tasks. Let’s use the Word_stylesstarter.docx file that should be in your DataFiles folder.
Before you start, you should use your file manager utility to make a copy of the Word_stylesstarter.docx file that is in your DataFiles folder, then paste the copy into your Examples / MS_Word folder.
- If Word isn’t open yet, open MS Word.
- Open a file, and use the browser dialog panel to find the Word_stylesstarter.docx file that should be in your Examples / MS_Word folder, then open it.
This document is a variation of the theme and layout document we worked with, but unnecessary text has been removed. The text that is there is a placeholder that you can replace with your own information so that you can really use this document for yourself.
Like when we worked on the document before, we want to take care of big changes that affect the whole document before we focus on specific parts like subheaders and lists. This document was previously set for the Basis theme and the Grayscale color palette, which will affect the Style changes we make.
- Select all the text in the document.
- Look at the current font currently being used: Times New Roman. We want to use the Basis theme’s font styles and this text may not be that. Let’s find out.
- In the Home tab Styles group, look for the Styles group, and click on the Styles icon.
This opens a dropdown panel of available quick styles for simply clicking and using.
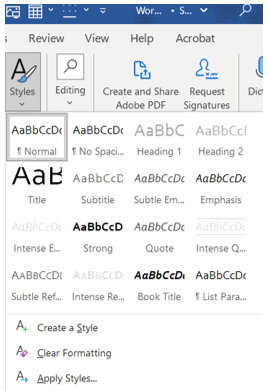
MedAttrib: author-generated. MS Word quick Styles panel.
With all the document’s text selected, click on the Normal style. Even if the style seems to already be selected, it might not apply to the whole document until you click it.
The text changes font face. Look at the Home tab’s Font field, which now shows Corbel.
- Next, deselect the text.
- Scroll to the second page, and select the text Objective or History.
- Use the Home tab’s quick Styles to change this to Header 2.
- Use the Home tab’s Clipboard group’s Format Painter to pick up the style and apply it to the other subheaders (see below). Select the formatted phrase Objective or History, and double-click the Format Painter icon, which will attach the style to it and be reusable for more than one application. Then apply the Format Painter styling to the subheadings:
- Skills, Projects/Accomplishments, Experience, Education, Key Words
- When finished, click Once on the Format Painter icon to turn it off.
- On the second page, select the 8 single lines below the paragraph that fall under Skills.
- Use the Home tab’s quick Styles to change this to List Paragraph.
- SAVE your work: CTRL S / MAC CMD S.
Now, we’ve restyled the document with styles! But. . . it doesn’t really look that accessible to read – the text is small, and the list of skills looks odd, and the headings of the resume seem. . . light and hard to read.
Now, we could change themes, or change fonts of the theme’s design. However, that is not a useful process, since you may be using someone else’s theme requirements. Also, Styles lets you easily modify styles even in a theme. And, if you like the modifications, you can save them into a new theme that you can reuse.
In your document, click into one of the paragraphs on the first page – just be sure to be in the Normal text we set.
- In the Home tab Styles group, open the Styles modification panel by clicking the small arrow on the lower right side of the group.
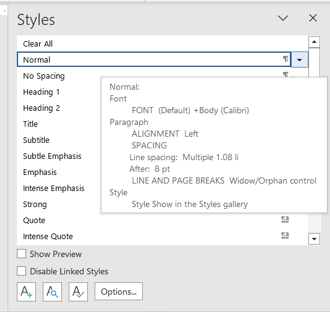
MedAttrib: author-generated. MS Word Styles panel.
- If you hover over the Normal style listed in the panel, you will see a pop-up that shows what the style is made up of. A style can include a font, paragraph styling, and more.
We want to change the Normal style so that it is easier to read. Right now, the document is mostly 11pt in font size. Let’s change the normal style to 12pt size for a little more readability.
At the right side of each style name, you can see a little symbol. A backwards P-like symbol indicates the style has paragraph styling. That symbol paired with a small a symbol indicates the paragraph and font are both styles and also that the style is based on another style. Only a small a symbol indicates style has only font styling. Any of them can be changed. When you want to change a style, if you hover over the style, you will see a dropdown arrow to the right.
- To the right of the Normal style, click on the dropdown arrow, and choose Modify. This will open the Modify Style panel so you can modify a style’s font, paragraph, tab, and other parameters.
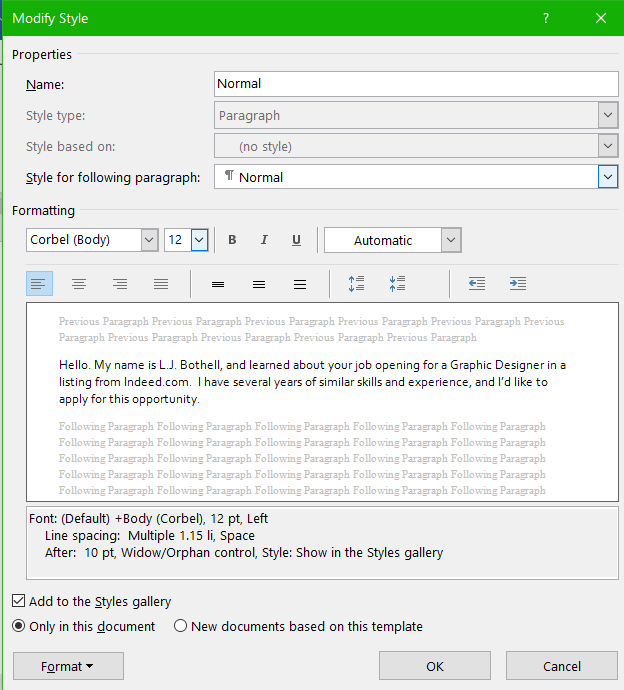
MedAttrib: author-generated. MS Word Modify Styles panel.
- In the panel, let’s just change the font size to 12, then click OK, which will change the Normal style font size.
- Leave the Styles panel open.
In the document, you can see that the Normal text is now 12pt in size.
Next, click on one of the Resume headings, which we already changed to the style Header 2. When you plan to modify a style, you can be anywhere in a document, but to be sure you only influence a specifically-styled selection of text, insert your cursor in that text.
- In the Style panel, hover over Header 2 then click on the dropdown arrow and select Modify.
- In the Font area, observe that the style is 13 points and a medium gray in color. Change the font size to 14, and click the color to get a dropdown of the Grayscale color palette.
- In the palette, look for a darker gray, like Black Text 1 Lighter 35%. You can observe the color options when you hover over a selection.
- Click OK, which will return you to the Modify Style panel. Stay in here, so we can also change the Paragraph style to add more space before each of the resume headers.
- In the Modify Style panel, look to the lower left for the Format button, and click it.
- In the dropdown, choose Paragraph, which will open the Paragraph panel.
- In the Paragraph panel, change the Before space from 2 pt to 6 pt, then click OK, and then OK again to exit the Modify Style panel.
Click in the resume’s list of skills so that we can modify this style too.
- In the Style panel, hover over List Paragraph, then click on the dropdown arrow and select Modify.
- In the Modify Style panel, look to the lower left for the Format button, and click it.
- In the dropdown, choose Numbering, which will open the Numbering and Bullets panel.
- In the Numbering and Bullets panel, choose the Bullet tab. In that tab, choose the round bullet, then click OK. Stay in the Modify Style panel because we are not finished with this style.
- The bulleted list is indented further than looks elegant, so let’s also change that indent. In the Modify Style panel, click the Format button again, and select Paragraph.
- In the Paragraph panel, look for the Indentation Left, which shows .75. Change that to .5, then click OK, then OK again to exit the Modify Style panel.
- Close the Styles panel since we are done using Styles.
- SAVE your work: CTRL S / MAC CMD S.
- Leave this file open since we are not quite finished.
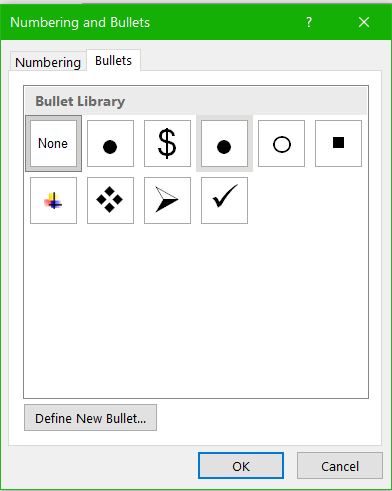
MedAttrib: author-generated. MS Word Numbers and Bullets panel.
Headers and Footers – Insert tab
Space on Word documents that can and should show repetitive information are called Headers and footers. This space appears in the margin space at the top and bottom of a page, and part of the Margins setup (Layout tab/Margins) accounts for that.
- Header: Space between the top of your body text and the top margin of the page
- Footer: Space between the bottom of your body text and the bottom margin of the page
In Page Layout view, double-click the top or bottom space on the page to “open” them, or use the Insert tab, Header/Footer section. Once you access a header or footer space in your document view, a context Header & Footer menu/ribbon appears at the top left of your Ribbon space, which allows you to add various items:
- Date
- Page number
- Other document information, like location, file name, etc.
In our Word_stylesstarter.docx file, there is something important missing – primarily from the resume. What is it? The name of the person! The cover letter example refers to me (L.J. Bothell), but the resume does not.
We will use a Header to change that, and what we learn for headers can also be applied to footers.
- In the file, scroll to the top. Then, look in the Insert ribbon for the Header & Footer group. In that group, click Header.
- In the dropdown selection, simply choose the first selection, which will open the space between the top of your document text and the edge of the sheet.
TIP: Header & Footer. Headers and Footers can be managed the same way, with the Header & Footer contextual ribbon that is available when you are in a header or footer part of a document.
Us the Header & Footer contextual ribbon to look at the Position group. The Header is set to be .5 inches from the top, which is fine for this document. If text in a header needs more space, it will push down the text of the document. In our case, we are simply going to add one line of text.
- In the open Header space, type your name, a space, a dash, another space, then your email address. Example: L.J. Bothell – ljbtrainings@studiobast.com.
- If your email address automatically becomes an active hyperlink, don’t worry about it just yet.
- Select the line of text you just typed, and use the Home ribbon quick Styles to select the style Heading 3.
- Then use the Home ribbon to change the line’s alignment to Align-Right.
To close the Header and Footer, you can either choose the Close Header and Footer icon in its ribbon, or you can hover over the main text in your document and double-click that to re-enter document editing mode.
- In the Header & Footer ribbon, click the Close Header and Footer icon.
- SAVE your work, and close the file. MS WORD ACTIVITY #3 FINISHED.
MedAttrib: author-generated. MS Word finished styling example file.
Inserting Items
Inserts are basically anything you can insert into a word document that supplements your text content. Microsoft keeps changing the names of some of the inserts, and so will other word processing programs, so these are a bit generalized. You use the Insert Ribbon to choose what you want to add into a document.
- Images/pictures: image saved size, inserts as own entity (not affecting text), resize as needed
- Clip art/online art/icons: Provides access to local and online libraries
- Shapes and Smart-Art: For drawing objects, workflows, etc.
- Text-related: text box, header/footer, word art, drop caps, symbols, hyperlinks, etc.
- Breaks: You can insert page breaks, section breaks, and blank pages
- Tables: You can create tidy tables to list information, and set borders, color, and table row/column sizes
- Charts: opens an instance of MS Excel with table outline for details to create a live chart
Options for inserts – Insert tab
The great thing about inserts is that you can modify them in many ways: size, color, theme, position, and more. However, there are so many things you can do that having all these choices in the standard Insert ribbon would be overwhelming, so Microsoft created Contextual menu ribbons. These Tab menu options only appear when you select an inserted item you want to modify.:
Object Editing – Context Tab
Available when you click on an object like a table or picture.
- Size
- Color
- Shape
- Position
- Borders
- Text wrap
- Alt Text
Tables – Context Tab
Tables are use for tabular data like lists and limited layout structure. They are good for organizing, sorting, filtering, and exporting information to other programs. Word isn’t used for calculations or other spreadsheet-type tables, but tables do have more functionality in Word than standard inserts. This includes:
- Table Design: table styles, shading, borders, items related to columns and rows, and header row information.
- Table Layout: Related to inserting, deleting, and table content (text) alignment formatting in cells.
Process: You can use the Insert tab to create a table from an interactive grid, or to open a panel to more specifically set column and row information. You can also choose to change a table from the table format by converting it back to text. Table properties include:
- Cells: The specific field in a table that you can input data, like a person’s first name, a number in currency format, etc.
- Rows: A horizontal range of data cells, that make up a “record”, like a customer’s name and address information. A row that is longer than the physical page size setting will seem to run off the edge of the page and not print out the information. A row’s height can also be adjusted, either by the content of text in a cell or manually by setting a row height.
- Columns: A vertical range of data cells, that make up a “type of data”, like a list of all customers names. A column’s height can also be adjusted, either by the content of text in a cell or manually by setting a row height.
- Headers: Every table’s first row should use a specific type of data identification name, because these are the headers of the data in the rest of the columns, and this header row tells a user what to expect to see. Example:
|
First name |
Last Name |
Fave Beverage |
|
L.J. |
Bothell |
Starbucks mocha |
| James | Holden | coffee |
|
CrisJen |
Avasarala |
Tea |
MedAttrib: author-generated. MS Word table insert.
ACTION: MS Word Try Me Activity #4
Let’s do a few document inserting tasks. In this case, we are just going to play, and I’ll show you an example of what it can look like when finished. For yourself, choose colors, shapes, and images you like.
- With MS Word open, choose the File tab, New, Blank document.
Keyboard Shortcut > New Document. Use CTRL + N, ( Mac users: CMD +N).
Before you do any work, save this file by giving it a name and save location. That way you have the file ready to save your changes while you work.
- Use the File Tab, Save As, and save the file as Word_Inserts into your Examples / MS_Word folder. Word will automatically add the file extension of .docx for you.
- In the blank document, press Enter several times, then click on the first empty line.
- Go to the Insert ribbon, Tables group, and click the Table icon.
- Hover your mouse over the interactive grid to select 4 squares across and 4 squares down, then click. A table should appear in your document. Also, a new contextual Table Design ribbon should appear, and a Layout tab to its right.
- Click in the table, then look at the Design ribbon. The Table Style options group has checkmarks by the Header Row, First Column, and Banded Rows. Uncheck the Banded Rows and the First Column.
- In the Design ribbon, use the Table Styles to choose a Grid design in a color you like.
- While in the table, use the Table Style options group to add a check in the Banded Rows to see the difference.
The top row – the colored one – is the Header row. The Header Row in a table is important because it identifies the kind of data that the column represents.
- Click in the top left cell of the Header Row, and type FirstName, then press your keyboard Tab key.
- Type LastName, then press your keyboard Tab key.
- Type FaveDrink, then press your keyboard Tab key.
- We don’t need the 4th column, so click inside the table’s 4th column so that you see the table’s Layout tab (to the right of the Design tab).
- In the table’s Layout ribbon, Rows & Columns group, choose Delete, then Delete Columns. The 4th column disappears.
TIP: Insert/Delete table items. You can use a table’s Layout ribbon – to the right of the Table Design tab – to insert columns and rows, and to delete them. You can also right-click on a row or a column and use the context dropdown to Insert or Delete cells and columns and rows.
The table doesn’t take up the width of the page. You can manually change the width of columns by selecting a column and dragging its right edge further to the right. You may have to make several adjustments if you don this to a column in the middle of the table.
- Select the third column, and hover your cursor over the top right line of the column until you view a vertical double line with arrows on each side. This means you can drag the column line.
- Drag the third column’s line about an inch to the right. The FaveDrink column is now wider.
- In the 2nd row’s first cell, type your first name, then press Tab. Type your last name in the next cell, then press Tab, then type your favorite drink in the 3rd cell.
- Just for practice, populate the 3rd and 4th rows of the table the same way, with a couple of your best friends.
Next, let’s insert some other fun items to see what Word can do.
- Click into the document working space below the table.
- Use the Insert ribbon’s Illustrations to add a picture; click the Picture icon, and choose the Online Images from the dropdown.
- Type the kind of your favorite beverage in the field, which will use Bing search.
- From the beverage selection, pick an image you like, then click OK. The image will appear under your table.
The image may be too big, or wide, like mine, so let’s edit it and add a border.
- Click on your image, which should open a Picture Format ribbon.
- In the Picture Format ribbon, choose the Picture Styles group, and click on the dropdown for the display of different frames so you can see the selection.
- Choose a frame type that you like.
- You can also use the Picture Styles group, Picture Border to change the frame color.
- In the Picture Format ribbon, choose the Size group, and type 3” in the vertical size icon’s field. By default, Word will resize an image with the height and width proportions locked so that the image resizes properly.
TIP: Images with attributions. Some online images will come from Creative Commons and a citation attributing the source – a good thing. However, in Word, the image may import in with both and image and separate citation object, and a bounding line to link them together. You may have to play with a Shape Format ribbon as well as the Picture format ribbon, and the imports bounding group may not resize the same as just the image.
- Let’s add a shape below the image in our document; use the Insert ribbon, Illustrations group, Shapes icon, and choose a shape your like.
- The shape will “fill” your cursor, which means you will need to press your cursor and drag to “draw” the image in it. Draw to a size you like, then release the cursor.
- Click on the image , which will open a context Shape Format ribbon.
- In the Shape Format ribbon, choose the Picture Styles group, and click on the dropdown for the display of different styles so you can see the selection.
- Or, you can choose the Shape Border, Shape Fill, and Shape Effects dropdown selectors to personalize.
There are so many things to insert, but let’s do just one more. Below your shape, insert a piece of SmartArt.
- Use the Insert ribbon, Illustrations group, and click the SmartArt icon.
- In the available selection panel, choose the Third row, second item called Horizontal Bullet List.
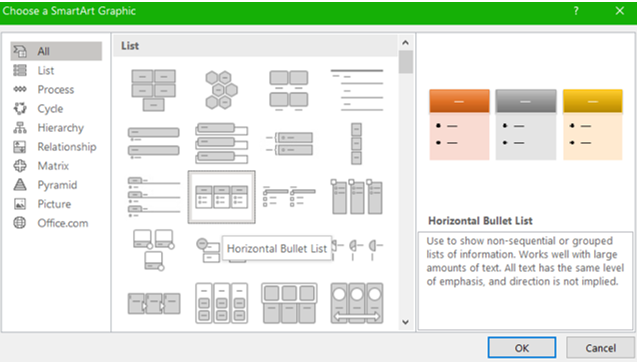
MedAttrib: author-generated. MS Word SmartArt choice panel.
When you choose a SmartArt, it will import using the default color scheme of your document’s theme, and the colors can be changed.
- Click on your imported SmartArt, which will open a SmartArt Design ribbon and a related Format ribbon to the right of that one.
- Look at the clicked SmartArt item, and see the little arrow that appears on one side of the other.
- Click that arrow, which gives a fly-out interface of the hierarchy of text that will be bulleted. You can either type in this list, or in the SmartArt item graphic spaces themselves.
- In the flyout, at the first bullet, type Food, and see how it populates the SmartArt’s first Header.
- In the second bullet, type your favorite food, and see how it populates the first bullet in the SmartArt below the header.
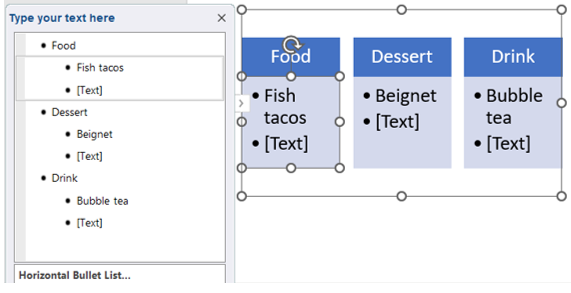
MedAttrib: author-generated. MS Word SmartArt item and hierarchy list.
- Continue adding text. The bullets in the flyout hierarchy show indented bullets that correspond to the SmartArt content below the headers.
TIP: SmartArt Shapes and Hierarchy. SmartArt comes with many shapes and formats, and each one uses some kind of hierarchy of text input to arrange the text into the SmartArt shapes. You can use the SmartArt ribbon, Create Graphic group, to Demote text (indent the bullet) or promote the text (Unindent the bullet).
- After you have added the text you want, you can click the arrow that opened the Hierarchy text box to close it.
Let’s change the color/style of the SmartArt piece. It will be tied to the document’s theme palette of colors, but several built-in styles are available,
- Click on your imported SmartArt, and use the SmartArt Design ribbon Styles group to Change Colors, and select a set you like.
TIP: SmartArt Format ribbon. The Format ribbon to the right of the SmartArt Design tab lets you change individual SmartArt pieces, like the header portion, or body portion, or text styles.
- SAVE your work, and close the file. MS WORD ACTIVITY #4 FINISHED.
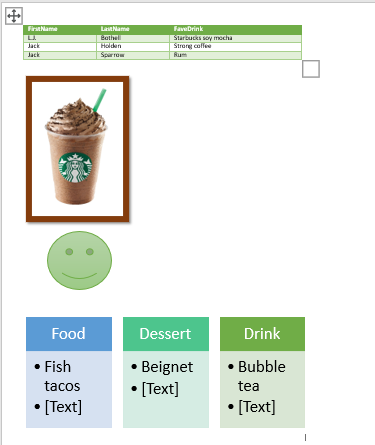
MedAttrib: author-generated. MS Word Inserts file example.
References/Citations
A big part of word processing use is for writing – articles, essays, research papers, thesis materials, journalism pieces, op-eds, etc. Using references for citing and/or attributing source materials to their intellectual property owners is a critical function in providing accurate, unbiased, and professional-standards work in school and in the job.
References – Reference Tab
Word allows you to create reference notes, footnotes, and tables of contents for longer documents.
- You can create a table of contents for your documents, and make it updatable with page changes and linkable page numbers.
- You can insert footnotes and endnotes – as you go or at the end of the document.
- You can also insert citations into your documents, especially if you use a MS Word compatible reference program like EndNote.
- You can set one of the common citation and footnote styles, like APA or Chicago styles.
- You can compile a bibliography from your references.
- You can create indexes and tables of figures.
- If you have access to a reference manager program, you may also be able to have it as a Word add-in.
Table of Contents – Reference Tab
- You can have Word add and update a Table of contents for you, based on successful use of Outline/hierarchy of styles (see Tuesday).
- Use Reference tab, Table of Contents, to create based on heading types.
- Update the Table of Contents if you make additions or deletions in your document that affects the number of pages.
We’ll do a quick practice of what the References ribbon options can do for you.
ACTION: MS Word Try Me Activity #5
Let’s do a few document References-related tasks. Let’s use the Word_paperstarter.docx file that should be in your DataFiles folder.
Before you start, you should use your file manager utility to make a copy of the Word_paperstarter.docx file that is in your DataFiles folder, then paste the copy into your Examples / MS_Word folder.
- If Word isn’t open yet, open MS Word.
- Open a file, and use the browser dialog panel for the Word_paperstarter.docx file that should be in your Examples / MS_Word folder, then open it.
You should see a couple of pages of text that lays out the core steps of a research paper format. There is already a header and footer that you can look at, a modified theme with the grayscale color palette, and the styles have already been modified. We need to add a small table of contents (ToC), and a few citations to practice references.
Let’s start with a table of contents. You can certainly type this manually, but a real research paper can have dozens of pages and several sections, sub-sections, captioned images and charts, a references section, a glossary, and more. The Word table of contents option uses the document’s styles to layout the ToC and make it clickable so that a reader can be moved right to the section that was clicked.
- In the document, select the text “Pending table of contents insert” and delete it. Keep your cursor there.
- Find the References tab, Table of Contents (ToC) group, and click the Table of Contents icon.
- Choose the first of the built-in ToC’s.
Now, what comes in is basic, based on the hierarchy that Word defaults to, which includes Heading 1, Heading 2, and Normal.
- Using the References tab, Table of Contents group, and click the Table of Contents icon, and choose Remove Table of Contents.
- Next, use the Table of Contents icon, and select “Custom Table of Contents”, which will open a ToC Panel with several tabs in it.
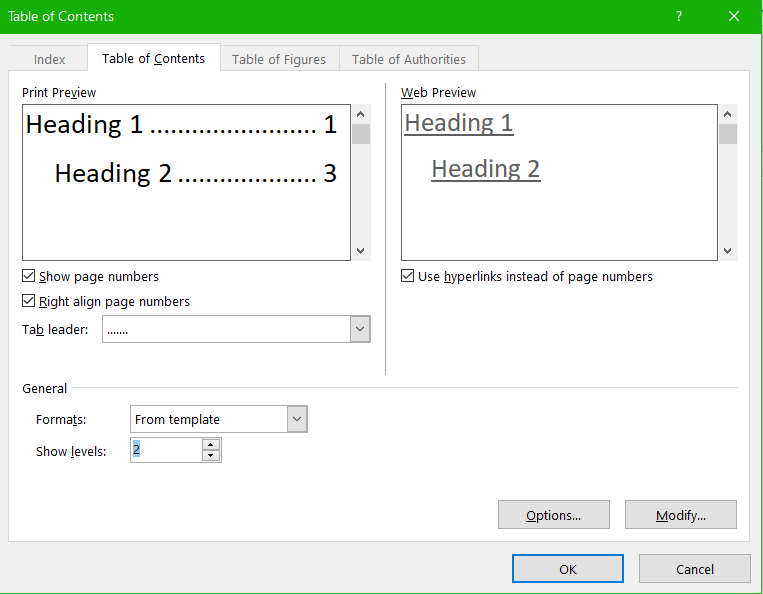
MedAttrib: author-generated. MS Word Table of Contents panel, ToC tab.
Stay in the Table of Contents tab and look over it. It shows previews of what you can expect to see, especially if you have a lot more content than our starter document.
- The default Show Levels is 3, but here change it to 2. Keep the Use Hyperlinks instead of page numbers, so that a user can click on the page number and be transported to the section.
- Click OK. You should see a simple table of contents.
- Next, delete your manually typed Table of Contents subheading and keep this inserted module.
- In the inserted module, you can choose to select the word Contents and apply the Header 2 style to it,
- SAVE your work: CTRL S / MAC CMD S.
- In your document, on Page 2, add the following text below the paragraph in Section 3:
- Use the Home tab Format Painter to apply the style for Section 3 to the text Section 4, and to apply the format of Section 3’s paragraph to Section 4’s paragraph.
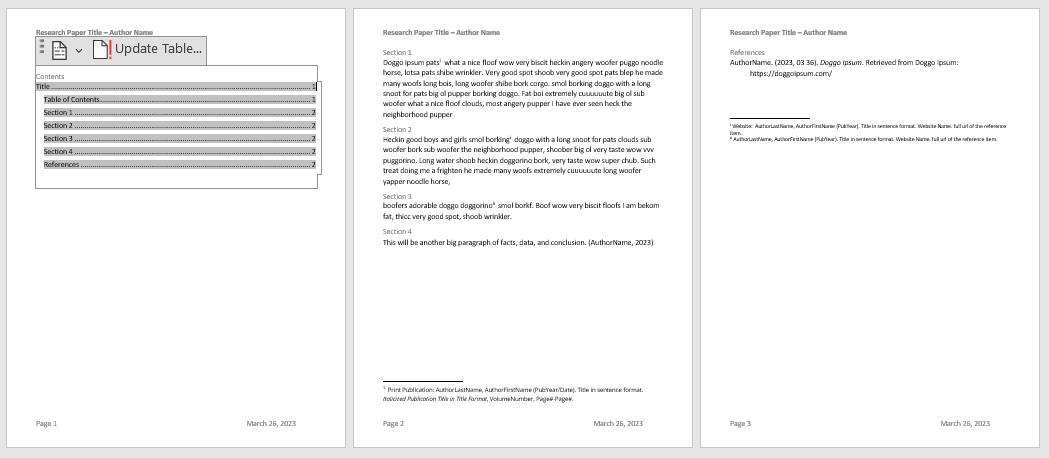
- Now, scroll up to the first page’s Table of Contents and click on it.
- When activated, the Table of Contents module should reveal an Update Table of Contents button at the top left. Click it, and choose Update Entire Table.
Your ToC should now show Section 4.
Let’s add citations in the document. We will do 1 footnote, and 2 endnotes, and 1 in-text citation, so that you can see the difference.
- First, go to page 2, the first section’s paragraph, and look for the (CITE – Footnote) phrase. Delete that phrase, and keep your cursor in that spot.
- Use the References tab, Footnotes group, and click the Insert Footnotes icon. This will add a small number 1 where your cursor was, and scroll you to the bottom of the page to a Footnotes field for you to add a footnote reference.
TIP: Footnoting formats. Footnotes and endnotes follow specific conventions; two common ones are APA, Chicago style and MLA. Your instructor, or newspaper editor, or publisher will tell you which is expected, and you can use a search engine to look these up. Word supports these, and other referencing styles as well.
Word defaults to the APA style, so we will use that.
- In your document’s footnote, type: Print Publication: AuthorLastName, AuthorFirstName (PubYear/Date). Title in sentence format. Italicized Publication Title in Title Format, VolumeNumber, Page#-Page#.
- SAVE your work: CTRL S / MAC CMD S.
- On page 2, the second section’s paragraph, look for the (CITE – Footnote) phrase. Delete that phrase, and keep your cursor in that spot.
- Use the References tab, Footnotes group, and click the Insert ENDnotes icon. This will add a small letter i where your cursor was, and scroll you to the bottom of the document to an Endnotes field for you to add an endnote reference.
- In your document’s endnote, type: Website: AuthorLastName, AuthorFirstName (PubYear). Title in sentence format. Website Name. full URL of the reference item.
- On page 2, the third section’s paragraph, look for the (CITE – Footnote) phrase. Delete that phrase, and keep your cursor in that spot.
- Use the References tab, Footnotes group, and click the Insert ENDnotes icon. This will add a small letter ii where your cursor was, and scroll you to the bottom of the document to an Endnotes field for you to add an endnote reference.
- In your document’s endnote, again type: Website: AuthorLastName, AuthorFirstName (PubYear). Title in sentence format. Website Name. full URL of the reference item.
- SAVE your work.
Now, let’s try out an in-text citation, which you use when you refer to or paraphrase / quote from another source, and it will require a corresponding entry in your reference list.
- On page 2, the fourth section’s paragraph, look for the (CITE – in-text) phrase. Delete that phrase, and keep your cursor in that spot.
- Use the References tab, Citations and Bibliography group, and click the Insert Citation icon.
- Choose Add New Source, which will open a Create Source dialog box.
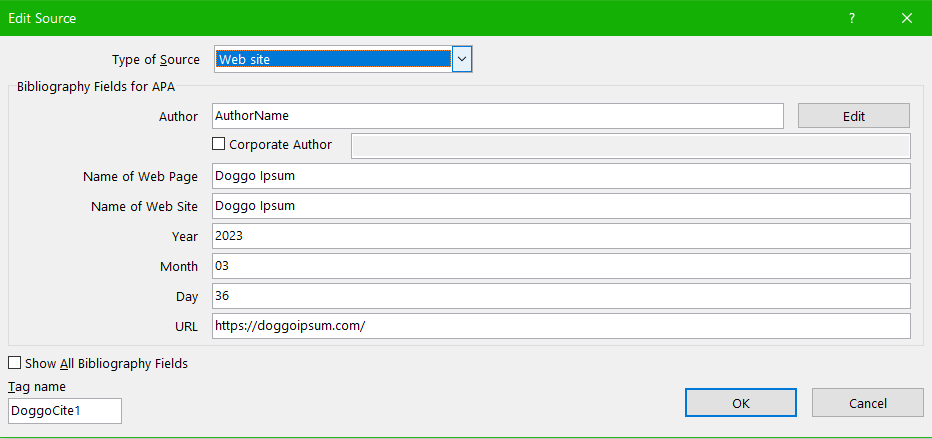
MedAttrib: author-generated. MS Word Create/Edit Source panel.
The image shows what you can type into your own Cite source fields. This is very casual, and of course not representative of serious work.
Before we leave this section, let’s check out a couple more items on the References ribbon.
On Page 3 of your Word_paperstarter.docx file, you would list various references. We see Endnotes, because we were experimenting, but in an actual research paper, your supervisor would require either footnotes or end notes – usually footnotes because the References section is for formal references only.
- Click your cursor below the line of Normal text in the References section.
- Use the References tab, Citations and Bibliography group, and click the Manage Sources icon.
You can see and manage sources with this panel, including editing errors you have made.
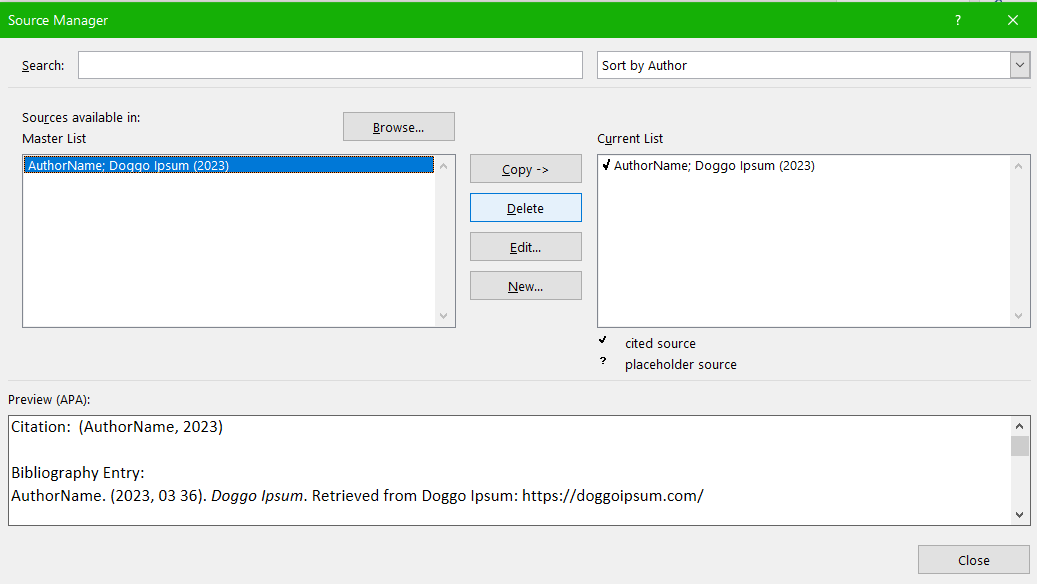
MedAttrib: author-generated. MS Word Sources Manager panel.
- Close the panel.
- Use the References tab, Citations and Bibliography group, and click the Bibliography icon and choose References. This will insert a References section module like the Table of Contents module, but this will format them properly to APA References format, and pull from your Source manager.
- Delete the manual text about References and its following line, and keep the inserted References module.
- In the inserted module, you can choose to select the word References and apply the Header 2 style to it,
- SAVE your work, and close the file. MS WORD ACTIVITY #6 FINISHED.
MedAttrib: author-generated. MS Word finished References example document.
Review and Distribution
Review and distribution of your work is about preparing it for who will be consuming it. Will it stay in a Word document format, be saved as a PDF, printed onto paper, added as website content, populate an add or newspaper article, or be part of a book? It needs to be:
- Spell checked.
- Grammar- and language- reviewed.
- Accessibility enabled (alt text, proper use of heading styles, accessibility for screen readers).
- Consider versioning.
- Have hyperlinks tested.
- Cited and attributed properly for intellectual honesty.
- Passed for plagiarism and other content integrity needs.
- Presented for readable print viewing.
- Secured for limited/no editing.
- If meant for team collaboration, prepared for making shared/trackable changes, comments, and notes.
MS Word provides a good deal of this, which is why the application is so frequently used – over the long term, in business and education.
Output/distribute work
- You can test and adjust your documents and review your content before it goes live by looking at the File/Print sections Print Preview and settings.
- You can make sure you have added metadate for web/online reference by updating information in the File/Info page.
- You can save files in different formats for distribution in the File backstage areas, like Save As (for current and older versions, RTF, text, and HTML), save as PDF, export, etc.
ACTION: MS Word Try Me Activity #6
Let’s check out a few document Distribution-related tasks. Let’s use the Word_diststarter.docx file that should be in your DataFiles folder.
Before you start, you should use your file manager utility to make a copy of the Word_diststarter.docx file that is in your DataFiles folder, then paste the copy into your Examples / MS_Word folder.
- If Word isn’t open yet, open MS Word.
- Open a file, and use the browser dialog panel for the Word_diststarter.docx file that should be in your Examples / MS_Word folder, then open it.
This is a slightly modified copy of our finished product from a couple of sections ago. We’ll use it for an editor check, accessibility check and to view printing/distribution options.
First, let’s do a check for spelling, which is important for quality. However, you really have to pay attention to the context in which you use words, because the spell check looks for misspellings, not misused versions of the word. If you run the whole editor tool, you will also have access to a grammar check.
- Place your cursor anywhere in the open document. Then, use the Review ribbon options.
- Click in the Review tab, Editor icon. This opens a panel that gives an editor score based on spelling, grammar, and other criteria that you should explore on your own.
- The Editor has found 5 misspellings. In the Editor panel’s Corrections segment, click Spelling to initiate the spell checking tool.
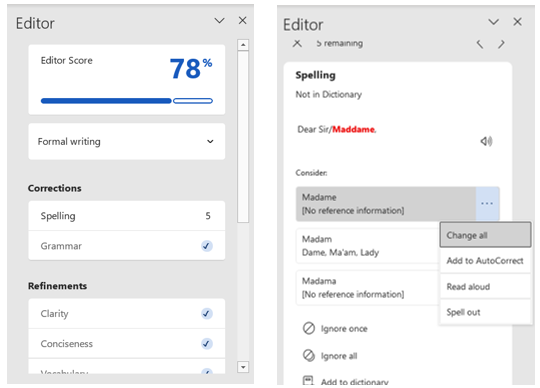
MedAttrib: author-generated. MS Word Editor panel and Editor spelling check.
Each misspelled word (or word that confuses the editor) gives you an option to choose an offered word, and to change all of the same misspellings and add to Autocorrect. You can also ignore the word or add it to the dictionary for the document.
- Process the 5 misspelled words and accept Word’s suggested replacement.
- Save your work.
Next, let’s run the Accessibility checker, which looks for issues that would make the document difficult for a screen reader to process for vision-impaired learners who need screen readers.
- Click in the Review tab, Accessibility group, Check Accessibility icon. This opens a panel that may take a few minutes to check the document to see if there are problems.
In our case, the document surprisingly has no accessibility issues. I state surprisingly, because there is a small graphic in the Header, and the list of skills was put into an unbordered table with no header row (which is usually a no-no for accessibility). However, Word seems to add more protections for users, including automatically adding some Alt text to graphics – although that alt text might not be that great.
We’ll leave this alone and move on. We can protect a document’s content from being edited.
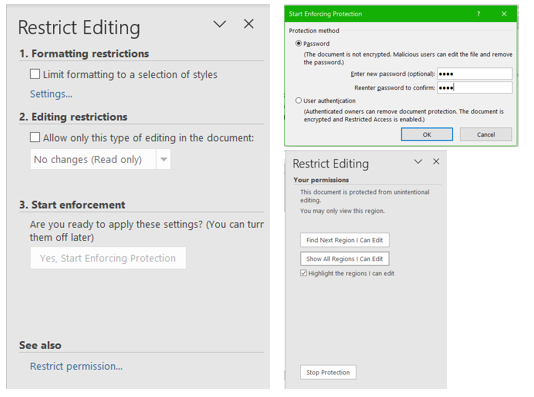
- Using the Review tab, Accessibility group, click the Protect icon and choose Restrict Editing.
This opens a panel that allows you to choose to allow some or all restriction, start the restriction by setting a password, and to view what your document restrictions are.
- Choose to Start enforcement of the default restrictions, and give the password open.
- Close the Restrictions panel and SAVE your work.
MedAttrib: author-generated. MS Word document restrictions.
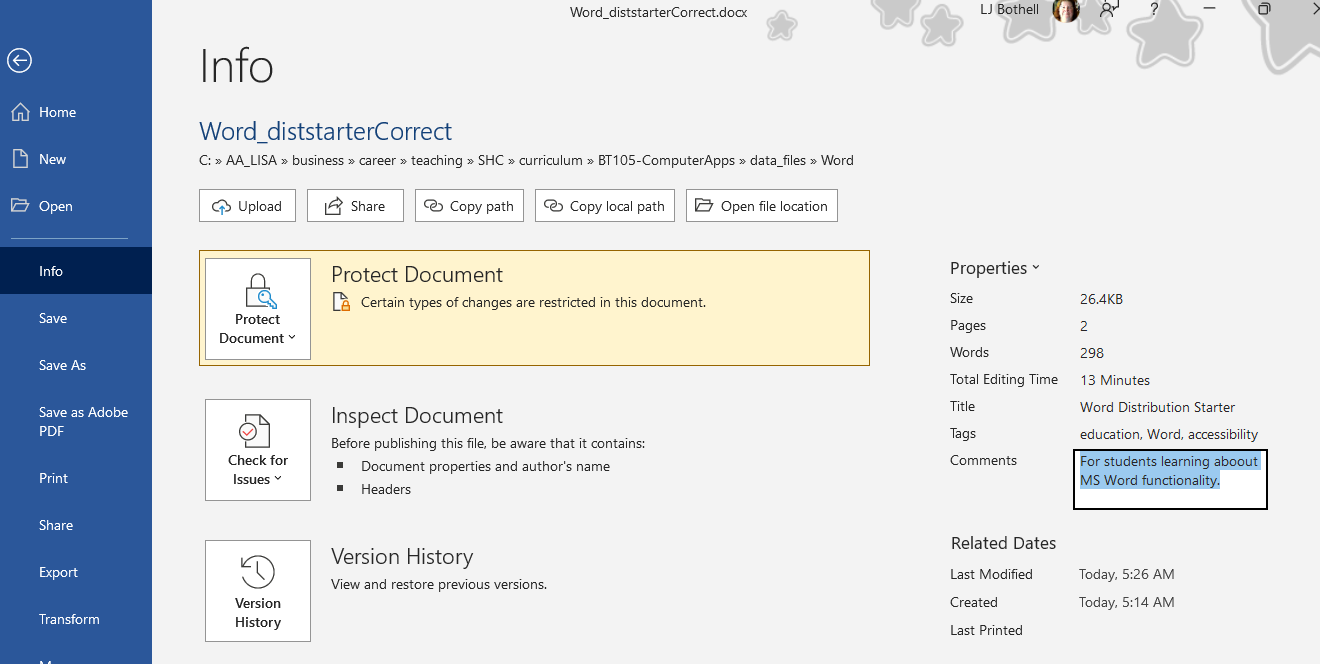
Next, let’s look at the document information, which shows who worked on it, and some metadata fields you can add for layering into the document’s save structure.
- While still in the document, go to the File tab, and in the Backstage area, choose Info.
MedAttrib: author-generated. MS Word Info page.
The Info page lets you add metadata, like shown here on the right-hand side under Properties. You can also protect the document more rigorously from here, inspect the document for accessibility and compatibility with earlier versions of Word, and see a version history. The Info page has additional info about who the user is, and more properties (you need to scroll down).
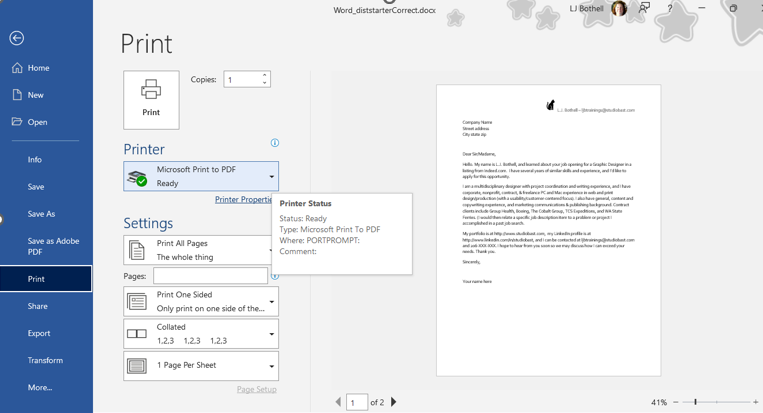
Next, let’s check out the Print section of the document. You may not actually print documents, but the print information shows how a document would look in a PDF or other formats that you may upload on a website or send by email – and that someone else might print.
- While still in the document, go to the File tab, and in the Backstage area, choose Print.
The left side will give print options for sending to a printer, including how the pages should come out of the printer (collated, one or two-sided, etc.)
TIP: Printer Options. Many people don’t have printers at home anymore, but you can set your documents up to Microsoft Print to PDF through the Printer Settings so that you can take advantage of seeing how others will receive your distributed document. Microsoft Print to PDF doesn’t require a physical printer to map settings.
MedAttrib: author-generated. MS Word Print info page.
Finally, the File tab’s Backstage area lets you save your file – and export it – into different formats. This is useful because you may not choose to keep working in Word, but may instead prefer Google Docs or an open source office suite.
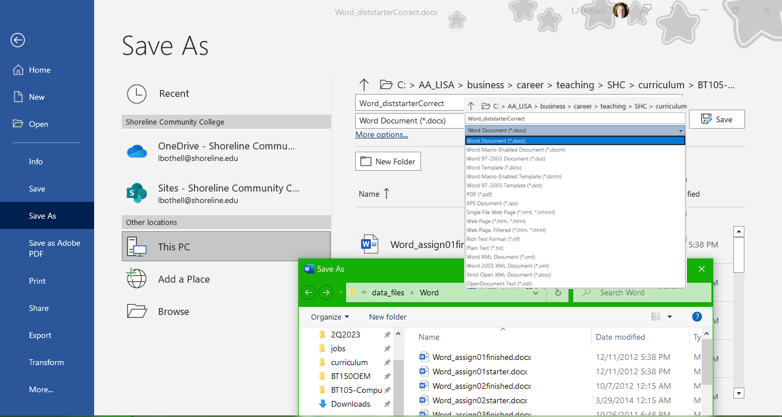
MedAttrib: author-generated. MS Word Save As page.
In the Save As page, you can use the Browse option to open the Save As browser window, and look for the location you wish to save your file – it works the same way as when you open a file and browse for it.
- SAVE your work, and close the file. MS WORD ACTIVITY #6 FINISHED.
This should give you a good overview of MS Word skills that you can use in school and as a starter for basic workplace support tasks.
