5.12 Bench Grinders
D.M. Donner

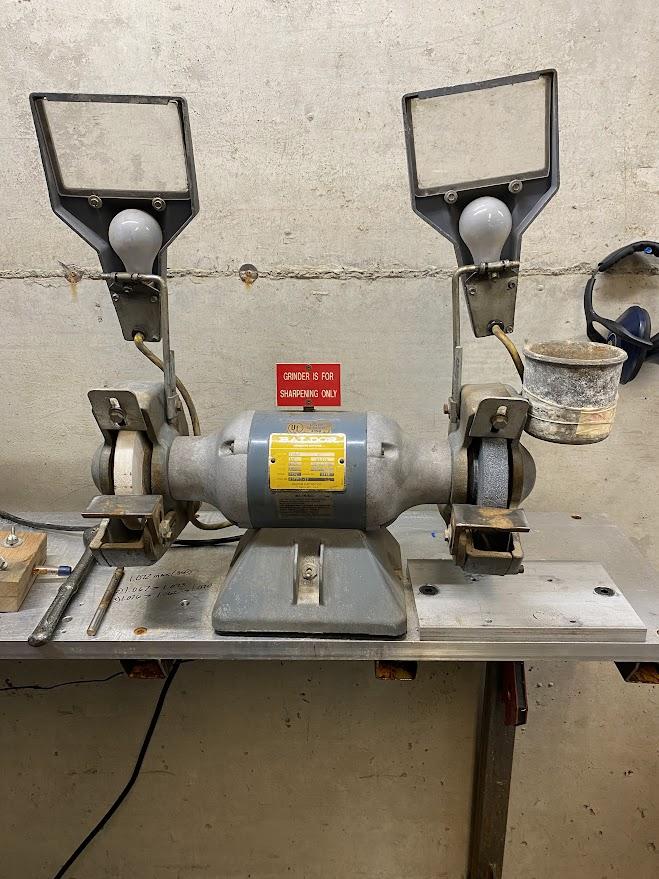
For the entirety of this section the grinding operations will be relative to a bench grinder. A bench grinder is a motorized tool with rotating abrasive wheels. The bench grinder is used to repair metal tooling.
A bench grinder is not the only equipment capable of performing quality grinding operations. A quality belt sander can perform just as well. However, this section will focus on the bench grinder providing information about its features, proper use, safety, and the different grinding activities it can perform.
Grinding Wheels
Bench grinders are categorized by the size of their wheel diameter, with 6″ and 8″ models being most common. Bench grinding wheels come in varying widths and are composed of many different materials.
What allows a grinder to be so useful is its ability to remove material in a controlled manner. The material removal rate of a grinding wheel is a factor of grain size and binder composition. Abrasive grains found in most grinding wheels are aluminum oxide and silicon carbide. These abrasive grains are held together by special bonding agents which are designed to serve specific purposes. The bonding agent holding all the separate grains together must break down in a manner that allows dull grains to fall away, exposing new sharp grains of abrasive material.
It is essential to understand abrasive grit prior to using a grinding wheel. Grit relates to the size of the individual grain of the abrasive material found in grinding wheels. The larger the size of grit, the more aggressively the abrasive surface will remove metal. Due to the greater spacing between individual grains of large abrasives, there is more room for air to get into a cut and to cool the cut. Because of this fact, larger grit wheels are designed to perform roughing operations, while finer grit wheels are used for finish grinding operations. Using a finer grit wheel for rough material removal will result in excessive heat and clogging of the wheel’s grain structure. Clogging occurs when foreign material becomes lodged between individual grains of grit on a grinding wheel. Special tools are used to clean the grinding wheel and remove clogged grains.
In the figure above, notice the low number of 40# and the high number of 2000#. These numbers refer to grit size where 40 represents a coarse abrasive with large grit size, and 2000 represents a finer grit. The “#” symbol is used in place of the term grit, so read grit when you see this symbol.
Another way to envision grit is to imagine you have a 1 X 1″ surface. On this surface, you spread grit material. The more material that can be evenly spread across this surface, the higher the grit number, and the less amount of grit that fits this surface, the lower the grit number.
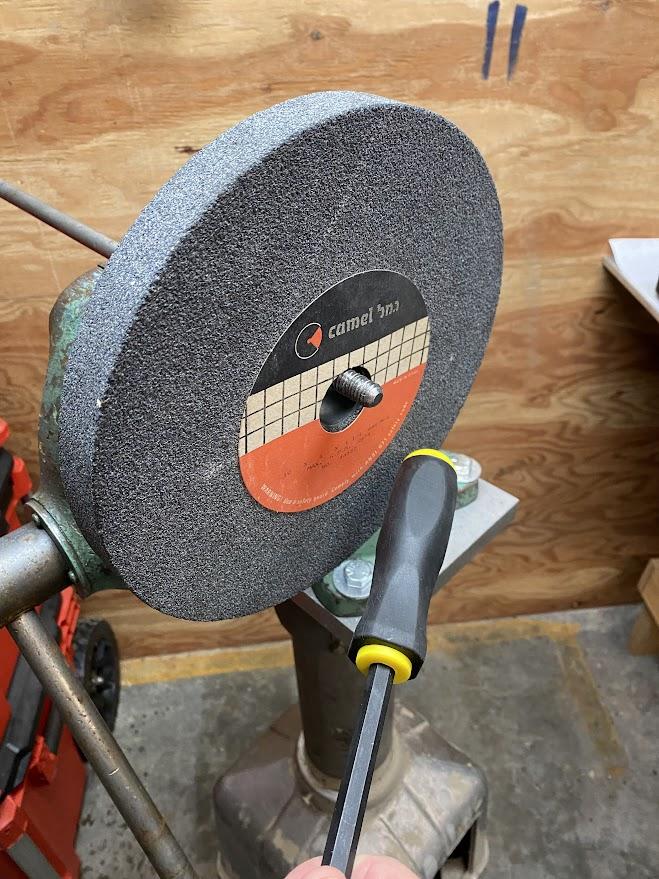
The figure above illustrates an operator performing a ring test before installing a grinding wheel on the machine. A ring test is performed by an operator to ensure the grinding wheel is without defect. A ring test is performed by supporting the wheel with a screwdriver or other object that can allow the wheel to be isolated from any interference. The wheel is then struck with a solid object, such as the handle of a screwdriver. A satisfactory sound would be a resonant ring like a bell. A dull sound would be an indication that the structural integrity of the wheel is compromised, and that it may shatter under use. This test is performed when the wheel is first installed or when damage is suspected.
Bench grinders typically have two wheels: one coarse grit wheel for roughing and one fine grit wheel for finishing. Most grinding operations will require the use of both wheels. The grit size for roughing wheels is usually at 36-40# and the fine side at 80-100# depending on the use of the grinder. The finer the grit, the more easily it can become clogged and require cleaning by the operator.
Tool Rests
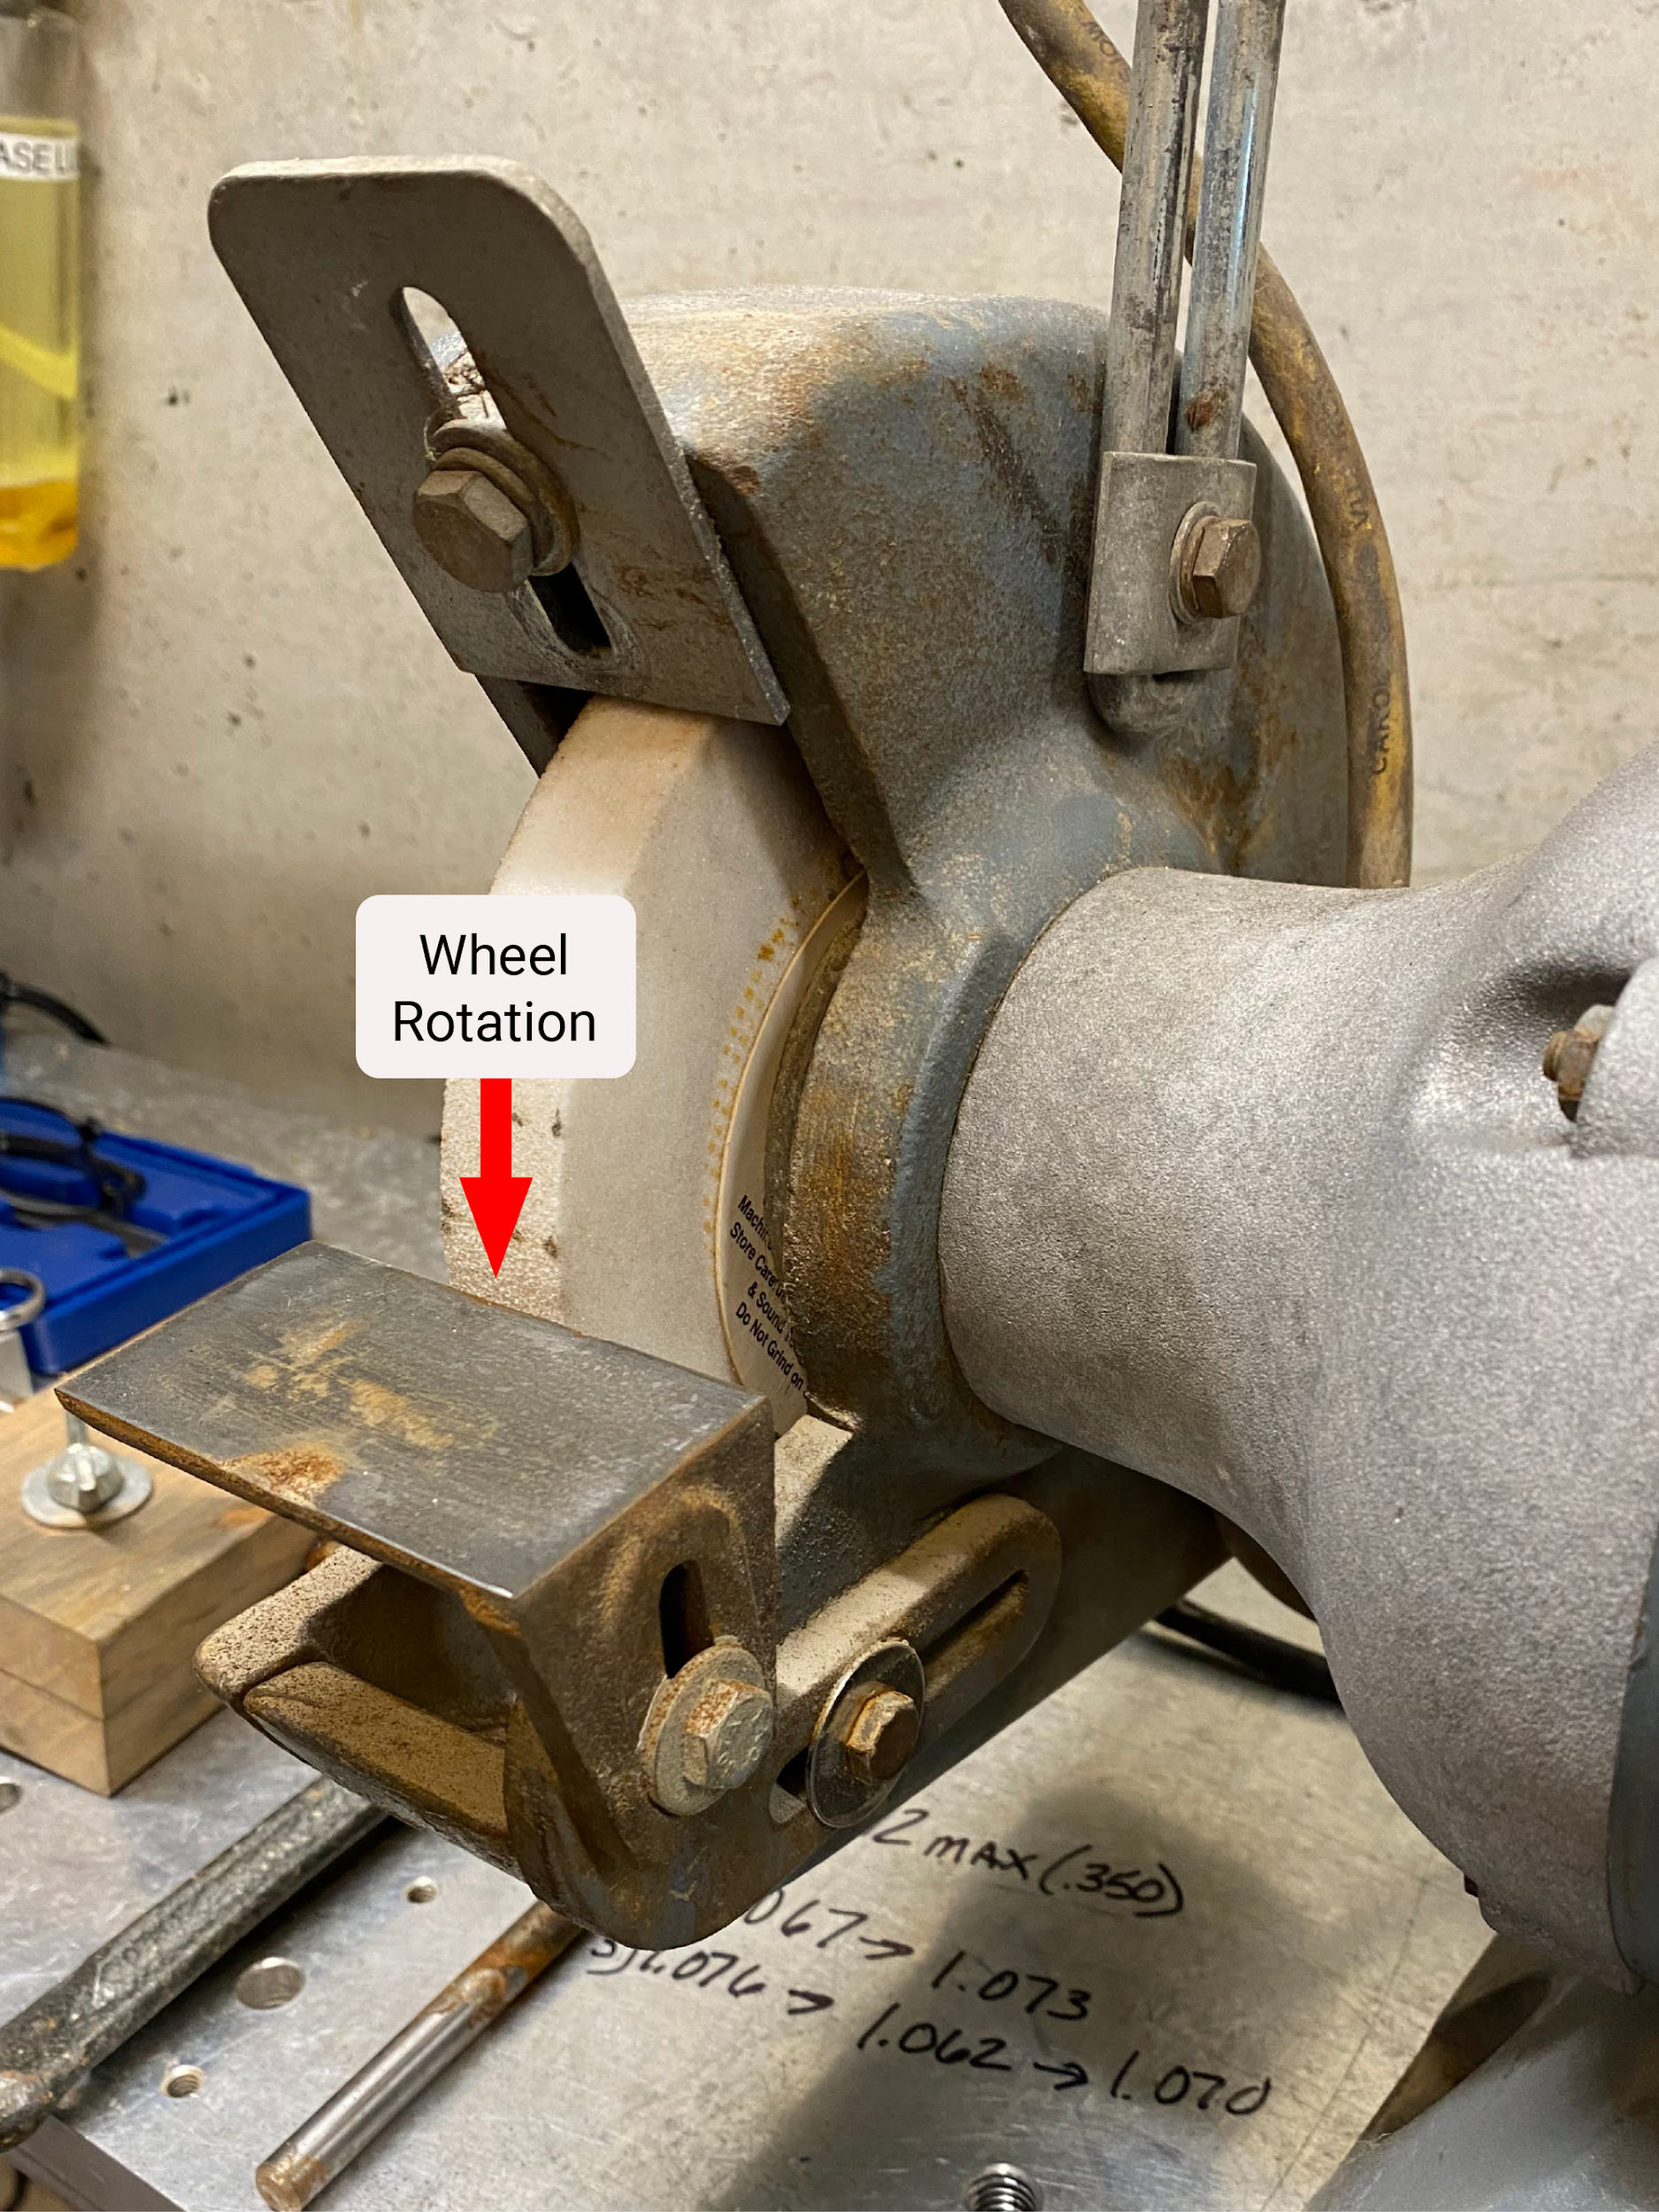
When a grinder is powered, the direction of wheel rotation is in a forward direction, which causes grinding forces to pull the part down and into the tool rest. The tool rest is an adjustable platform that is used to support the part during grinding. Grinders should not be used without a tool rest or any guards in place to prevent injury to the operator.

The relationship between the grinding wheel and the tool rest is an important factor for safety. Due to the very hard nature of grinding wheels, if an object were to get caught between the tool rest and the wheel during operation, the wheel could break and send pieces out at high speed.
Since the grinding forces are pulling the part down against the tool rest, the space between the wheel and rest must be controlled to prevent parts from getting lodged there. The acceptable gap between wheel and tool rest is ⅛” maximum. If the gap is larger, loosen the tool rest and reposition the rest to obtain an acceptable spacing.
Bench Grinder Operation
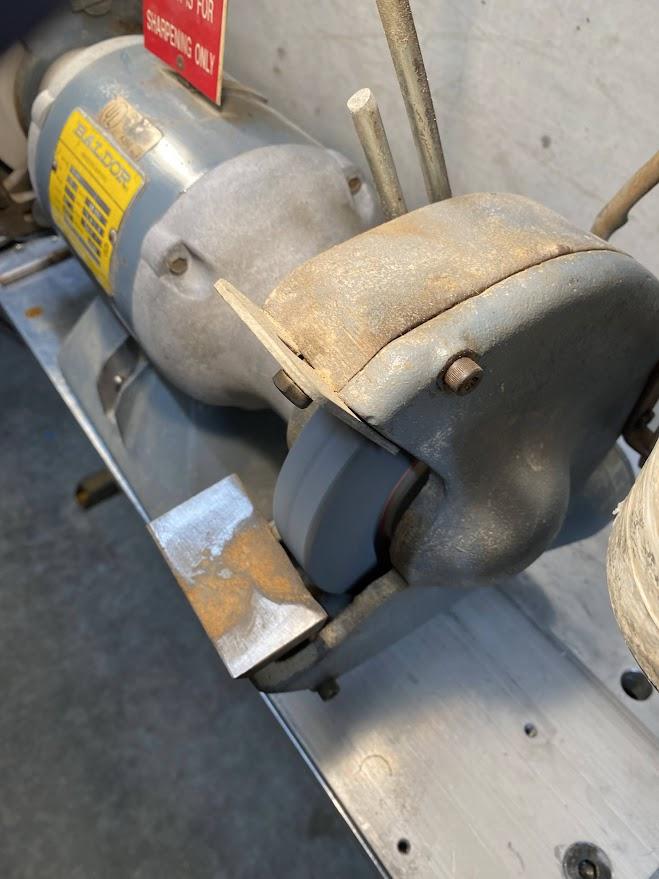
As with all equipment, a preoperational check should be performed to verify the equipment is free from any observable damage. Rotate the grinding wheel by hand and look for any damage to the wheels. If there is observable damage, remove the wheel and perform a ring test. Verify all guards are in place and tightened to prevent inadvertent contact with the grinding wheel during operation. Inspect the gap between tool rest and grinding wheel and adjust if necessary. Inspect the area around the grinder for any material that may encounter hot sparks from the grinder. All flammable material should be stored well away from spark producing equipment. Lastly, ensure the grinder is mounted securely to prevent movement during use.
The figure above shows the spark shield at the top of the grinding wheel. The spark shield limits sparks from traveling over the top of the wheel and endangering the operator or causing damage to nearby areas.
ON/OFF switch
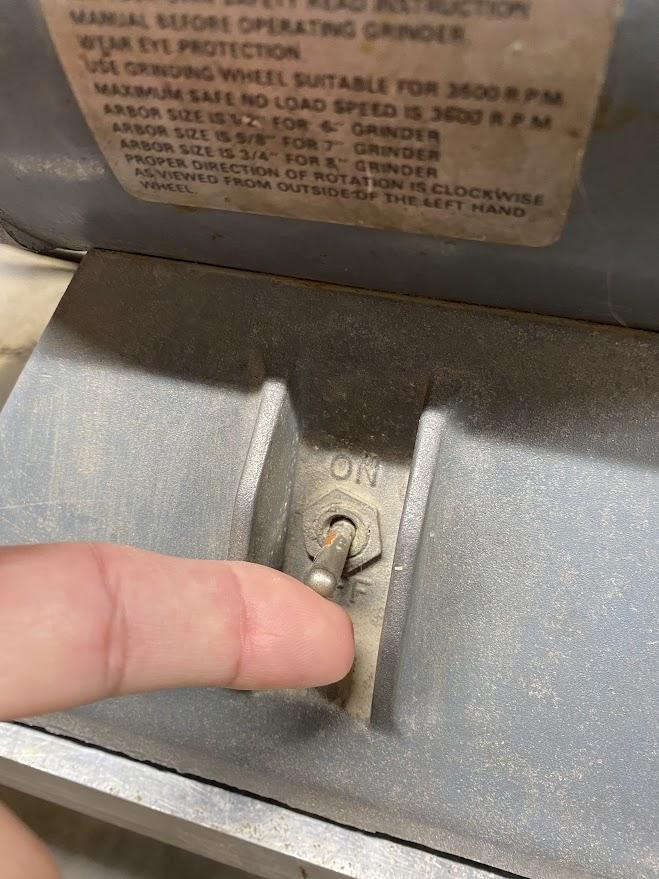
When first turning on a grinder, the operator should stand to the side in case the wheel flies apart due to unseen damage. The centrifugal force created by the spinning wheel will send wheel fragments out in a vertical line parallel with the wheel.
If a wheel failure occurs, the debris will fly outward toward the operator.
Dress for success!
During normal use of the grinding wheels, the surface will dull and become clogged with debris. An operator must clean the grinding wheel surface to remove debris, and expose new, clean, and sharp grit.
This process is referred to as dressing the wheel. Wheel Dressing is a grinding wheel maintenance task where the surface of the grinding wheel is restored to improve performance.
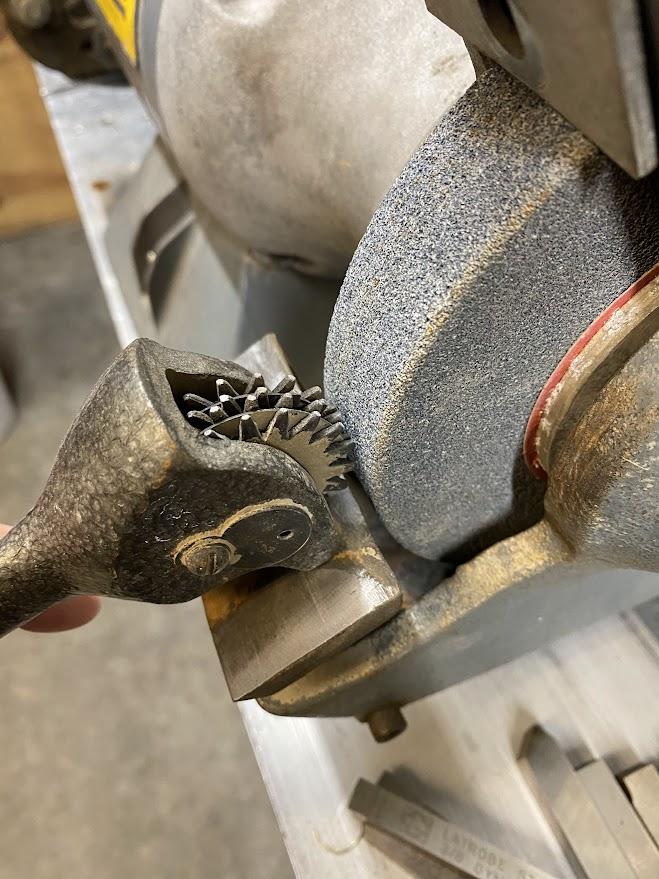
The disc cutter wheel dresser in the figure above abrades the cutting face forcing contaminants from the surface. This is to be used when debris has clogged the wheel which limits the cutting ability, and creates excessive heat in the part.
Turn ON the grinder, place the dressing wheel’s body on the tool rest and contact the wheel surface with the wheel. Sweep back and forth across the grinding wheel until the surface is clean.
A dressing stick is made from the same material as grinding wheels (aluminum oxide or silicon carbide) and is pressed against the grinding wheel to restore the shape of the grinding wheel.
The final tool we will discuss for dressing a grinding wheel is the diamond dresser. Aluminum oxide and silicon carbide are very hard minerals which can take a lot of use. All of this use, however, leaves the grinding wheel in need of some attention. When the surface of a grinding wheel is severely fouled or misshapen from heavy use, a diamond tipped dresser should be used. Industrial diamonds retain the hardness of fancy jewelry diamonds but lack all the clarity features of their expensive cousins.
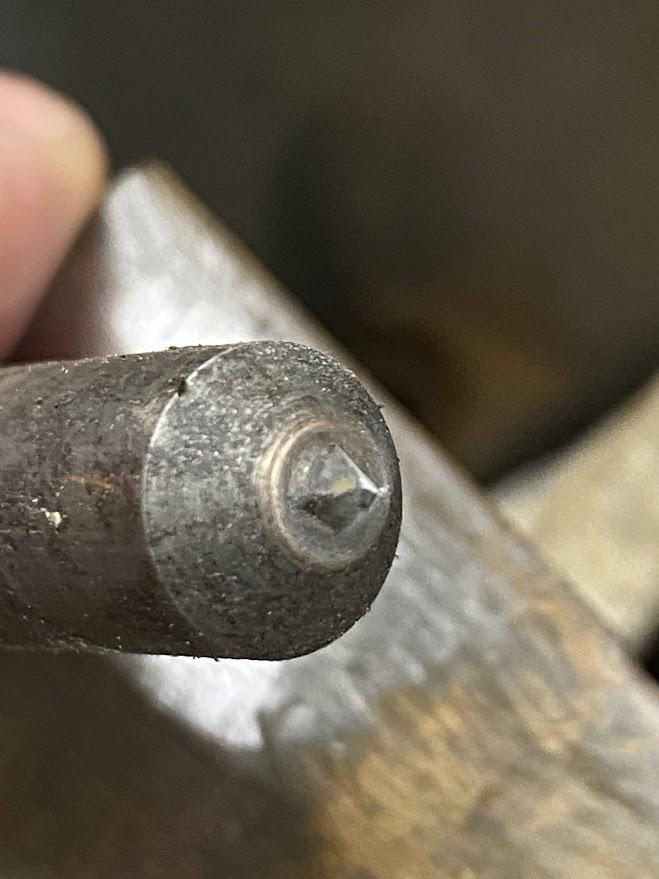
A diamond dresser has an industrial diamond attached to the end of a bar and is used to perform severe grinding wheel dressing.
Position the tool rest
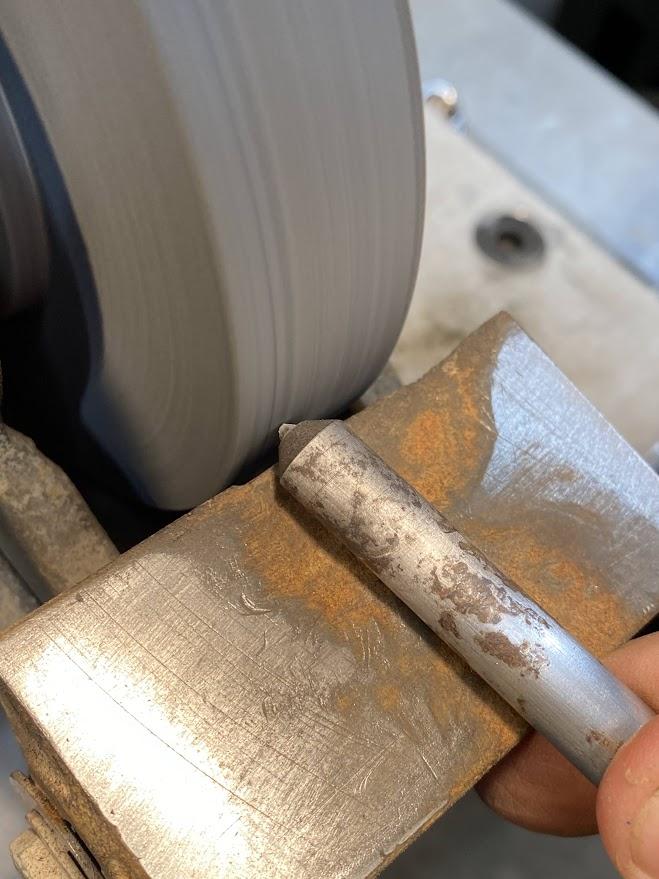
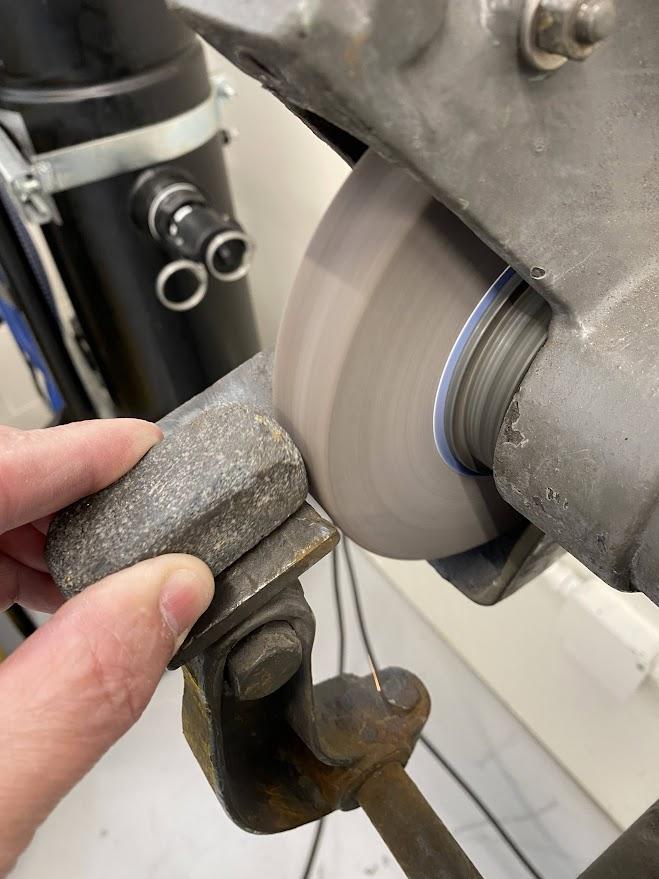
Use a diamond wheel dresser whenever the condition is too severe for other methods. For example, a diamond wheel dresser is necessary when metal gets fused onto the surface of the wheel. Also, when a fresh wheel is installed on a grinder and the surface needs to be tried to eliminate runout, a diamond wheel dresser is used. Runout is when the surface deviates from the axis of rotation around the circumference of the grinding wheel. A grinding wheel surface with excessive runout will only contact a small portion of the part, and the operator will experience a skipping action as the part only contacts the wheel on the high spots.

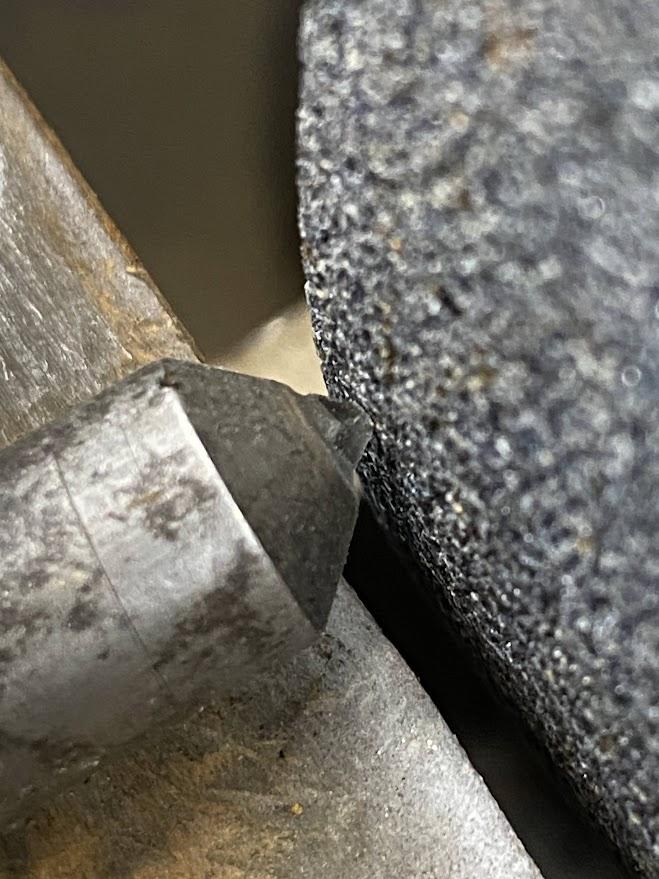
In the figure above metal has fused into the grain of the grinding wheel and must be removed for improved performance. This fused material is very hard and need to be removed in gradual depths. The dressing diamond must be in contact with the tool rest to create a rigid platform for the operation.

To dress the wheel with a diamond dresser, make sure the tool rest is firmly set because the tool must remain in contact with the tool rest during the dressing operation.
Place your finger on the edge of the work stop to function as a guide for this dressing operation. The goal is to create a flat surface on the face of the grinding wheel with square corners and no low spots.
Drag the diamond back and forth across the face of the wheel, taking shallow cuts. This process takes time and precision. Continue to take small light passes back and forth until the surface is restored.
When truing a new grinding wheel, the runout will be excessive, and the dressing operation will require several passes and create quite a mess as the grinding wheel material accumulates on the floor at the base of the grinder.
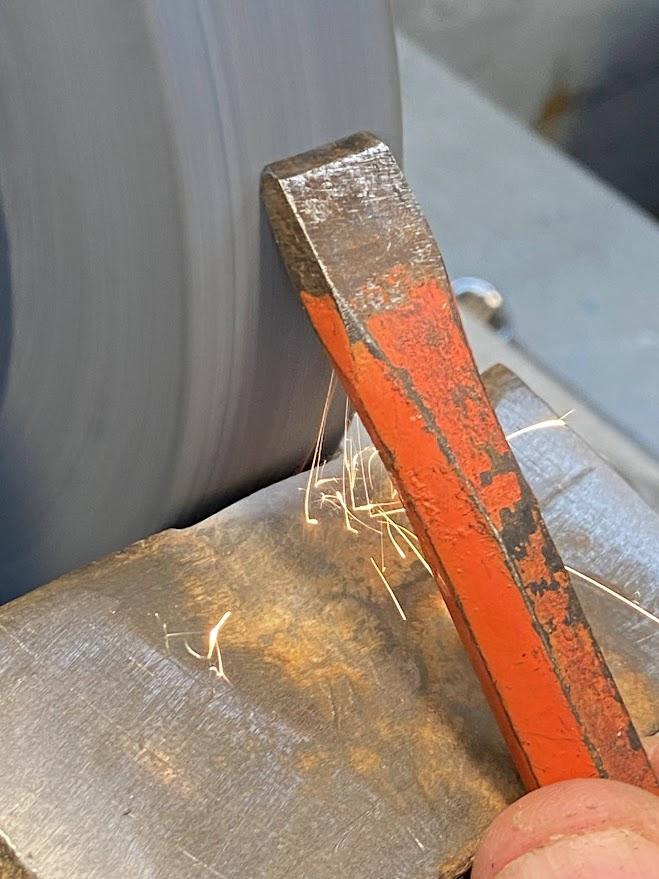
Roughing and finishing
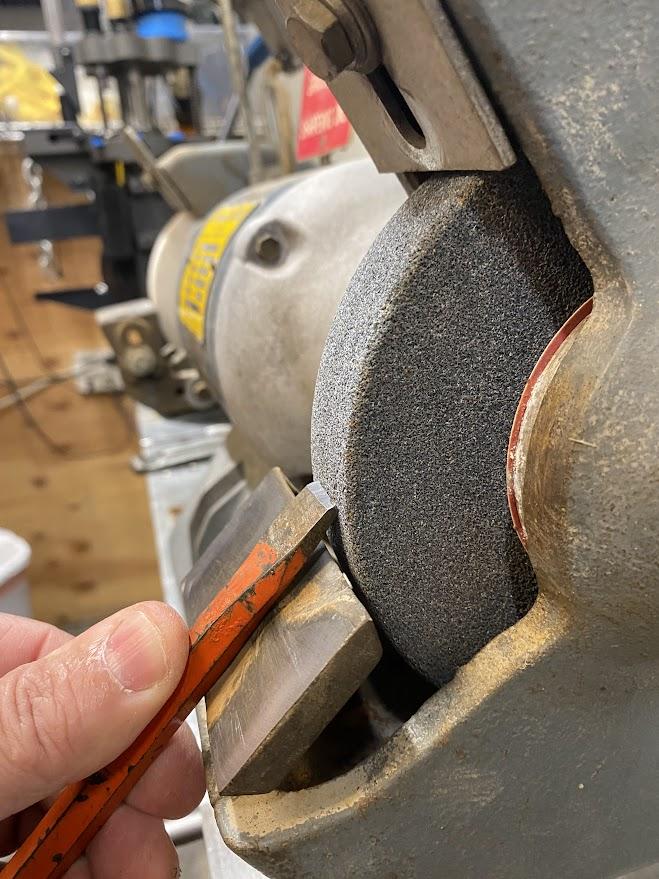
Always start a rough grinding operation on the coarse wheel. It will remove material quicker than a fine grit and will create less heat buildup in the part.
Use the entire surface of the wheel to prevent uneven wear on the wheel’s surface.
It is not recommended to use the side of the grinding wheel to shape parts. The force of the wheel against an unsupported plane can cause severe damage if the wheel fails.
Finish grinding operations are for final cuts to establish a sharpened edge and smooth surface finish. When roughing, a heavy hand may be used to apply enough force to remove material; however, when performing finish grinds, a light, delicate touch is required.
Controlling heat
When performing grinding operations on material such as high-speed steel (HSS), the part will get hot enough to cause discomfort to the operator.
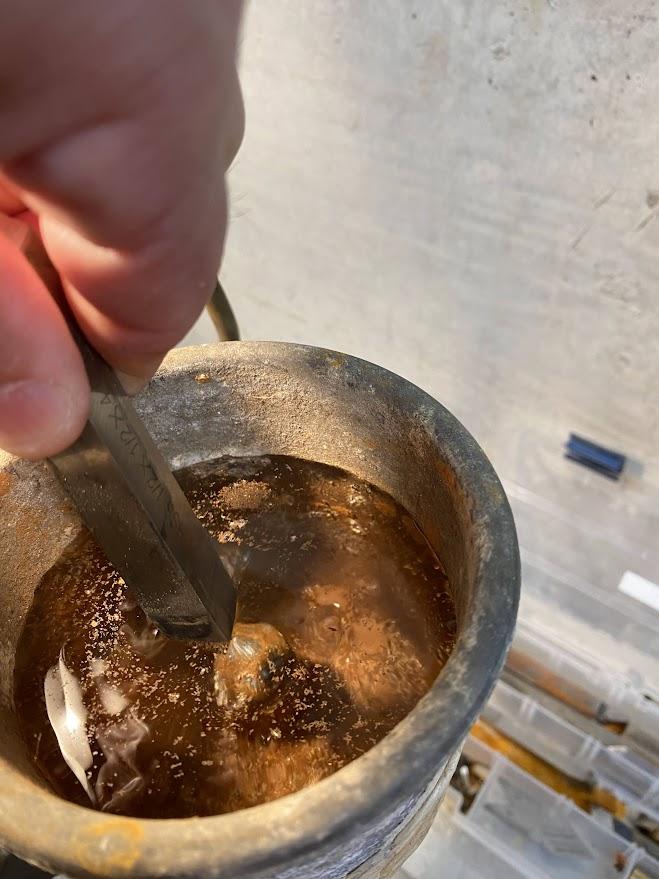
Keeping a bowl of water nearby will help the operator manage the heat. When the part becomes uncomfortably hot, place the hot part into the water allowing the heat to transfer from the part into the water. Repeated quenching is necessary during long grinding operations.
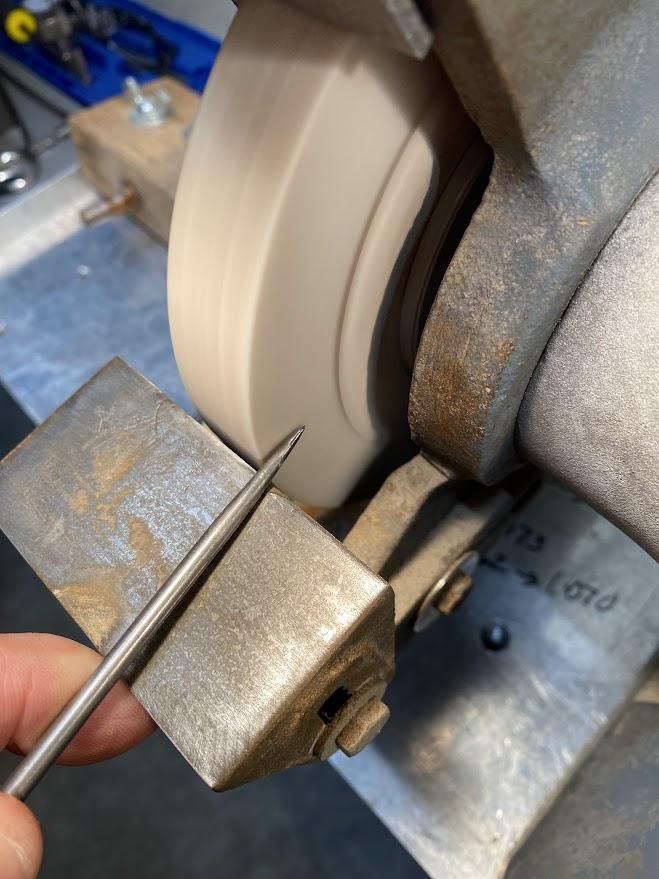
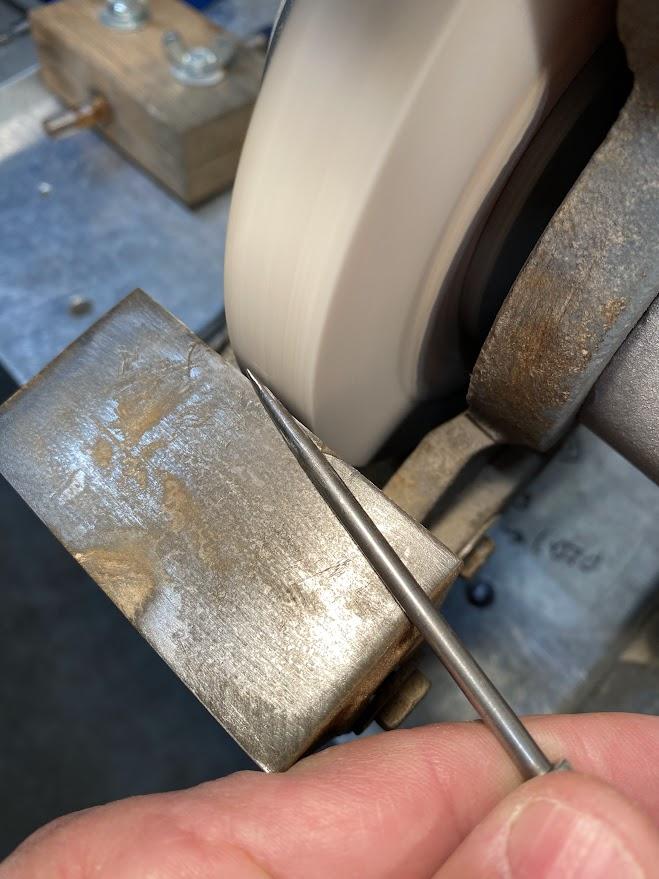
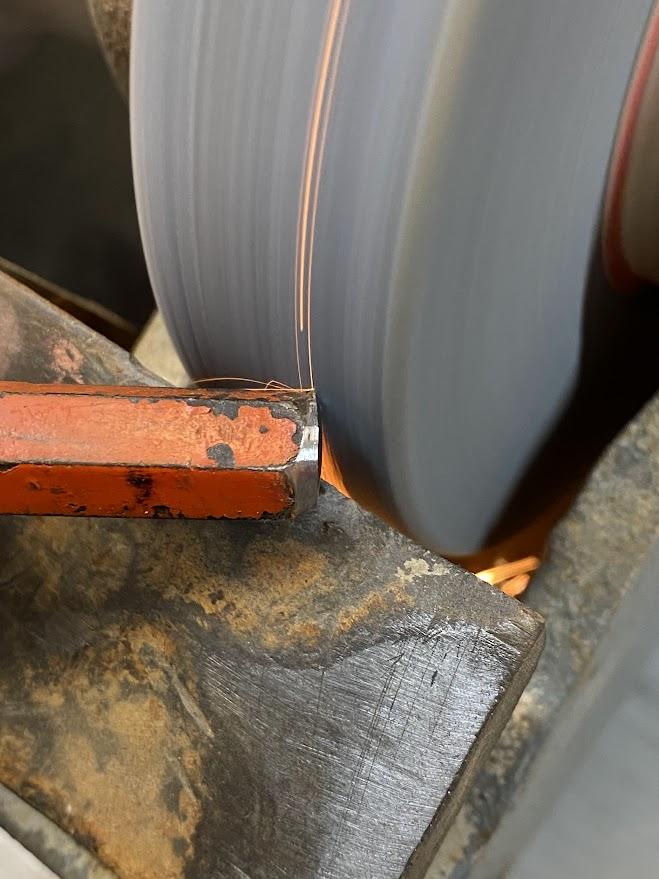
Sparks
Sparks are a byproduct of grinding. Reading the sparks can assist in your grinding operations.

In the figure above, a lathe parting blade is being sharpened. Notice the sparks have wrapped around the wheel and are bouncing off the top of the part. This indicates that the top edge of the part is not in contact with the wheel, and the sparks cannot go under the part’s edge. When this happens, the cutting edge is sharp, and it is time to remove it and inspect the edge.
You can’t grind that!
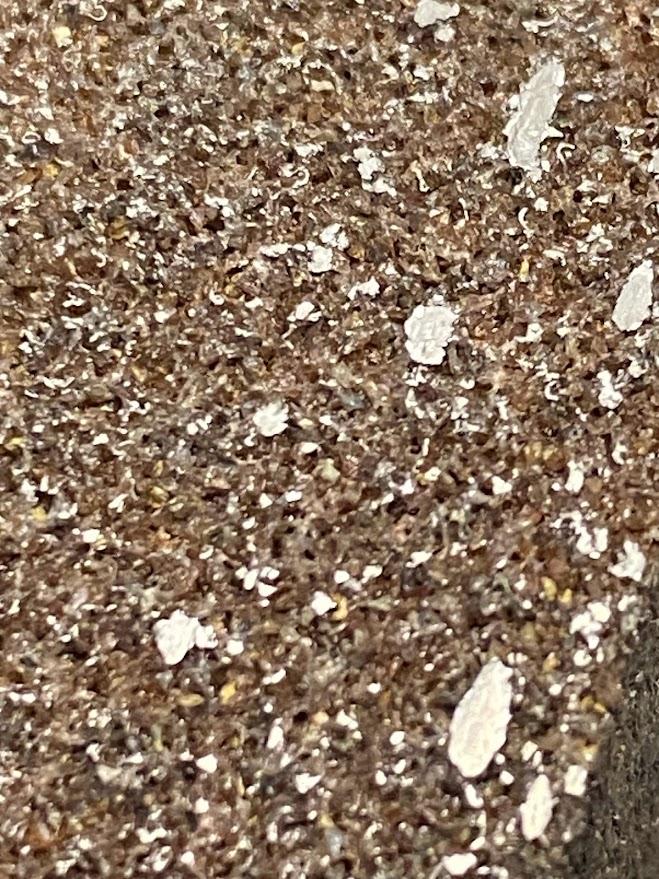
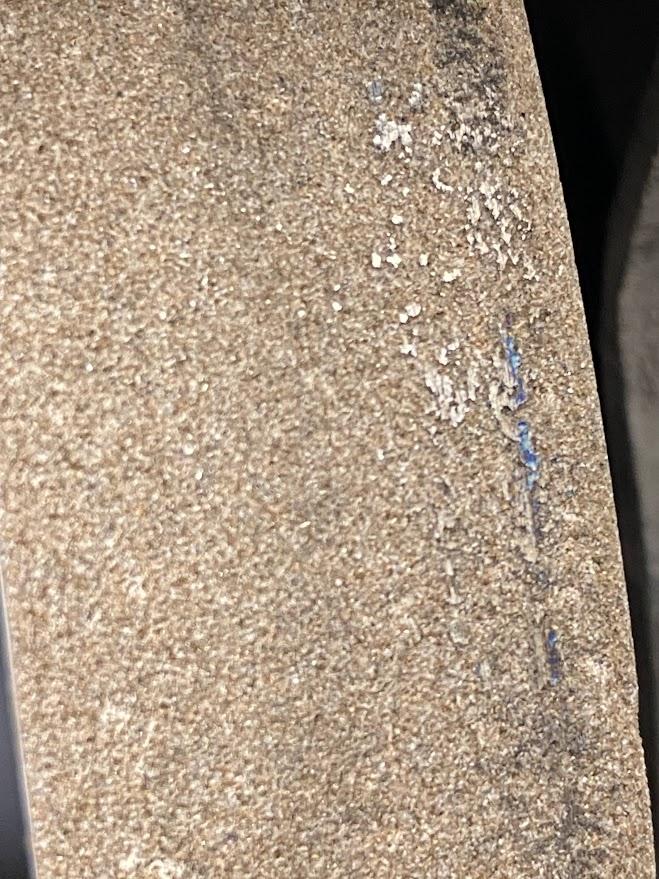
The grinding wheel in the figure above has become clogged because an operator has selected a material that should not be ground on a grinding wheel. This is a common error among inexperienced operators. A material such as aluminum, if placed against the wheel, builds up heat, melting and solidifying on the wheel. Aluminum transfers to the grinding wheel where it cools and creates very hard contamination zones.
To restore this wheel, a diamond dresser must be used to remove these hard contamination zones.
The rule for which material is allowed on a grinder is simple. If it creates a spark, you can grind it. If it doesn’t create a spark, find another method, such as belt sanding. Belt sanders do not build up heat like a grinding wheel but offer all the characteristics of grinders, such as aluminum oxide/silicon carbide grit, tool rests, and robust power.
Attributions
- Figure 5.96: 8″ Baldor bench grinder by Damon Donner, for WA Open ProfTech, © SBCTC, CC BY 4.0
- Figure 5.97: Performing a grinding wheel ring test by Damon Donner, for WA Open ProfTech, © SBCTC, CC BY 4.0
- Figure 5.98: Grinding wheel direction by Damon Donner, for WA Open ProfTech, © SBCTC, CC BY 4.0
- Figure 5.99: Bench grinder tool rest gap by Damon Donner, for WA Open ProfTech, © SBCTC, CC BY 4.0
- Figure 5.100: Bench grinder by Damon Donner, for WA Open ProfTech, © SBCTC, CC BY 4.0
- Figure 5.101: Grinding wheel & spark shield by Damon Donner, for WA Open ProfTech, © SBCTC, CC BY 4.0
- Figure 5.102: Before turning on a bench grinder by Damon Donner, for WA Open ProfTech, © SBCTC, CC BY 4.0
- Figure 5.103: Stand to the side when switching on a grinder by Damon Donner, for WA Open ProfTech, © SBCTC, CC BY 4.0
- Figure 5.104: A fouled grinding wheel by Damon Donner, for WA Open ProfTech, © SBCTC, CC BY 4.0
- Figure 5.105: Using a dressing wheel by Damon Donner, for WA Open ProfTech, © SBCTC, CC BY 4.0
- Figure 5.106: Dressing stick by Damon Donner, for WA Open ProfTech, © SBCTC, CC BY 4.0
- Figure 5.107: Diamond dresser by Damon Donner, for WA Open ProfTech, © SBCTC, CC BY 4.0
- Figure 5.108: Diamond dresser by Damon Donner, for WA Open ProfTech, © SBCTC, CC BY 4.0
- Figure 5.109: Using a diamond wheel dresser by Damon Donner, for WA Open ProfTech, © SBCTC, CC BY 4.0
- Figure 5.110: Metal embedded on the grinding wheel by Damon Donner, for WA Open ProfTech, © SBCTC, CC BY 4.0
- Figure 5.111: Diamond dressing a grinding wheel by Damon Donner, for WA Open ProfTech, © SBCTC, CC BY 4.0
- Figure 5.112: Roughing grinding wheel by Damon Donner, for WA Open ProfTech, © SBCTC, CC BY 4.0
- Figure 5.113: Side grinding by Damon Donner, for WA Open ProfTech, © SBCTC, CC BY 4.0
- Figure 5.114: Finish grinding by Damon Donner, for WA Open ProfTech, © SBCTC, CC BY 4.0
- Figure 5.115: High speed steel by Damon Donner, for WA Open ProfTech, © SBCTC, CC BY 4.0
- Figure 5.116: Quenching steel by Damon Donner, for WA Open ProfTech, © SBCTC, CC BY 4.0
- Figure 5.117: Grinders create sparks by Damon Donner, for WA Open ProfTech, © SBCTC, CC BY 4.0
- Figure 5.118: Sparks bouncing off the top of a part by Damon Donner, for WA Open ProfTech, © SBCTC, CC BY 4.0
- Figure 5.119: Grinding wheel is clogged by Damon Donner, for WA Open ProfTech, © SBCTC, CC BY 4.0
- Figure 5.120: Grinding steel by Damon Donner, for WA Open ProfTech, © SBCTC, CC BY 4.0
relates to the size of the individual grain of the abrasive found in grinding wheels
A process performed to verify a grinding wheel is not structurally damaged. It requires suspending the wheel loosely on a screw driver and rapping the side of the wheel with a hard-plastic handle. It should be a high-pitched ring note. If not, the wheel has a crack in it and should not be used.
an adjustable platform that is used to support the part during grinding
a grinding wheel maintenance task where the surface of the grinding wheel is restored to improve performance.
A tool with an industrial diamond attached to the end of a bar and is used to perform severe grinding wheel dressing
Runout is the total variation that the reference surface can have when the part is rotated around the datum's true axis.
