1
BIOL&160 General Biology
Laboratory Information
 1. Student Responsibilities
It is your responsibility as a student to read through all the information within this lab manual. By remaining enrolled in the course, you agree that you have read and understood this information, and that you agree to follow and abide by all the rules, regulations, principles, policies and guidelines contained in it.
Laboratory Cooperation & Responsibility
All students are expected to:
- Arrive on time and prepared for lab.
- Follow all safety guidelines at all times (not just during scheduled lab times), including:
- Wear closed toed shoes.
- Wear a lab coat.
- No food or drink in lab (keep in backpack or bag on shelves next to door).
- Do not eat, drink, or chew gum in the laboratories.
- Do not take out or put in contacts, apply lip balm or makeup in lab.
- Follow all lab manual and instructor instructions.
- Pay attention to what you and others are doing in lab. Do not text, tweet, call, or use social media in the laboratory. If you have an emergency to attend to, please leave the lab room before you contact or respond to others.
- Clean up at the end of the lab period.
- Use chemicals safely.
- Properly store your microscope.
- Dispose of lab waste in the appropriate container.
- Work cooperatively and interactively with your colleagues.
- Share of techniques, data, and serving as a resource for others.
2. Lab Information
Students must bring the following materials to each laboratory session:
- this lab manual (print out the current lab or bring an electronic version)
- a bound laboratory notebook (see section 4)
- a lab coat
- black or blue pen (for writing in your laboratory notebook)
- pencil (for drawings, there are colored pencils in lab rooms)
Pre-laboratory preparation
Before each lab there may be a set of tasks for you to do in preparation for the lab. These tasks are described on the first page of each lab. It is your responsibility to do these preparations before lab.
Laboratory notebook
You will need a hardbound laboratory notebook that you must bring to each lab. You will use this notebook to keep a record of all the work you do in the laboratory. You will also be expected to do some pre-lab assignments in your lab notebook. At the beginning of each lab session, you should write the date and time and the names of your lab partners (if any). Your lab notebook will be collected and evaluated periodically during the quarter. See Section 4 for more details.
Laboratory Materials and clean up
In general, follow these clean-up procedures:
Lab materials should be returned to where you got them or disposed of properly.
- Prepared sides should be returned to the correct box; please be certain they are in the appropriate labeled box. Remember to remove slides from the microscope stage BEFORE putting the microscope away.
- Dissection tools, beakers, test tubes, etc. should be cleaned, and returned to their proper places.
- Garbage should be put in the wastebasket. Broken glass and other sharp garbage should be put in a specially marked container. Contaminated items and chemicals should be placed in labeled containers. Do not leave anything in the sinks.
- Wipe off the surface of the lab bench with a paper towel so that the table will be clean for the next class. Please leave lab bench clean and dry.
- If pathogenic organisms are being used in lab, all lab surfaces must be disinfected.
- If hazardous chemicals are used in lab, they must be properly disposed of in designated waste containers. Never return excess chemicals to the supply jar. They must be disposed of properly, or given to a fellow student in need.
- Replace the lab chair beneath the lab table. Please leave the lab neat and clean.
3. Lab Safety
The best safety precaution is to arrive on time, be prepared. and pay attention in lab.
- Absolutely no food or drink (including gum and water) are to be consumed in the lab room. There are pathogenic organisms and hazardous chemicals used here.
- All accidents (cuts or burns, for example) must be reported to your instructor.
Before you come to lab:
- Read the lab protocol. If you know what you’re doing, you’re less likely to make mistakes and create unsafe lab conditions. If you don’t understand the procedure, ask.
- Bring the necessary supplies (lab notebook, lab manual, lab coat, close-toed shoes).
- Wear appropriate clothing. Wear clothes that cover your thighs and torso to protect your skin from chemical burns. You must wear closed-toed shoes in lab at all times (to protect from chemical spills, broken glass and pathogens). Tie back long hair and avoid wearing loose clothing.
During the lab:
- Follow all instructions. Do not start the lab early and NEVER work unsupervised.
- Always label the reagents you take or make up.
- Read hazard information carefully. Check and recheck what you should be using. Reagent bottles may look identical and many look like water. Mixing the wrong chemicals together can be dangerous. NEVER taste a chemical.
- Close the lids of reagent and dropper bottles jars immediately after use.
- If a chemical is placed in the hood, leave it in the hood. It may be hazardous.
- Take care of lab equipment. No dangling cords. Clean up all equipment after use.
- Do not sit on the lab benches.
- Keep your work area clean and free of non-essential material.
- Only take the supplies you need, and return them as soon as you’re done. Never return chemicals to the supply bottle. If you have excess chemicals, give them to someone who needs them, or put them in the waste disposal container.
- Never put toxic chemicals down the drain. Not only will this damage the pipes at LWTech, it can poison wildlife, harm ecosystems, and it is against the law.
- Clean up all spills, chemical or otherwise. You may know that a white powder is sugar, but no one else will. All unknown spills must be treated as hazardous!
- Don’t distract other students. Do not text or talk on your phone during lab. Please leave the room to text, tweet or use your cell phone.
- Let the instructor know about malfunctioning equipment.
- Report any accidents or breakage.
After you are finished:
- Wash your hands.
- Clean your table and any equipment you used should be clean and chemical free (wash the area with soap and water, or disinfectant if needed).
- Hazardous chemicals must be properly disposed of in designated waste containers. Never return excess chemicals to the supply jar. They must be disposed of properly, or given to a fellow student in need.
Just in case
- Locate the eye wash and safety shower, if present.
- Know the location of all exits from the lab.
- If an accident does happen:
- Alert your instructor.
- If it’s an emergency, call 9-911.
- In case of fire:
- Alert your instructor.
- Turn off the gas.
- If it’s a small container fire, try to smother the fire by covering it.
- If someone’s clothes are on fire, have them stop, drop to the floor, and roll. Wrap them in the fire blanket (in the staff prep room) as soon as possible.
- If you get a chemical in your eyes, remove your contact lenses if you’re wearing any, and flush your eyes in the eye wash for 25 minutes.
- All accidents (even minor cuts or burns) must be reported to your instructor.
4. Lab Notebook
Objectives
- To use this common tool in the sciences.
- To methodically record lab work: methods, data, results, conclusions, questions.
- To promote observational skills through sketching.
- To develop understanding of class and lab material.
- To help students organize lab material so relationships among important concepts can be better understood.
- To help students prepare for each lab.
- To help students reflect on what they have learned from each lab.
LABORATORY NOTEBOOK
A laboratory notebook is a tool. The researcher uses it to prepare for the work to be done, to record observations and data, to record analyses and conclusions, and to record ideas and thoughts that occur during the work. In most research labs (commercial, university, government lab, etc.), an individual’s lab notebook is considered a historical record that is legally the property of the laboratory/employer. It is a public record, and because it is a record of what was done, it can be used (for example) in court to support patent claims and other legal issues.
You may have used a laboratory notebook previously in chemistry or physics. Different disciplines may format the lab notebook a bit differently (just as employers may). If you continue on to Biology 260 you will likely continue to use laboratory notebooks.
You must purchase a bound laboratory notebook which you will bring to each lab. You will use this notebook to keep a record of all the work you do in the laboratory. For each lab session, you must write the date and time and the names of your lab partners (if any), at the top of the page. You will also be expected to complete some pre-lab assignments in your lab notebook. Your notebook will be evaluated periodically during the quarter; sometimes your instructor will do so during lab, and other times your instructor will collect your lab notebooks.
General criteria
Your laboratory notebook is the record of what you did in lab. It is both a historical record and a working document, and must therefore be kept up to date every lab day. DO NOT save entries to complete later after lab is over. Your lab notebook must be complete, understandable by your peers, legible, and scrupulously honest.
Physical characteristics
Your lab notebook must have the following physical characteristics:
- Bound: Pages may not be inserted or removed.
- Numbered pages: Labs will be referenced by page number in the Table of Contents.
- Durable: Lab notebooks are intended to be “permanent” (long-term) records.
The following illustration depicts an acceptable lab notebook:

Specific criteria
- ALL notes, observations, thoughts, ideas, speculations, scribblings, diagrams, drawings, sketches, calculations, etc., MUST be in your lab notebook!! It is a permanent record of your observations and thoughts.
- Put your name on the cover of your lab notebook.
- Use the pages in consecutive order. Normally, do not leave any blank pages, or room for data or data analysis to be added later. Use both sides of the page. See below for exceptions.
- Keep a Table of Contents that includes names of labs and page numbers (see example below). Leave the first 2-4 pages of the lab notebook blank initially, and use them for a Table of Contents that you fill in as you go along. If you plan on taking Biology 260 (Microbiology), you should leave enough room for a table of contents for this class, so you can use your lab notebook for this class, too.
Example of Table of Contents (TOC):
Lab #: Name page #
Lab 1: Microscopy 4
Lab 2: Cells 8
Lab 3: Diffusion & Osmosis 13
- Number each page.
- Date every lab (next to the title).
- Make neat, legible entries in blue or black ink. Sketches can be in pencil (and/or colored pencil, if you’d like).
- You will have several sections for each lab. Each section should have its own heading. The sections are:
Introduction
Objective (purpose)
Pre-lab
Procedures
Results
Discussion and Conclusions
Recording contents into your lab notebook
- In preparation for the lab, some material needs to be entered into the Lab Notebook BEFORE lab. See below.
- Material for the day’s lab MUST be entered into the lab notebook as you work in the lab, during the lab session. Do NOT wait until after the lab session to finish writing in your notebook! You should not rely on your memory.
- Start each lab session with a new page.
- Making corrections
- Neatly cross out mistakes with a single line (so they are still legible); do not erase anything in your lab notebook, do not use white out, and do not tear out pages. This ensures that all material is recorded, even mistakes – remember that the notebook can be considered a legal document. Plus, sometime even mistakes may turn out to be important!
- If your page becomes so messy as to be unreadable, cross out the entire page, and indicate the number of the page that contains the rewritten information. Do not tear out the messy page!
5. Every person in a lab group should have a separate copy of all data or results in his/her own notebook.
6. Each member of a lab group should write up the experiment in his/her own notebooks. The data may be the same, but introductions, discussions, etc., should be in your own words (entries other than data should not be identical).
7. If data or samples from another source (or person) are entered, be sure to clearly indicate the source, including the name of the person from which they were obtained.
8. If you need to add data or analysis later, add them in the next available page, and clearly reference that page with “continued on page __”; on the page where you continue, write “continued from page __”. Be sure to indicate the correct page numbers in your Table of Contents.
BEFORE LAB, enter the following, IN ORDER:
- Date
- Title of the lab exercise that communicates the nature of the scientific problem.
- Names of all lab partner(s) or group members.
- Purpose (Objective): Briefly and accurately state the purpose of the Lab Exercise(s) — what it is that you are trying to accomplish— in your own words. Do not simply copy the objectives listed in the Lab Manual.
- Pre-Lab: Some labs have a pre-lab that you must complete before lab. However, you will not copy procedures into your lab manual. You may outline or make a flow chart of your plan for the lab and you may prepare data tables before lab.
- Plan, Outline or Flow Chart of Procedures: This should be simplified and summarized so that it will be easy for you to follow during lab. Make drawings, diagrams, flow charts, bullet points, or attach pictures, if it will help remind you, or make clear to others, how you will conduct your study. Explicitly refer to the protocol in the lab manual by page number and note any deviations from the protocol. Many labs have more than one exercise or part. If you are designing your own procedures, write out a list of all materials and supplies you will use, and record all steps in sufficient detail so that any person skilled in the field can repeat the work and obtain the indicated results.
- Results: Construct data tables as needed (and/or as instructed for the Pre-lab). Please label each lab exercise or section separately.
DURING EACH LAB, record the following:
1. Notes: You may keep notes from your lab instructor’s introduction to the lab
2. Procedures: Note specifics that weren’t made clear in the lab manual or might be different from the written protocol, such as:
-
- which chemicals, enzymes (especially restriction enzymes later in the quarter), solutions, cultures, etc. you used (if any)
- the actual pH of your solutions (if measured)
- the actual temperature(s) of water baths, room temperature, etc.
- the actual time when you start and end a procedure, and an entire experiment. (For example, if you incubate a solution for 20 minutes, write “incubated at 38°C from 2:42 pm to 3:02 pm” in your lab notebook instead of just writing “incubated at body temperature for 20 minutes.”)
- Qualitative data is important to note, such as the color of a solution, cell or organelle, cell shape, position or location (is something ‘floating’ in the solution, is the color at the top of the solution different, etc.) errors, mistakes, or problems that occurred.
3. Results: Include raw data (usually recorded, neatly, in tables) and calculated data (including averages, corrections, etc.). Include units! You may prepare tables before the lab period, often as part of the pre-lab. Formulae and sample calculations are also important to include, because you may need this information later (for example, a conversion of units). Write your results and do calculations DIRECTLY in your lab notebook, NOT on loose pieces of paper.
-
- Write down everything that happens during the experiment that may be important for the results or the interpretation of the results. For example, even when gathering quantitative data, it is usually worthwhile to also keep a record of qualitative data (i.e. your observations on the solution color and other descriptors, e.g., cloudy, clear, etc.). You should also record any mistakes that were made and any problems that you observed or encountered.
- You should include any questions, ideas, comments, etc. that occur to you during the work. These ideas can be very important if you are performing an actual study, because they may lead to other research. Your comments can be personal, such as “Wow, that was a cool reaction!”
4. Discussion/Conclusions: The discussion is the most important part of the write-up in the laboratory notebook because it reflects your own understanding and critical thinking. Briefly review your results (for example, the absorption spectrum for our pigment had two peaks …), interpret your results, and draw conclusions about your study. Did your results agree with your predictions? Was your hypothesis supported? Were the objectives met? Why or why not? Include any comments that you have about the procedure and/or the results that you find useful. Write down your interpretations of the results, especially if they were not as expected. Also include any error analysis: if anything went wrong, describe what happened; otherwise, discuss possible sources of error.
Be sure to answer any questions posed in the Lab Protocols for this section. You may also reflect on your learning experience with the lab exercises. What did you learn, and why? How did the lab relate to course material? How did it help you learn that material?
5. Other material: For computer-generated records, images, photographs, drawings, gels, and other types of data, tape the material into your notebook where appropriate. Tape these flat so they do not cover any information in your notebook. Attachments should not hang out over the edge of the notebook. Date all materials taped into your lab notebook. Identify the material on the page.
Drawings and Sketches
- Drawings and sketches are records of your observations, therefore they must be accurate and detailed enough for you to study from later. Drawings and sketches do not have to be works of art, they do have to represent the specimen you observed with the detail necessary to identify specific structures (cell walls, for example), and shapes, size and arrangement of components.
- Sketches must be done DIRECTLY in your Lab Notebook. Each drawing should be about three (3) inches across.
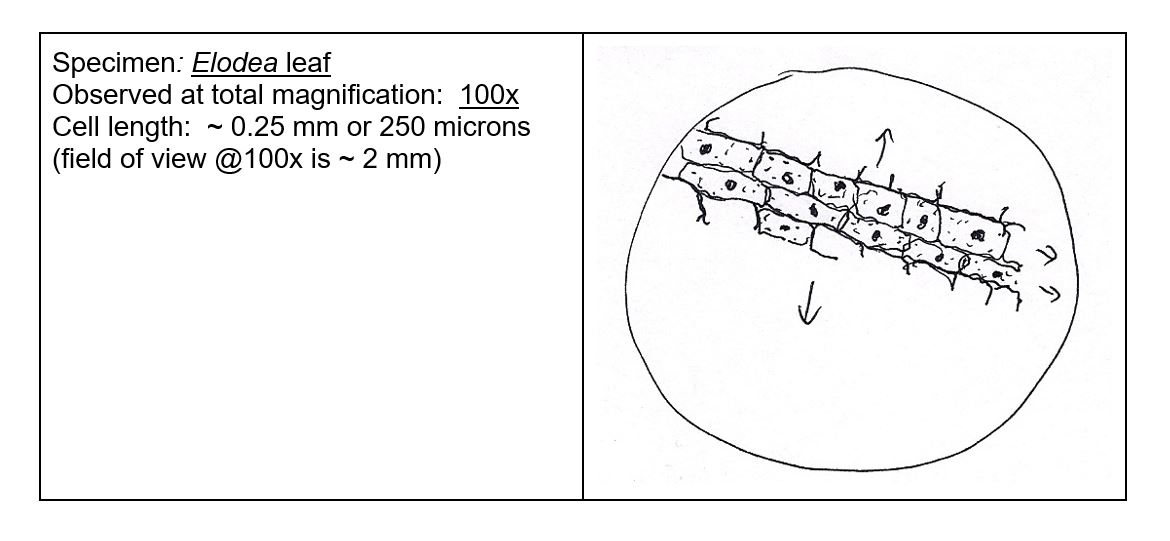
- Each drawing should include a title (what it is), the total magnification at which you made your observation, a scale bar and labels of the important structures (as appropriate). You may be asked to write an appropriate Figure caption or to make an estimate of the size of a cell or structure (and note the length, width or diameter).
- It may be helpful to begin your drawing with a frame (3 inches in diameter is usually good), outlining the field of view. A Petri dish or cup can be used to draw a circular frame.
- You may use pencil or colored pencils for your drawings, which will probably be easier than using pen. Labels however should be written in ink.
SKETCHING TIP 1: If your drawing has a repetitive pattern, you can draw enough to represent the pattern, then use arrows or some other way to indicate that the pattern continues.
SKETCHING TIP 2: To illustrate more detail in your drawing, you can draw an additional “call-out” or “focus” drawing:
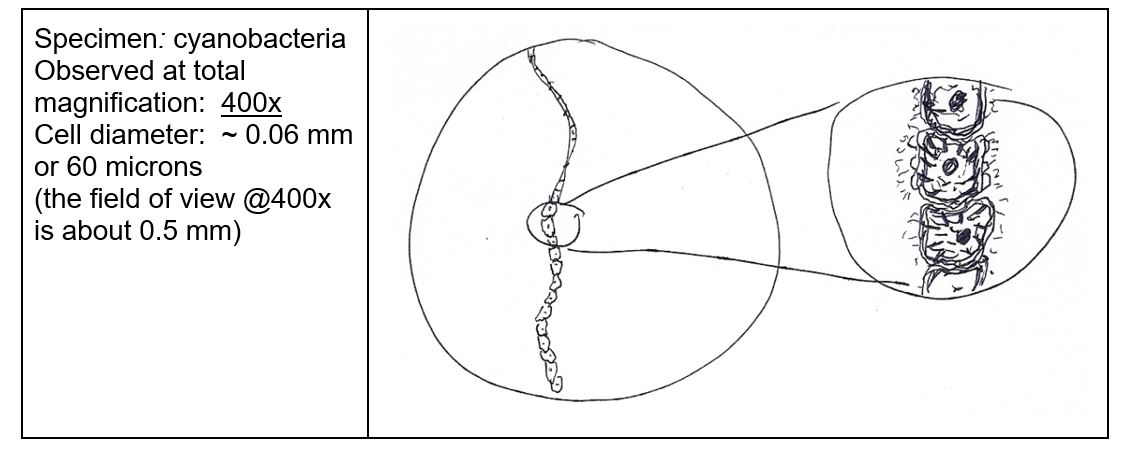
Please note that these two illustrations are missing important, required information, including a scale bar and labels of structures.
Tables and Graphs:
- Tables and graphs must have clear, descriptive/explanatory figure captions or titles. “Absorbance vs. time’ is not descriptive.
- Tables and graphs in your lab notebook can be produced by hand, or by computer, unless otherwise instructed. Graphs must be complete, accurate and appropriate. Default settings in Excel are not always appropriate. Each student must produce their own, unique graph of these data. Use distinctive point protectors to plot your data and include a key.
- Tables should be neatly aligned and data must be legible. Columns and rows should have headings or labels, with units (when appropriate).
- Graphs (and tables) should be drawn directly in the lab notebook (not pasted or stapled in), unless otherwise indicated.
Assessment
Your laboratory notebook will be assessed (i.e., graded) based on the instructions above. There may be prior announcement of lab notebook assessment during the quarter, when you will have to hand in your notebook.
