8 Lab 7. Identify Foods Containing Genetically Modified Organisms (GMO)
Lab 7. Identify Foods Containing Genetically Modified Organisms (GMOs)
OBJECTIVES
- Learn lab techniques involved in extracting DNA from a food sample.
- Understand how PCR amplification works and how it can be used to study DNA at the molecular level.
- Discuss the importance of PCR in DNA technology and how it is being used in research, biotechnology, medicine, forensics, and agriculture.
PRELAB
Go to the following websites below and answer the following questions in your lab notebook.
-
- See the DNA Learning Center tutorial:
- http://dnalc.org/resources/animations/pcr.html
- See the DNA Leaning Center video:
- http://www.youtube.com/watch?v=2KoLnIwoZKU&list=PLD0D5F297744AD515&index=1
- See Gel electrophoresis video
- Gel Electrophoresis (utah.edu)
- What are the main steps in PCR?
- Why must you heat the sample to 95oC?
- What is a primer?
- What other things, besides primers and the DNA that will be copied, do we need to add to a PCR reaction?
- Why is an electrical current necessary for gel electrophoresis to work properly?
- What feature of DNA determines how fast it travels through the cell?
- What is the purpose of the DNA size standard?
Genetically Modified (GM) Foods Investigation
In this lab, you are going to bring in a corn-, papaya-, or soy-based food item from home (see Table 1), isolate DNA from the food, and use polymerase chain reaction (PCR) to amplify specific DNA sequences commonly associated with genetically modified crops. This will be followed by gel electrophoresis, which will be used to confirm the presence or absence of those amplified sequences.
What to keep in mind when selecting your food item:
- – Avoid using fresh corn or soy (rarely GM)
- – Bring only non-organic foods
- – Okay to use processed foods such as cheese-flavored puffed corn snacks
Table 1. List of foods that can be used in this lab.
| Very Reliable | Reliable | Less Reliable | Very Difficult/Not Possible |
|---|---|---|---|
| Fresh papaya (not from Hawaii) | Veggie sausages | Veggie burgers | Oil |
| Corn bread/cake mix | Tortilla chips | Fried corn snacks | Salad dressing |
| Corn meal | Flavored tortilla chips | Popcorn | Cereal (cornflakes) |
| Soy flour | Puffed corn snacks | Fried | Wheat Flour |
| Meatbeals/burgers containing soy protein | Potato chips | Soil milk |
This is a two day lab:
- Day 1 – DNA Extraction and PCR
- Day 2 – Gel Electrophoresis
INTRODUCTION
Genetically Modified Foods
With the world population exploding and farmable land disappearing, agricultural specialists are concerned about the world’s ability to produce enough food to feed the growing population. Environmentalists are concerned about the overuse of pesticides and herbicides and the long-term effects of these chemicals on the environment and human health. Might there be a solution to both of these problems? The biotechnology industry thinks so. Its proponents believe genetically modified organisms (GMOs), particularly genetically modified (GM) crop plants, can solve both problems. This proposed solution, however, has met with great opposition throughout the world. Dubbed “frankenfoods” by opponents and restricted in most European countries, GMOs are widely produced and sold in the United States. Currently in the US, foods that contain GMOs do not have to be labeled as such.
Genetic manipulation of crop plants is not new. Farmers have been genetically modifying crops for centuries and crop breeding to encourage specific traits, such as high yield, is still an important part of agriculture today. However, there is now the option to place genes for selected traits directly into crop plants. These genes do not have to originate from the same plant species—in fact, they do not have to come from plants at all. One popular class of GM crops has a gene from the soil bacterium Bacillus thuringiensis (Bt) inserted into their genomes. Bt crops produce a protein called delta-endotoxin that is lethal to European corn borers, a common pest on corn plants. Farmers who plant Bt crops do not have to apply pesticide because the plants produce the toxic protein inside their cells. When the corn borers feed on the genetically modified plant, they die. Other GMOs include those that are herbicide-resistant delayed for fruit ripening, are resistant to fungi or drought, have increased crop yield, or bear improved fruits
Many people object to the use of GM crop plants. They argue that there is a potential to create super-weeds through cross-pollination with herbicide-resistant crops or that superbugs will evolve that are no longer resistant to the toxins in pest-resistant crops. Many are concerned with potential allergic reactions to the novel proteins or antibiotic resistance arising from the selectable markers used to develop the crops or other unforeseen effects on public health. Proponents of GM foods argue these crops are actually better for the environment. Fewer toxic chemicals are put into the environment and thus fewer toxic chemicals canharm the environment and human health. In addition, these crops can preserve arable land by reducing stresses on the land, improve the nutritional value of food in developing countries, and allow crops to be grown on previously unfarmable land.
Whatever position one takes in the GMO debate, it would be beneficial to be able to test foods found in the grocery store for the presence of GMO-derived products. This canbe done in several ways. One would be to use an antibody-based test such as the enzyme-linked immunosorbent assay (ELISA), which can detect the proteins that are produced specifically by GM crops. However, the ELISA is not useful for testing foods that have been highly processed, because the proteins have most likely been destroyed and different GM foods produce different proteins. Another method is to use the polymerase chain reaction (PCR) to look for a DNA sequence common to GM foods. DNA is more resistant than proteins to processing and can be extracted from even highly processed foods. It is these GMO DNA sequences that we will be testing for in this laboratory. In the first lesson you will extract genomic DNA from food samples and you will run PCR reactions to amplify GMO and natural plant sequences from the DNA, and in the second lab you will electrophorese the amplified samples to visualize the DNA. Let’s see if your favorite food contains GMOs.
Polymerase Chain Reaction
PCR is a simple technique used in a whole range of applications from identifying viruses, to crime scene analysis, to diagnosing diseases, to identifying the illegally caught fish, to sequencing entire genomes. It is one of the most important biological techniques developed. The process mimics DNA replication by utilizing the enzyme DNA polymerase taken from special bacteria that live in hot springs. The PCR reaction is performed in very small tubes with special thin walls to allow the temperature to change in the solutions inside very quickly. The machine that permits this reaction is called a thermocycler. It basically heats and cools the tubes for various lengths of time as needed. The important components of a PCR reaction are as follows:
- Taq DNA polymerase: A version of polymerase taken from thermophilic (heat-loving) bacteria. It is extremely heat-tolerant, which is important to this procedure, since pulling apart two DNA strands requires heating to near boiling temperatures.
- DNA template: Your DNA. Because PCR makes copies of DNA, you only need a tiny amount, in this case, 50 nanograms.
- Primers: Short, single stranded pieces of DNA complementary to each end of the region being amplified. Primers specifically bind to the complementary DNA region within the genome and allow the polymerase to start adding base pairs.
- dNTPs: A mixture of adenine, guanine, cytosine, and thymine deoxyribonucleotides. These are the building blocks of DNA and serve as the raw material as the DNA strands are built by DNA polymerase.
- Buffer: Contains salts and ions needed to create the proper pH environment for the reactions to occur.
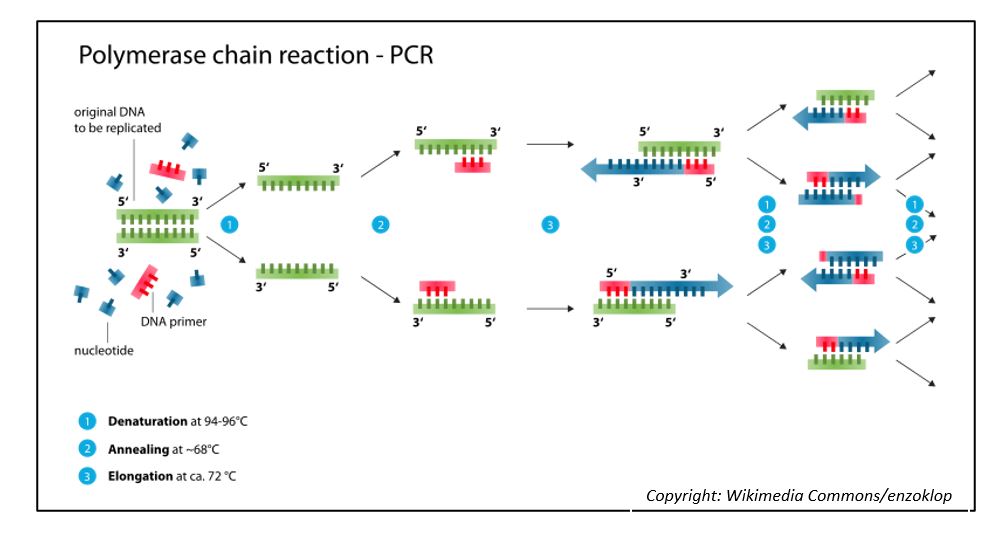
The process of PCR involves many cycles (see Figure below). Each cycle has the following steps:
- Denaturation step: The reaction is heated to 94oC to allow DNA strands to unwind and separate, or melt. (Note: Most DNA polymerase enzymes from most organisms (including us) stop working at this temperature. However, because Taq DNA polymerase came from bacteria that live in hot springs, it is unaffected and will still be functional for step 3.)
- Annealing step: The reaction is cooled to ~50oC to allow the primers to stick to complementary regions of the template DNA, setting the stage for the DNA polymerase. (This temperature is too cold for Taq DNA polymerase to function well.)
- Extension step: The reaction is heated to 72oC, a temperature where DNA stays bound together, but the Taq DNA polymerase enzyme is optimally functional. The enzyme starts at the primer and fills in bases complementary to the template strand.
These three steps (1 cycle) are repeated 35 times. Each time the cycle is repeated, the number of copies grows exponentially until you have millions of copies.
Your Task for This Lesson
For this experiment you will set up two PCR reactions per DNA sample. You will work with a total of three DNA samples: your test food, a GM+ control DNA sample, and a GM- control food (oats). Thus in total you will set up 6 PCR reactions.
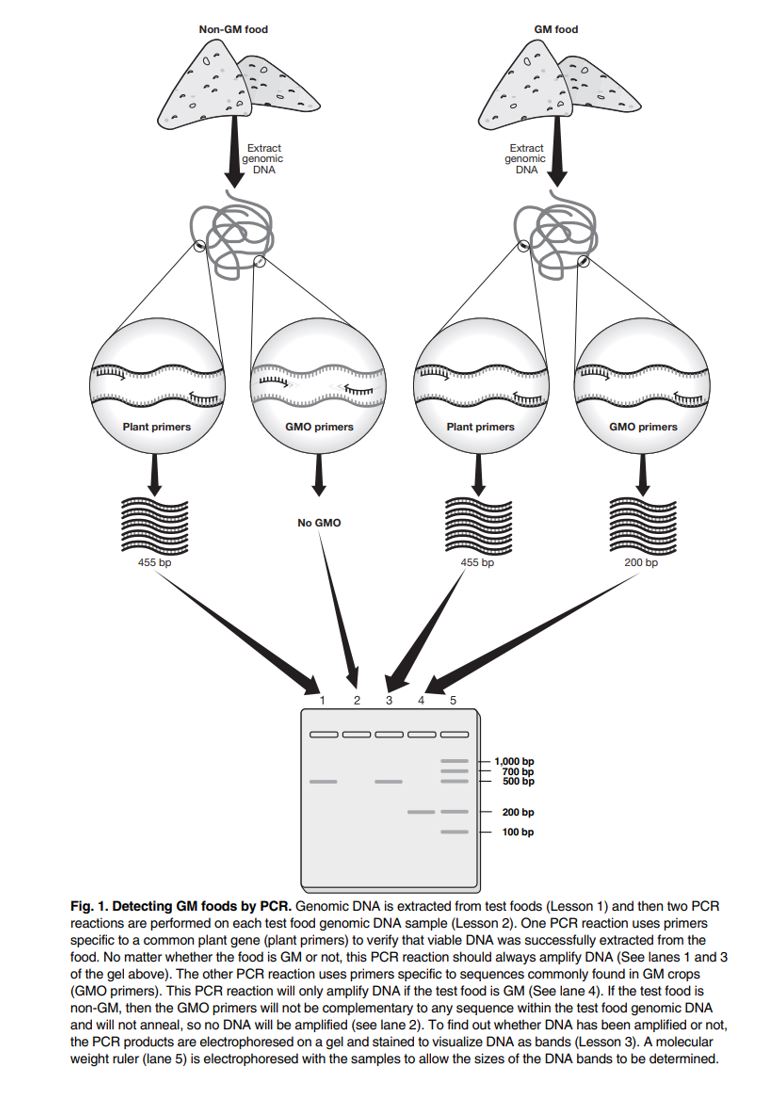
The first PCR reaction, uses the plant master mix (PMM – green mixture provided in the kit), is a control to determine whether or not you have successfully extracted plant DNA from your test foods. This is done by identifying a DNA sequence that is common to all plants by using primers (colored green in the kit) that specifically amplify a section of a chloroplast gene used in the light reaction (photosystem II).
Why is this necessary? What if you do not amplify DNA using the GMO primers? Can you conclude that your test food is not GM or might it just be that your DNA extraction was unsuccessful? If you amplify DNA using the plant primers, you can conclude that you successfully amplified DNA, therefore, whether or not you amplify DNA with your GMO primers, you will have more confidence in the validity of your result.
The second PCR reaction, using the GMO master mix (GMM – red mixture provided in the kit), will determine whether or not your DNA sample contains GM DNA sequences. This is done by identifying DNA sequences that are common to most (~85%) of all GM plants using primers specific to these sequences.
Why do you have to set up a PCR reaction with DNA from certified non-GMO food (oats)? What if some GMO-positive DNA got into the InstaGene or master mix from a dirty pipet tip or a previous class? This DNA could be amplified in your test food PCR reaction and give you a false result. By having a known non-GMO control (oats) that you know should not amplify the GMO target sequences, you can tell if your PCR reactions have been contaminated by GMO-positive DNA.
NOTE: our lab uses three foods and seven lanes on the gel
PROCEDURE
The protocol below, with slight modifications, is from the Biotechnology Explorer™ GMO Investigator™ Kit from Bio-Rad.
Day 1: Extraction of DNA From Food Samples
- Turn on a 95oC water bath.
- Obtain one screwcap tube and label it “non-GMO.” Add an identifying label (initials) as well.
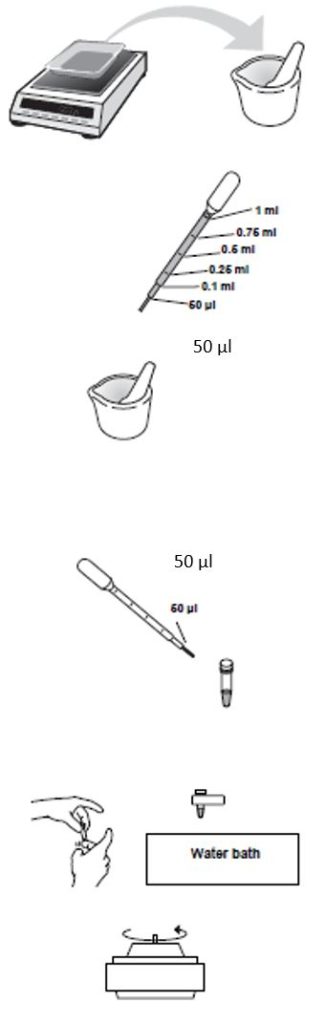
- Weigh out 0.5–2 g of the non-GMO oats and put it into the mortar.
- Add 5 ml of distilled water for every gram of food. To calculate the volumes of water you need, multiply the mass in grams of the food weighed out by 5 and add that many milliliters. (Mass of food in grams X 5 = ______ ml of water)
- Grind with pestle for at least 2 min. to form a slurry.
- Add the same volume of water as was added in step 3. Mix or grind further with pestle until smooth enough to pipette.
- Pipet 50 μl of ground slurry to the screwcap tube containing 500 μl of InstaGene labeled “non-GMO” using the 50 μl mark (first mark) on a graduated pipet (see figure at right). Gently mix by pipetting up and down. Recap tube.
- Flick the non-GMO food InstaGene tube and place in 95°C water bath for 5 min.
- Rinse mortor and pestle with distilled water and dry using a paper towel.
- Obtain a second screwcap tube and label it “test”. Add an identifying label (initials) as well.
- Repeat procedures 3-9 using test food and second screwcap tube labeled “test”.
- Place both tubes in a centrifuge in a balanced conformation and centrifuge for 5 min at max speed.
Set Up PCR Reactions
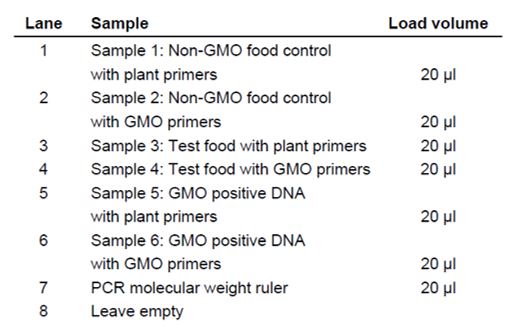
- Number six (small) PCR tubes as 1-6 and initial them/mark with a unique symbol.
The numbers should correspond to the following tube contents:
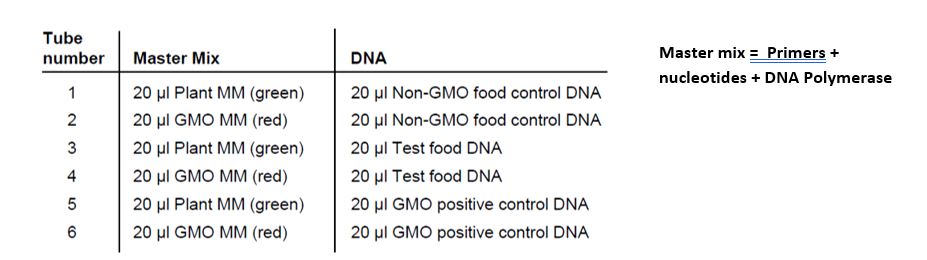
2. Place each PCR tube in a capless microtube adaptor and place on ice.
3. Referring to the table and using a fresh tip for each addition, add 20 μl of the indicated master mix (MM) to each PCR tube, then recap the tubes.
4. Referring to the table and using a fresh tip for each tube, add 20 μl of the indicated DNA from the InstaGene tubes to each PCR tube, be sure to avoid the InstaGene pellet at the bottom of the InstaGene tubes. Mix DNA and MM by gently pipetting up and down, then recap the tubes.
5. When instructed, place PCR tubes in thermal cycler and record their relative positions in the thermocycler in case the labels get rubbed off.
We will finish the lab next week!
Day 2: Electrophoresis of PCR products
1. Set up your gel electrophoresis apparatus as instructed.
2. Obtain your PCR tubes from your instructor.
3. Using a fresh pipette tip each time, add 10 μl of Orange G loading dye (LD) to each PCR sample (1-6) and mix well (gently pipette up and down).
4. Load 20 μl of each sample into your gel in the order indicated below. Remember to CHANGE TIPS after loading each lane.
5. Load 20 μl of the molecular weight ruler/DNA ladder to lane 7.
6. Run the agarose gel for 1 hour at 100 Volts.
ANALYSIS & INTERPRETATION
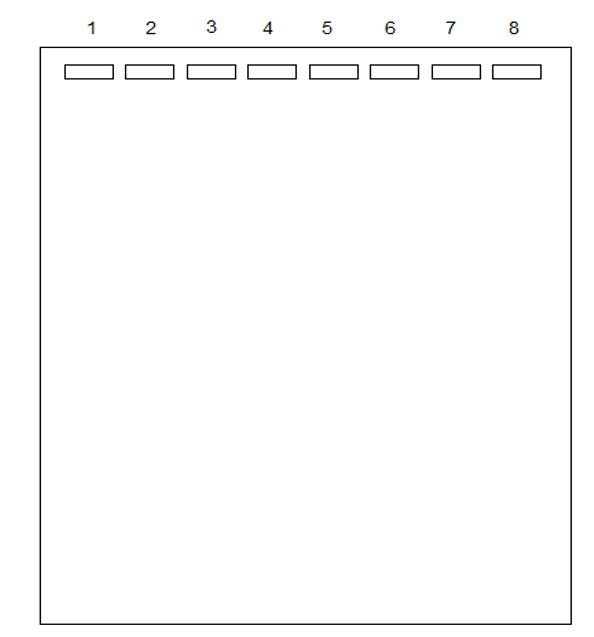
- Carefully place your gel onto the Gel Doc.
- In your lab notebook draw the band(s) that you see in each lane on your gel. You can use the template below and cut & paste into notebook. Note that the PCR molecular weight ruler (lane 7) has DNA fragments of the following sizes (base pairs): 1000, 700, 500, 200, and 100.
Post-Lab Questions – record your answers in your lab notebook.
1. What food item did you test? Did it contain genetically modified organisms? Explain in detail how you were able to determine this based on the bands in your gel.
2. In which lane do you expect bands to be absent? Why would you expect it to lack bands? Does this mean that no DNA is present in that lane? Explain your answer.
3. You separate DNA fragments via gel electrophoresis. Towards which end of the gel are the larger fragments located? Why?
