Chapter 5 Part 2 : Benchwork
5.6 Scribes
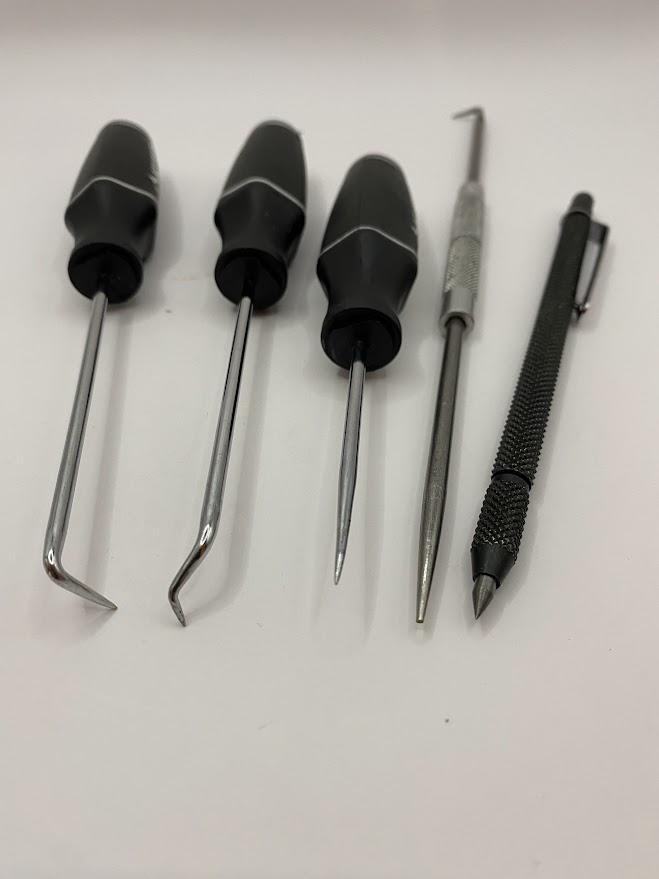
The tool used to create crisp, sharp scratches on the surface of material in preparation for machining is called a scribe. A scribing tool must be able to hold a sharp edge or point as it presses into the surface of the metal to displace enough material to leave a visible scratch. It must be harder than the material being scribed, and it must be in a configuration that fits the operator’s hand.
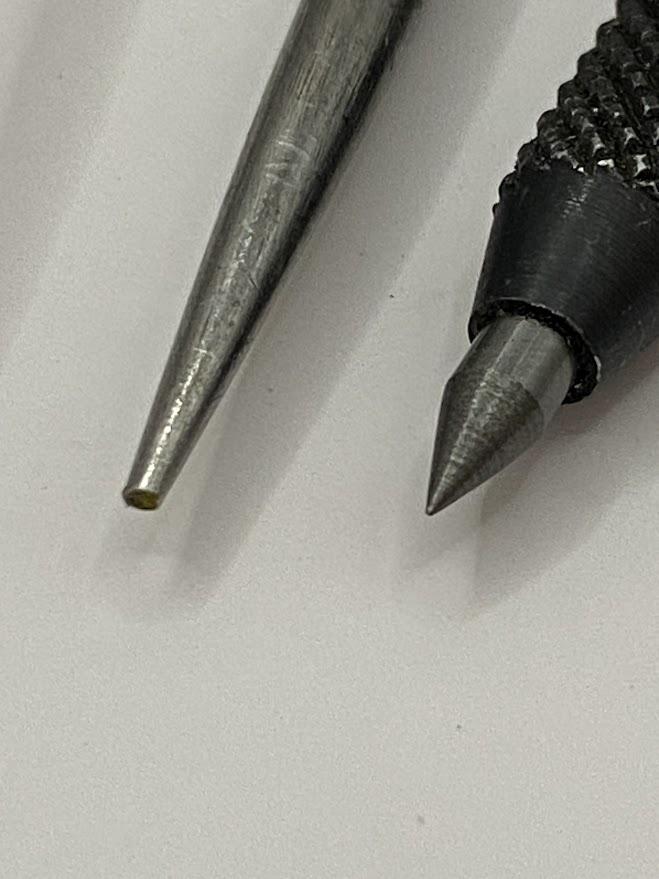
In the figure above, the high speed steel (HSS) machinist scribe on the left has the tip broken off and requires a regrind to correct it. The scribe tip on the right is made from carbide and is capable of marking most materials.
Machinist scribes are commonly used in conjunction with layout or measuring tools such as rulers, squares, or protractors. The scribing process requires the point of the scribe to be carefully aligned against the guide, such as a ruler and workpiece, and by applying pressure and dragging the scribe across the surface, a fine line is etched or scored into the material. This line serves as a guide for subsequent operations, such as cutting, drilling, or milling.
The scribe point is usually sharp and durable to ensure precise marking on different materials, including metals, plastics, or wood. Some scribes may feature replaceable tips, allowing for easy maintenance and prolonging the tool’s lifespan.
Machinist scribes are essential for accurate and meticulous work in machining, metal fabrication, woodworking, and other industries where precise marking and layout are crucial for achieving high-quality results.
5.7 Punches
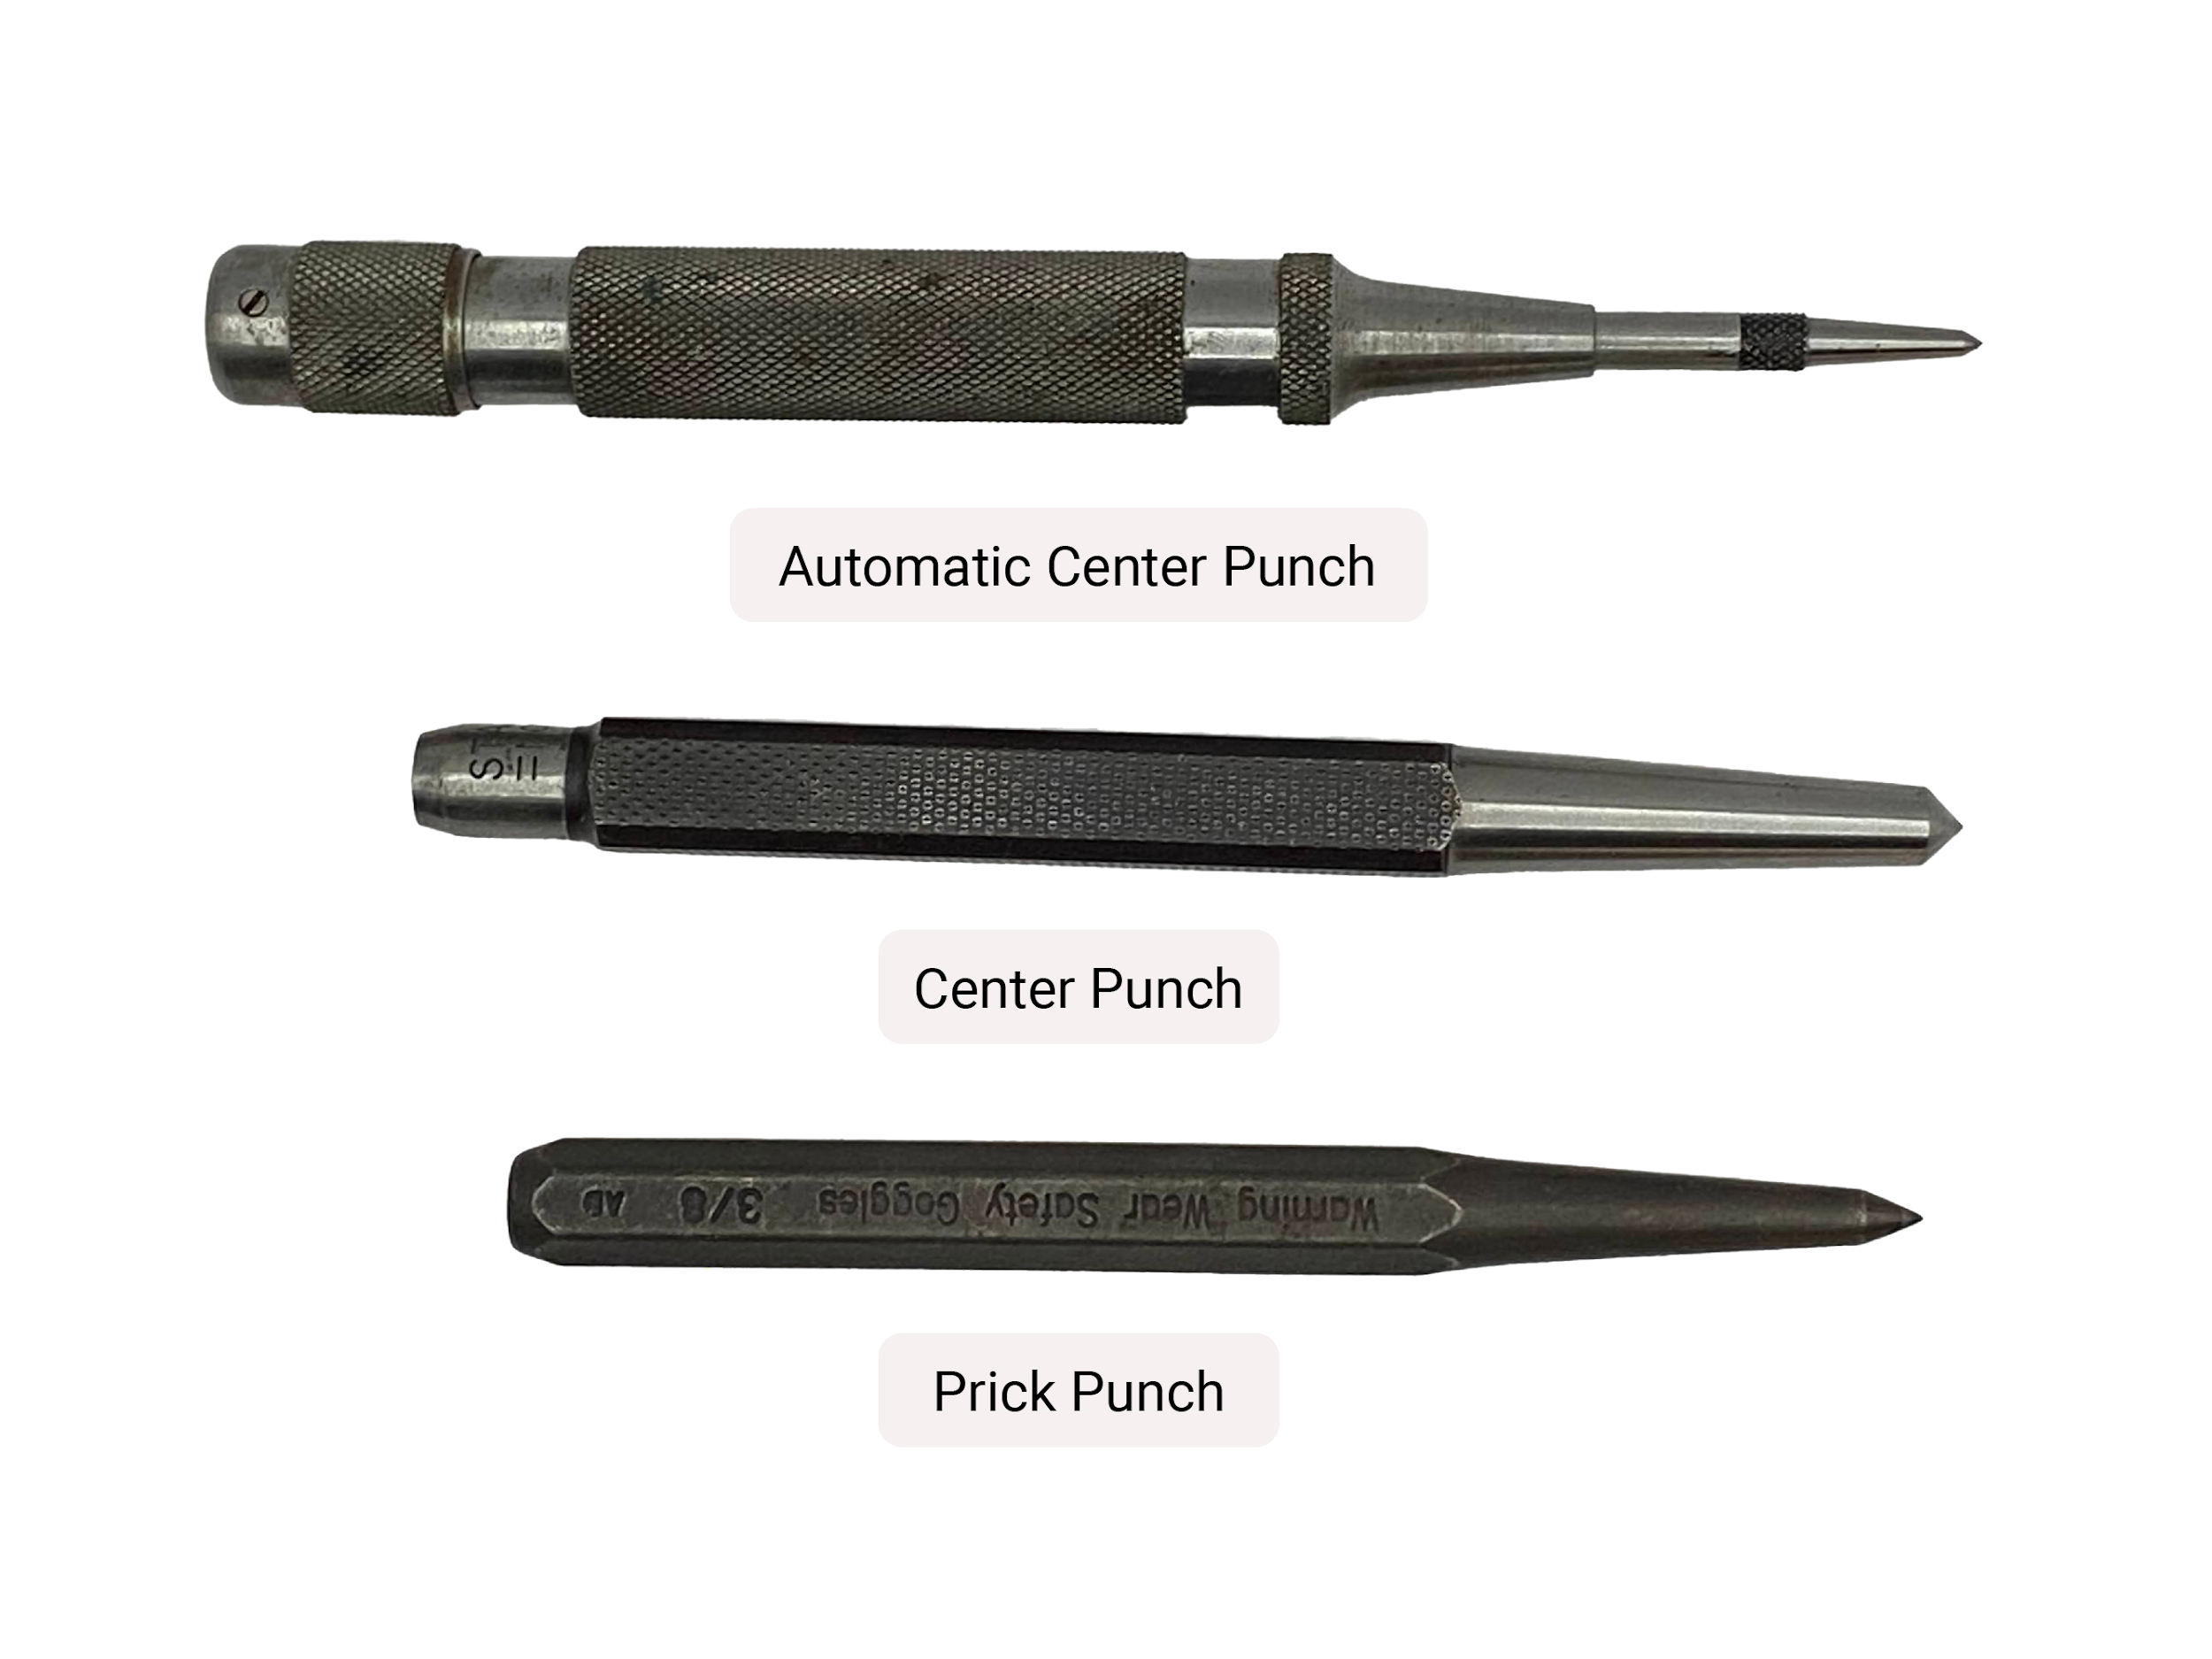
Point style punches are form tools with conical ends designed to be struck with a hammer, leaving a dimple on the stock material. The two general types of punches are center punches and prick punches. Both types of punches are similar, but they have different purposes, and a well prepared tool maker or fabricator will need a quality set of both. The material used for punches needs to be high carbon steel, which can maintain a ground tip durable enough to sustain repeated use without deforming yet a striking end annealed (softened) to withstand repeated hammer blows.
5.7.1 Punch Tips
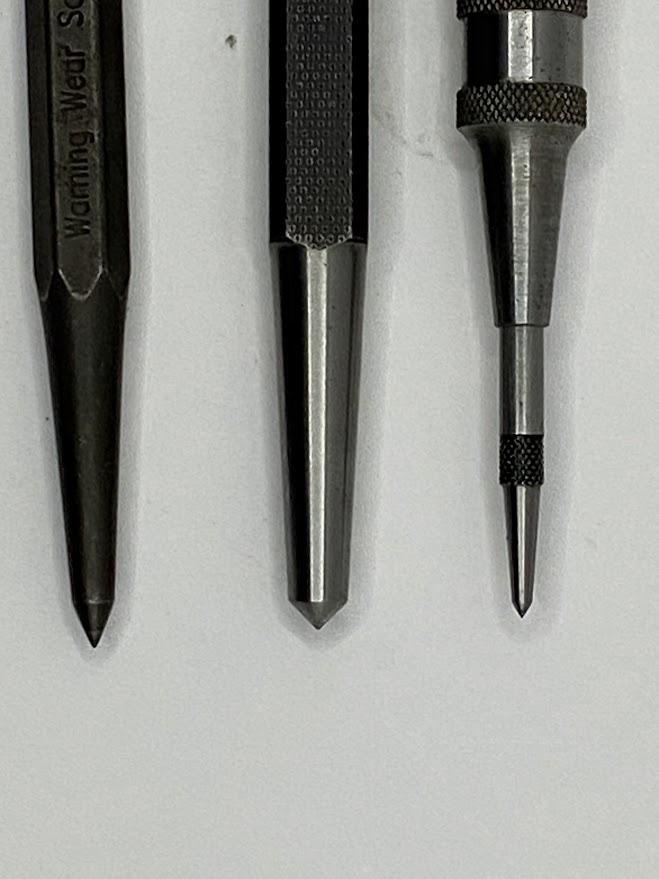
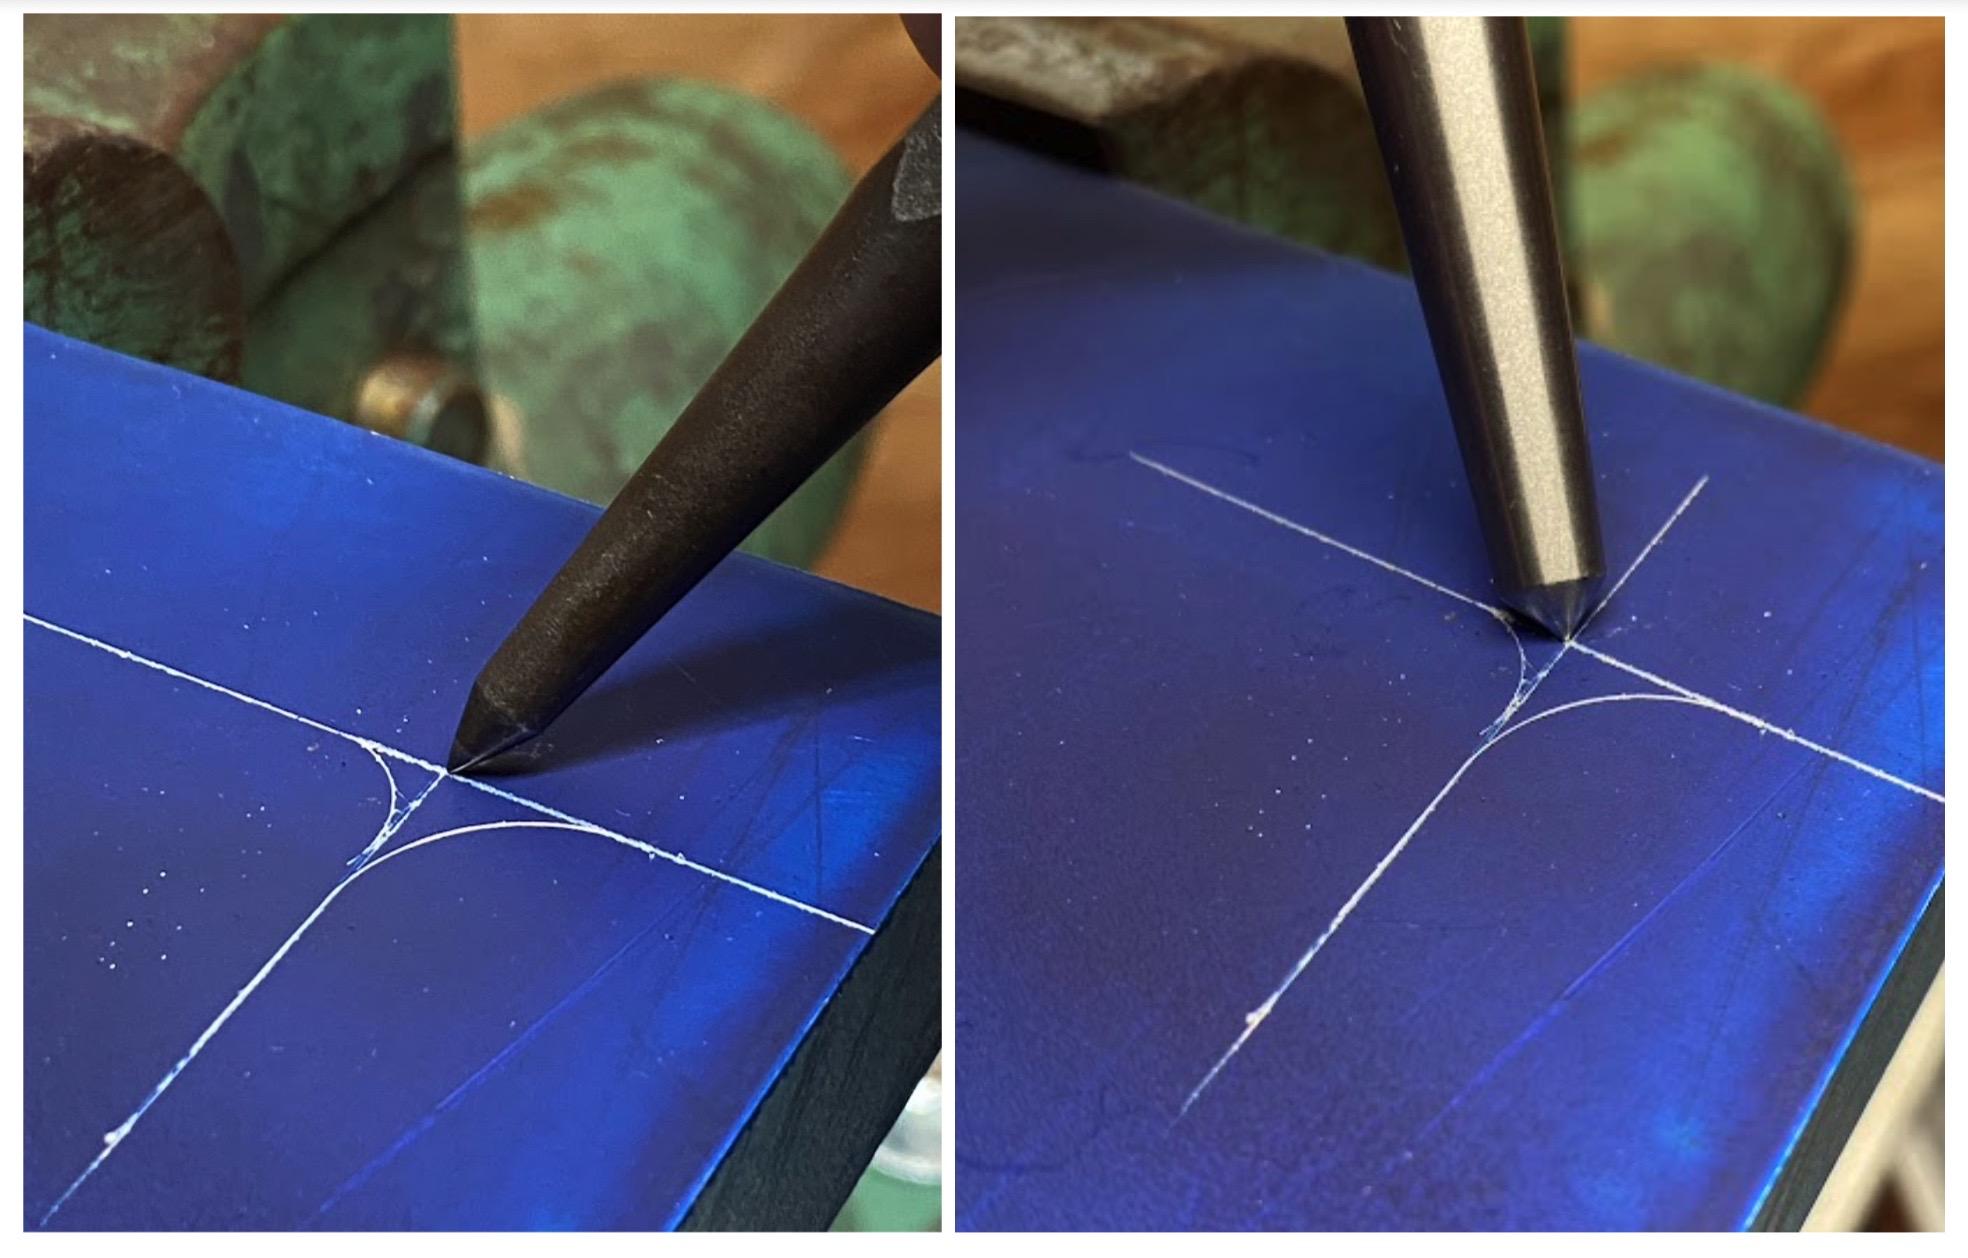
The above photo illustrates the tip grinding on both a prick punch and a center punch. The slender tip taper of the prick punch is designed to allow better visibility and more concentrated pressure when performing layout marking. Contrast the relative shallow taper of the center punch. This hearty tip is designed for creating a larger formed dimple, which will be used to locate a drill bit tip when performing drilling operations. The most common drill bit tip is 118 degree angle. This will aid in centering the drill bit in the center punch strike, preventing the drill from “walking” out of the center punch dimple.
AUTHOR’S TIP
The figure above illustrates the improved visibility of the prick punch (left) due to the relatively steep angle of the taper as compared to a center punch.
5.7.2 How to Center Punch
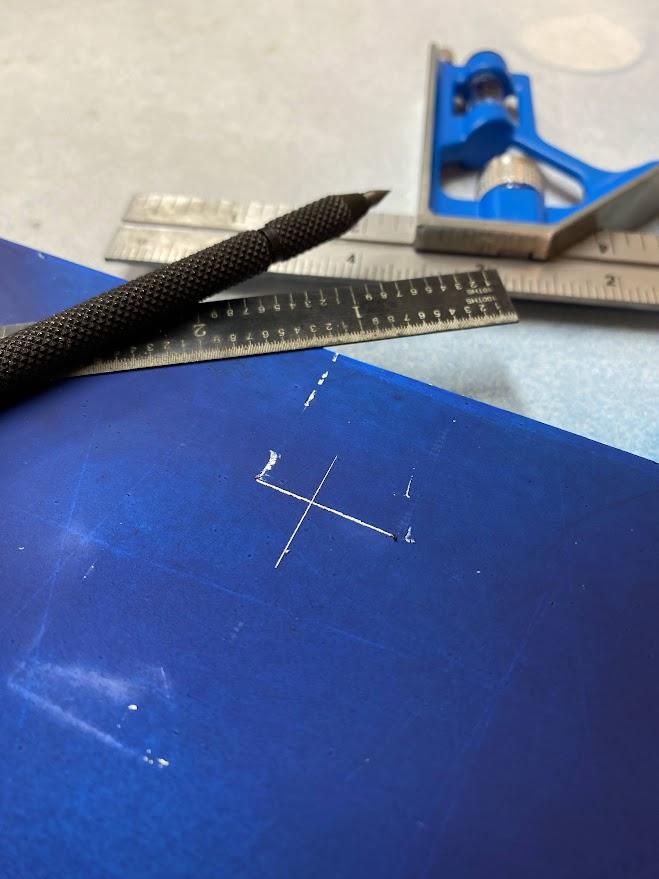
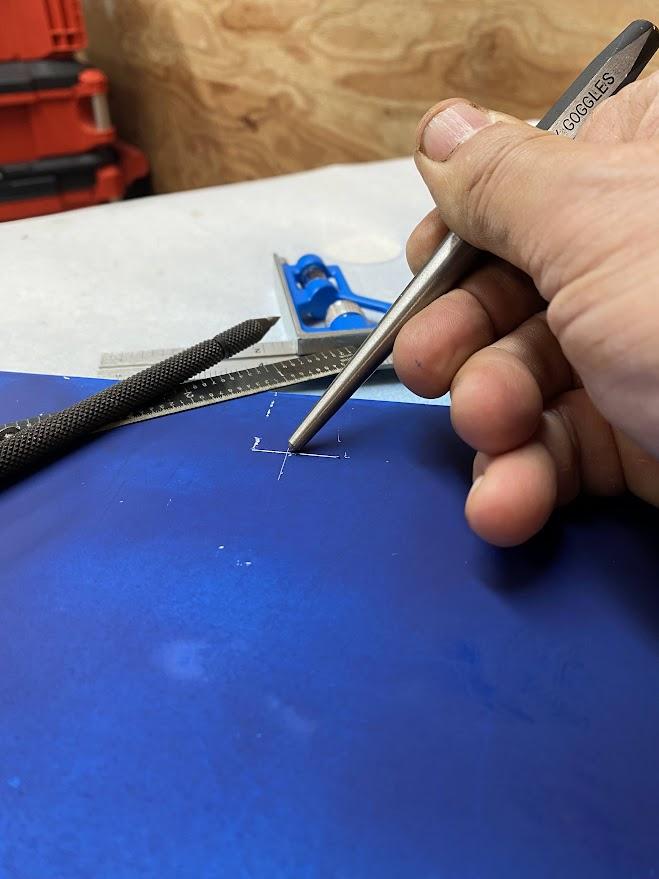
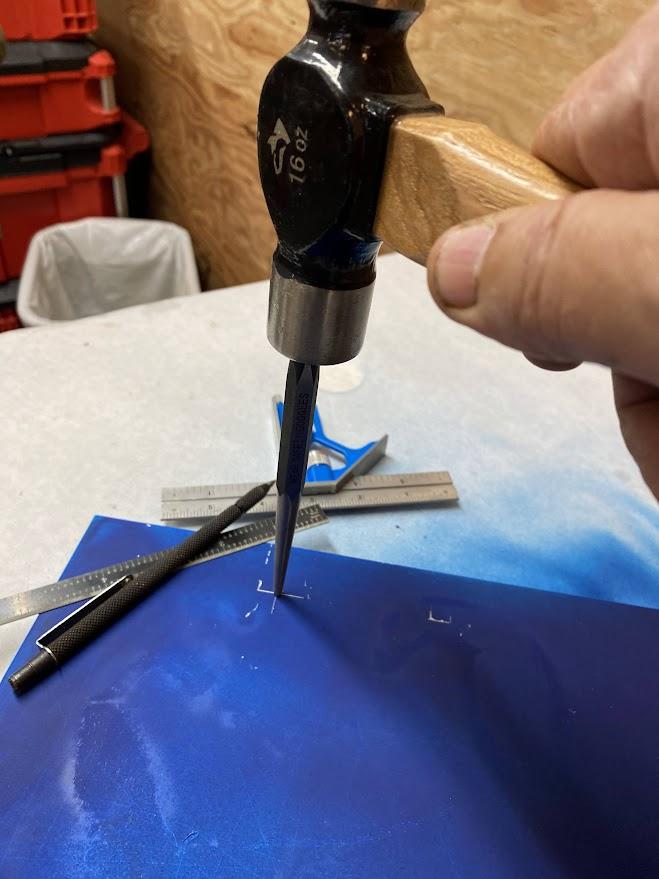
Placing an accurate punch mark with enough depth to align a setup tool point, such as a divider or trammel or for the tip of a drill bit, is an essential skill for a layout technician to perform. Below are steps for the proper application of a prick punch.
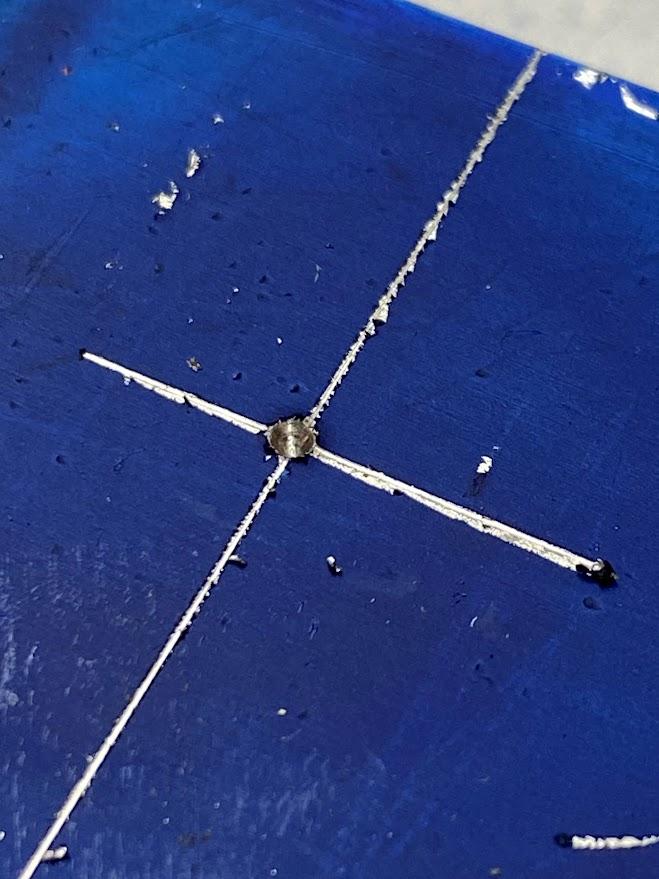
5.7.3 Automatic Center Punch
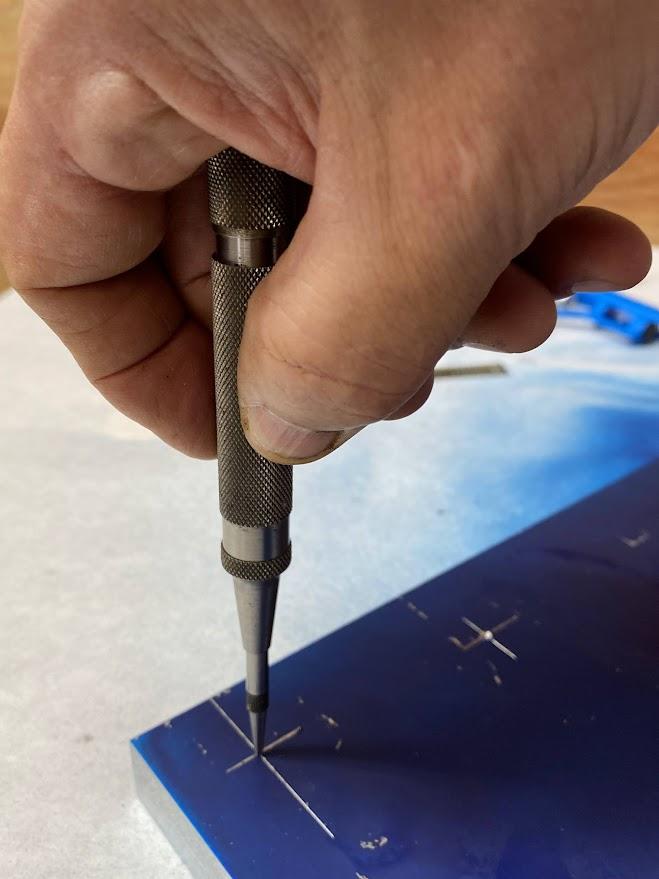
Automatic center punches are spring-loaded tools used to create center punch marks. When you press the handle of an automatic center punch, it compresses the spring inside. The spring stores energy and releases it as an impulse that drives the punch into the workpiece. The impulse is repeatable, so you can make uniform impressions. Some find this to be more accurate than hammer driven center punches due to the tendency to strike the punch “off center,” which causes the punch mark to be off location. Repeated strikes of the automatic center punch will create a larger mark. If necessary, a center punch can now be used to enlarge the strike mark with a lower likelihood of the tip departing from the mark site due to the well positioned automatic center punch mark.
5.8 Files
Files were invented to remove material during the manufacturing process. They are some of the first tools designed to perform this task, and the history of this tool is vast (McGeough & Hartenberg, 2023). Technology has almost eliminated hand files from the manufacturing process with the evolution of more sophisticated cutting tools. However, when performing benchwork, we do not use complicated tooling, so the file finds a nice home here.
Files take a back seat to saws when it comes to material removal, but a saw can not remove material very close to a layout line. This is when we reach for a file. Files are tools made from hardened steel with small cutting edges designed to remove material in small slivers called filings.
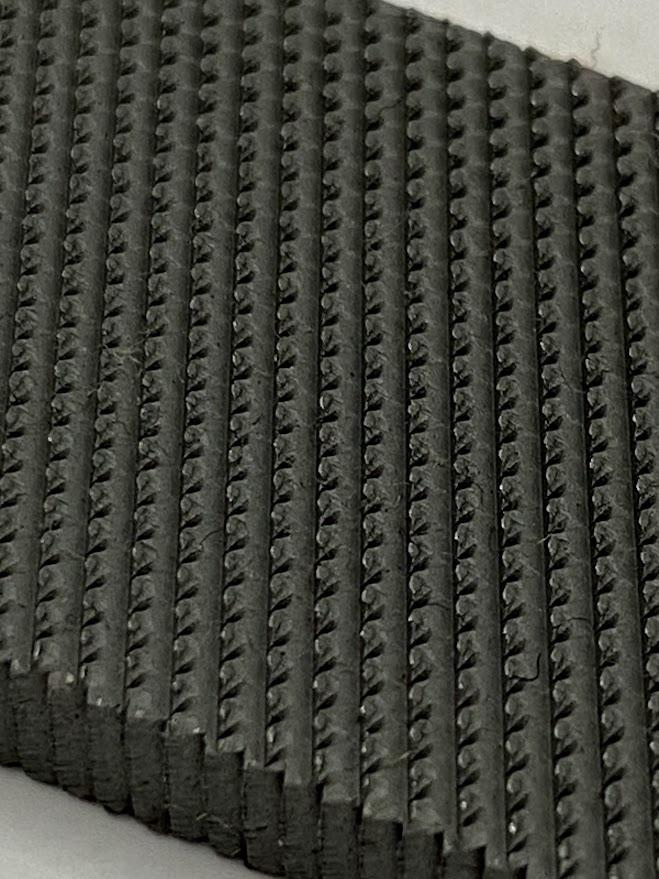
As with all machining processes, there are roughing and finishing operations. Filing is no different, there are rough cutting files with aggressive teeth designed to remove as much material as possible per stroke. And there are files with smaller cutting edges to achieve an accurate and smooth cut.
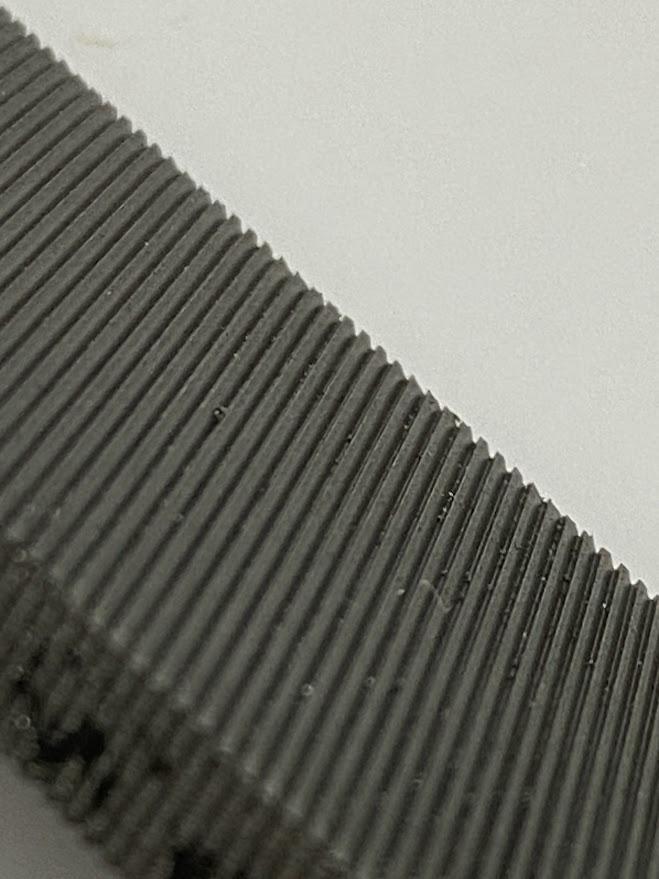
A simplified explanation of files categorizes them for roughing and finishing processes. The roughing type files are double cut, meaning the cutting edges are created by a criss cross pattern on the face of the file which creates a more aggressive pattern designed for maximum material removal and not for a smooth finish. A single cut file has a single row of cutting teeth much like a saw blade and they remove material in a less aggressive manner than the double cut files.
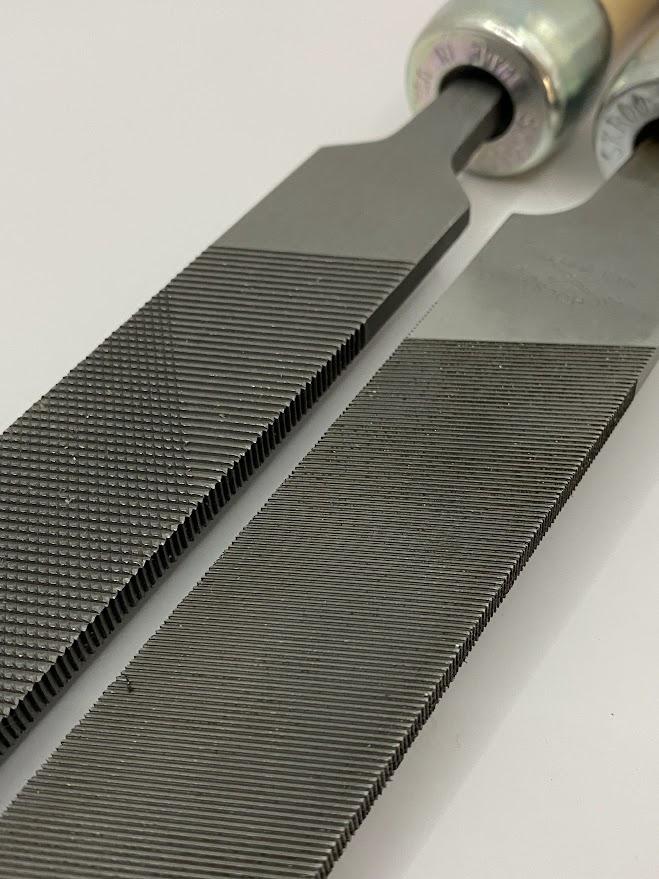
In the photo above the double cut edges on the left file are obvious next to a single cut file on the right. Having both of these files on hand is necessary for both aggressive material removal used in roughing actions and finer controlled material removal used in finish actions. The term “bastard” refers to the grade of cut. It is the most aggressive after smooth and second/medium cut grades. For general benchwork activities, bastard cut files work best, and they are the most popular cuts available.

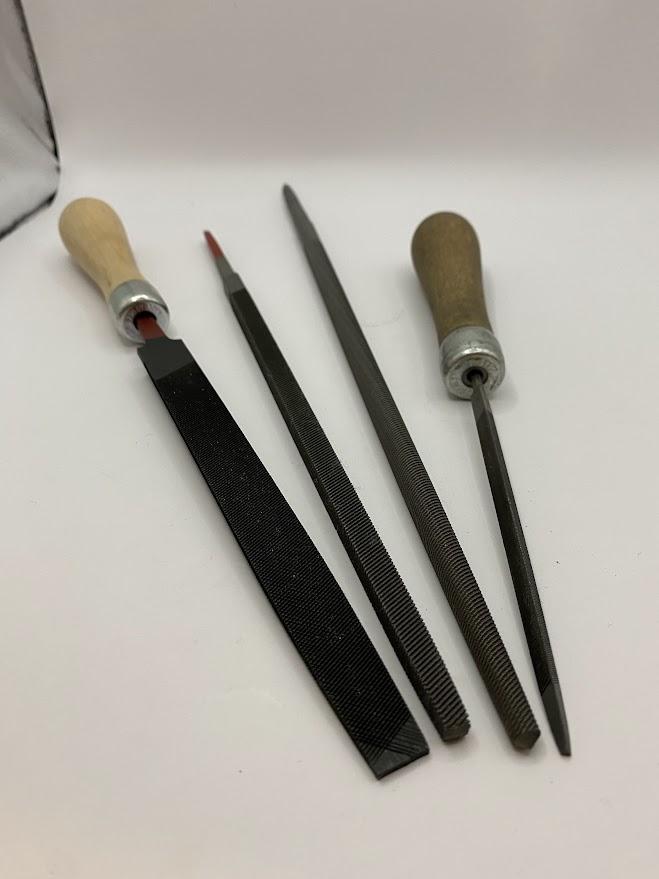
Files are one of the most versatile tools for cutting metal. This is due to their selection of cuts, shapes, and sizes. In the figure above, a small selection of files represents some of the shapes available. The flats on the left are common in 6-12” lengths in both single and double cut. The square file is nice for cutting features with square corners. The round file can cut radius features into parts, and finally, the triangle file. The triangle file is a must due to the 60° included angle, which can be used to repair external threads.
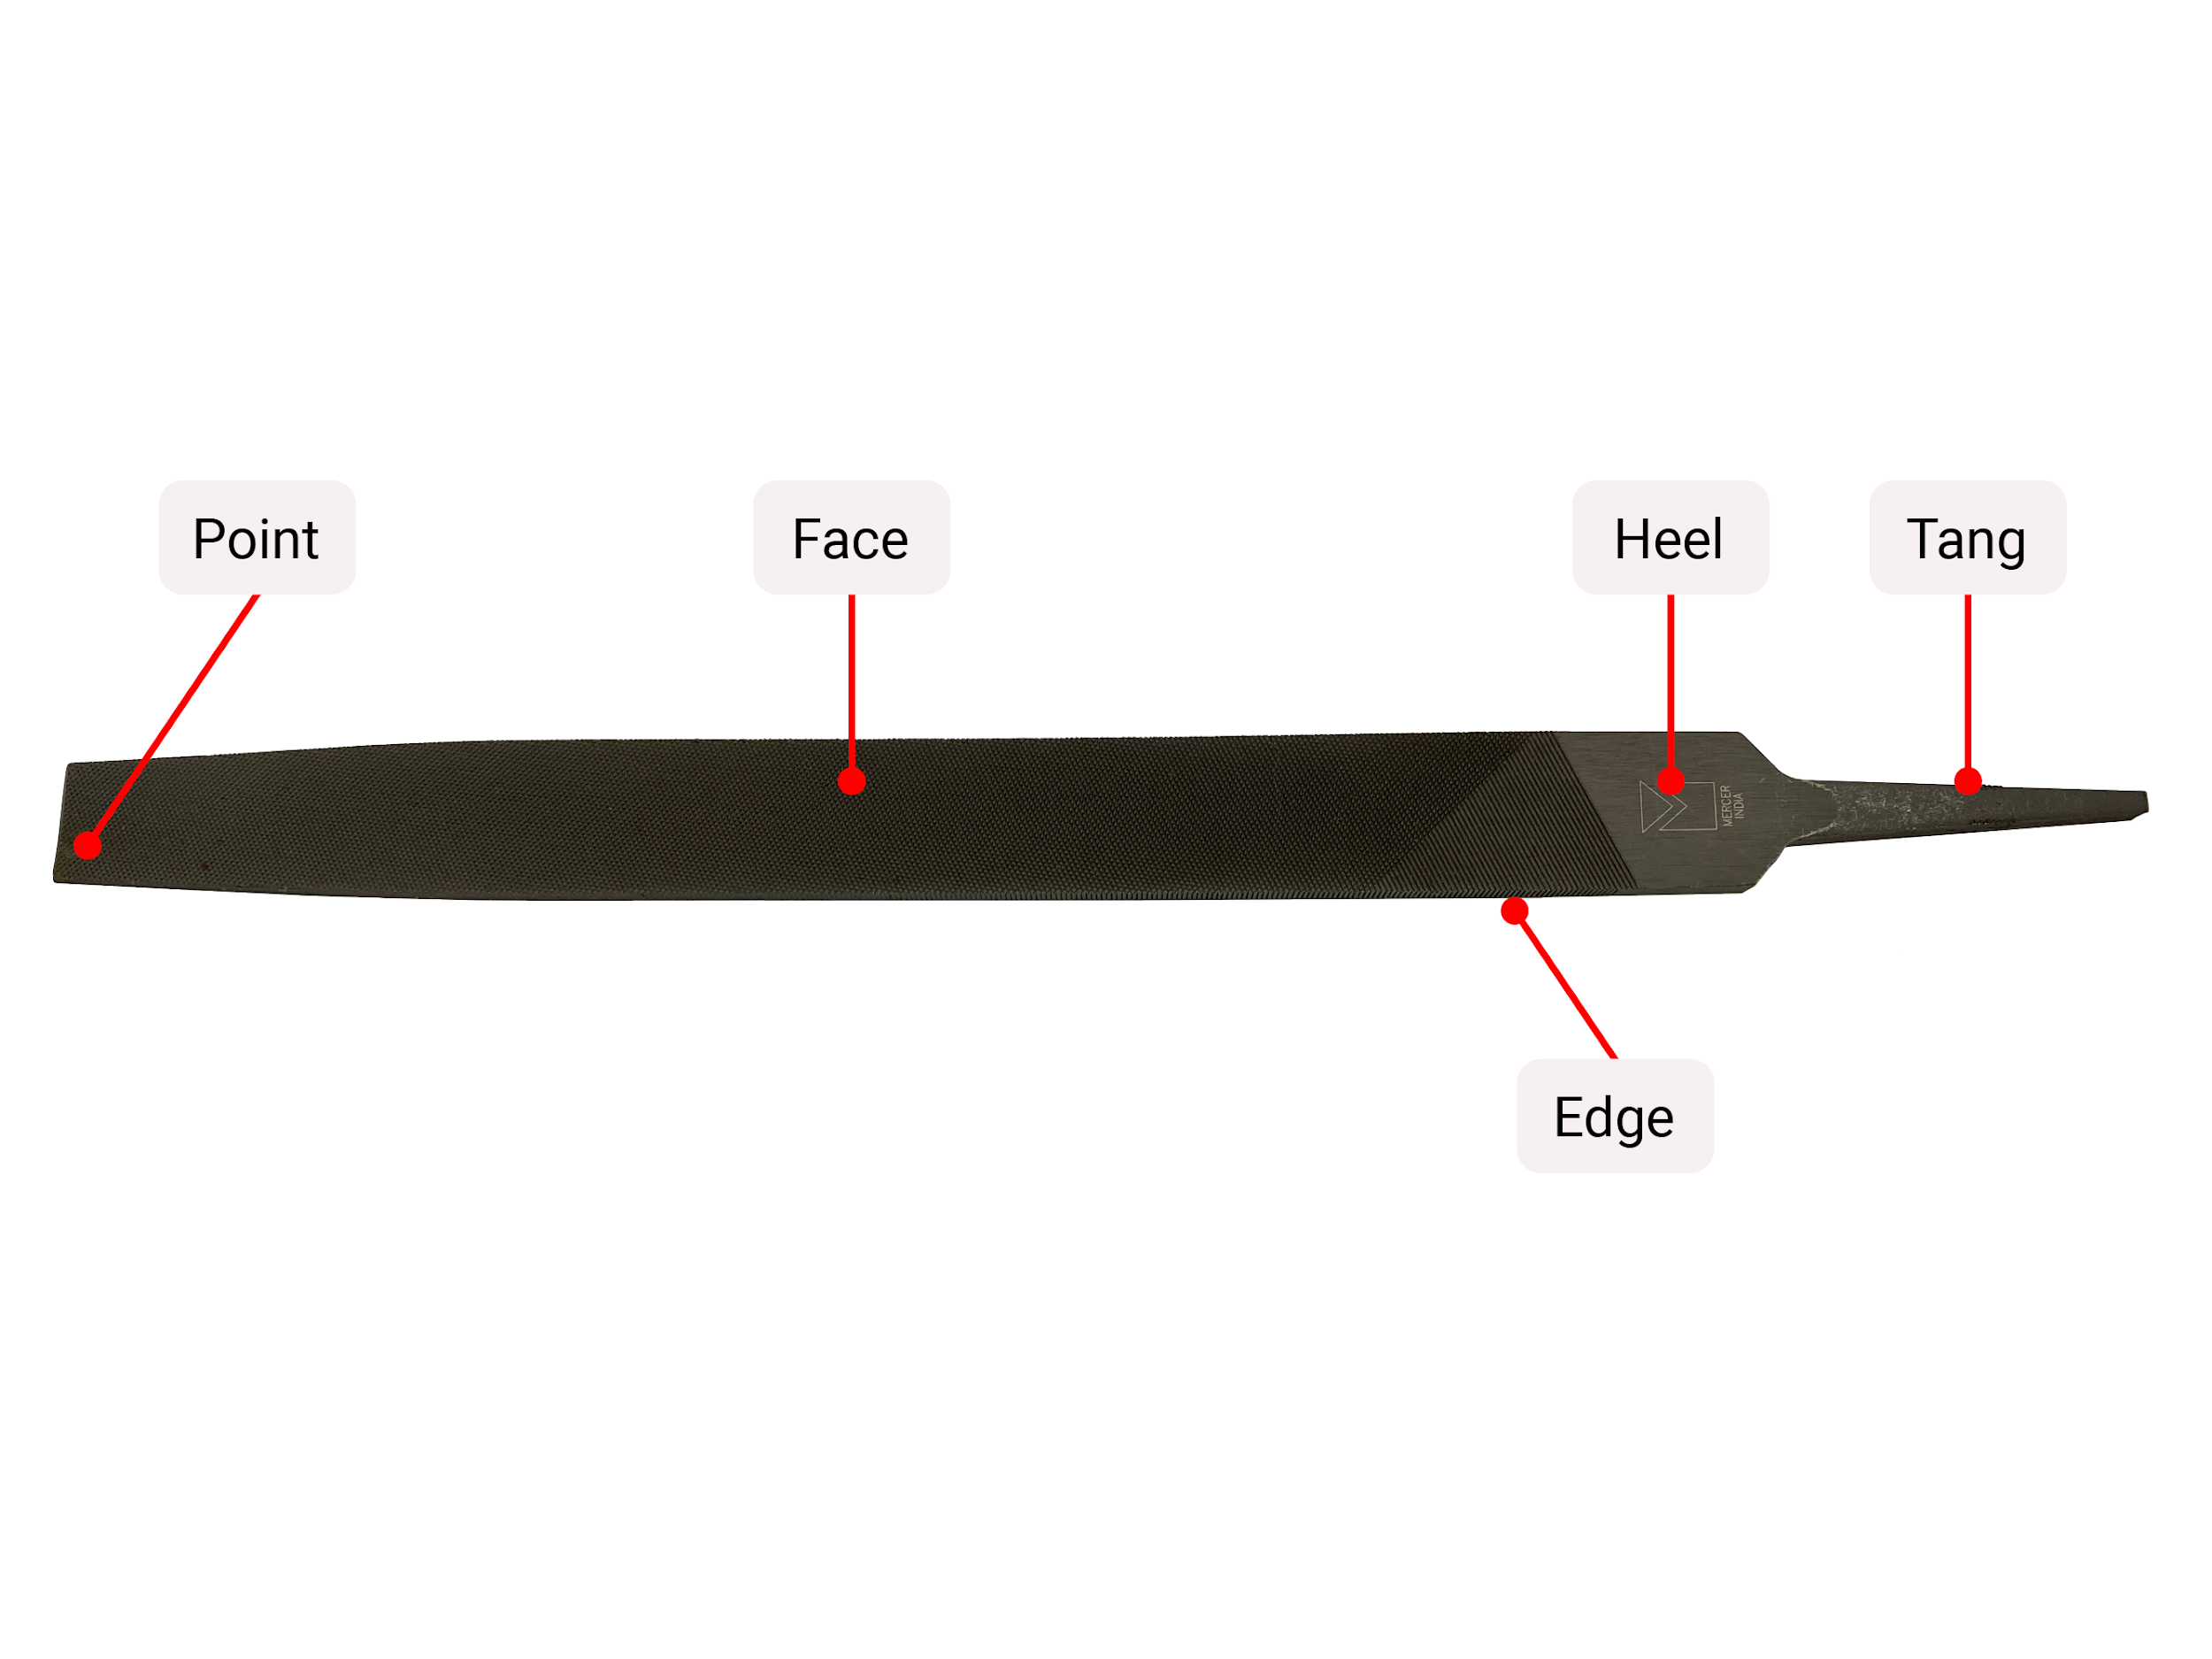
The figure above lists the parts of a file. The point is the far end, opposite the heel. The tang is an annealed portion of the file used to attach a handle. Annealing is a process used on hardened parts where the material is softened, in this case by allowing a handle to be threaded onto the tang. The face and edge of the file are where the cutting edges are, with the exception of files such as lathe files, which have safe edges with no cutting edges.
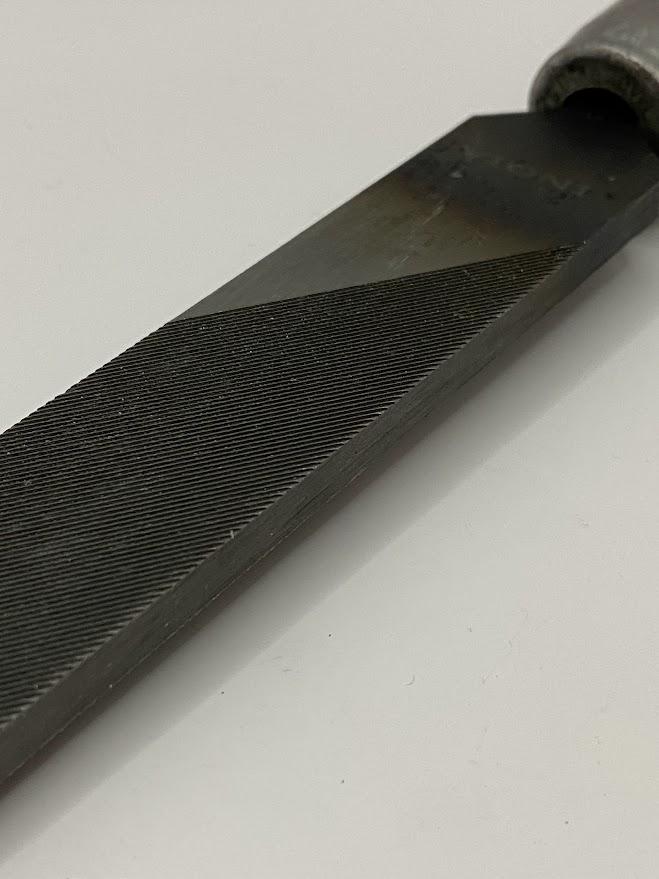
The figure above is an example of a lathe file with safe edges. The safe edge lacks cutting teeth and prevents damaging adjacent surfaces while filing. The lathe file also has longer and steeper cut edges, which is useful for finishing actions such as draw filing.
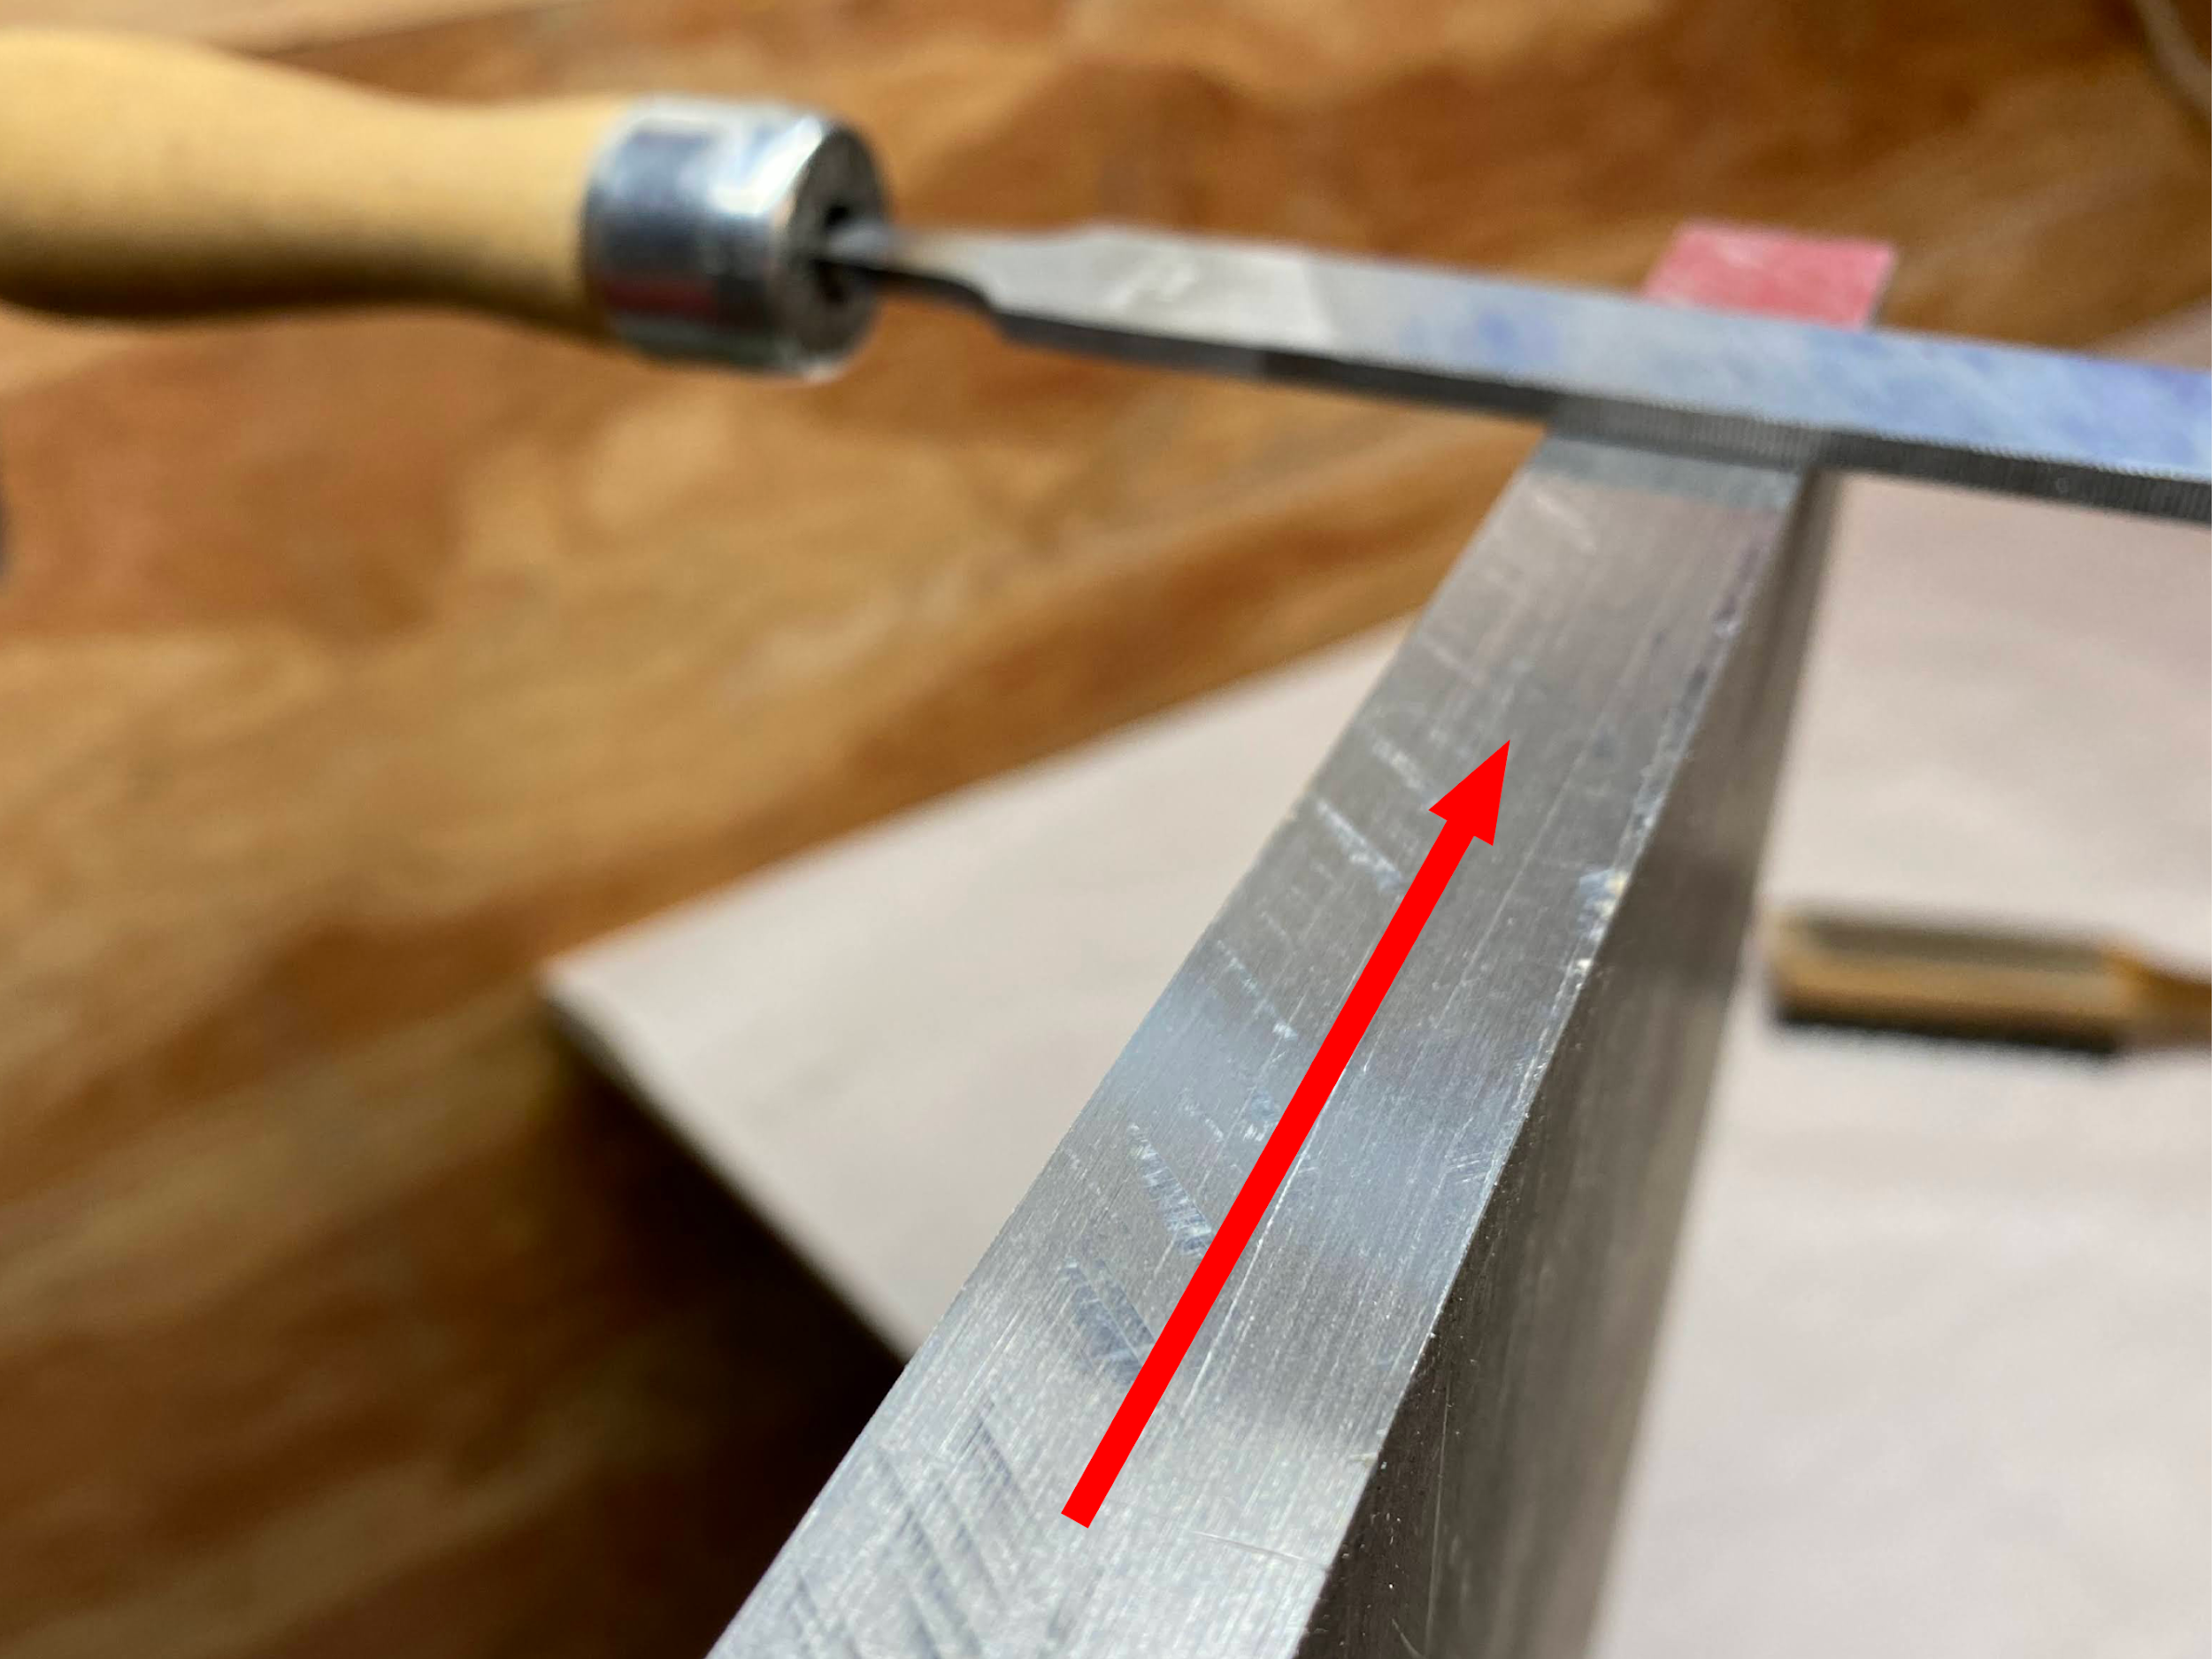
Draw filing is a fine finishing technique where the file is perpendicular to the surface being filed and the file is either pushed or pulled depending on which direction the cutting edges are facing. In the figure above, the handle is on the left, so the draw file is performed by pushing away. This provides an effective shearing motion, creating a very fine surface.
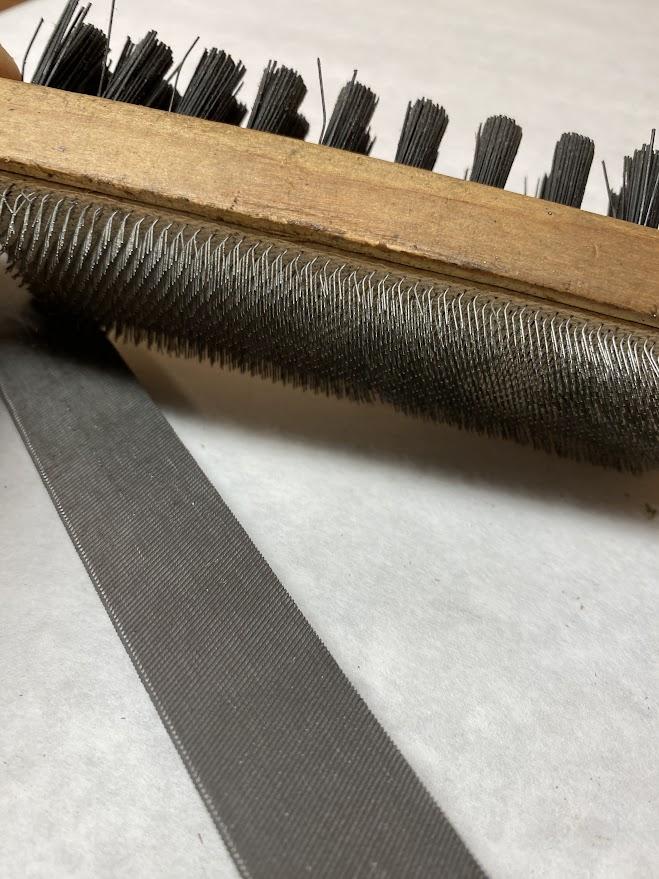
A file card is a brush designed to clean the cutting edges on files by brushing away filings. One side of the brush has nylon bristles for most uses, and the backside has metal teeth similar to those used in the carding process of processing cotton into threads.
A file card is used in conjunction with a file. The spaces between teeth, similar to hacksaw blades, fill with filings and can reduce the effectiveness of the file or damage the surface of the part. For this reason, clean the file often using the file card.
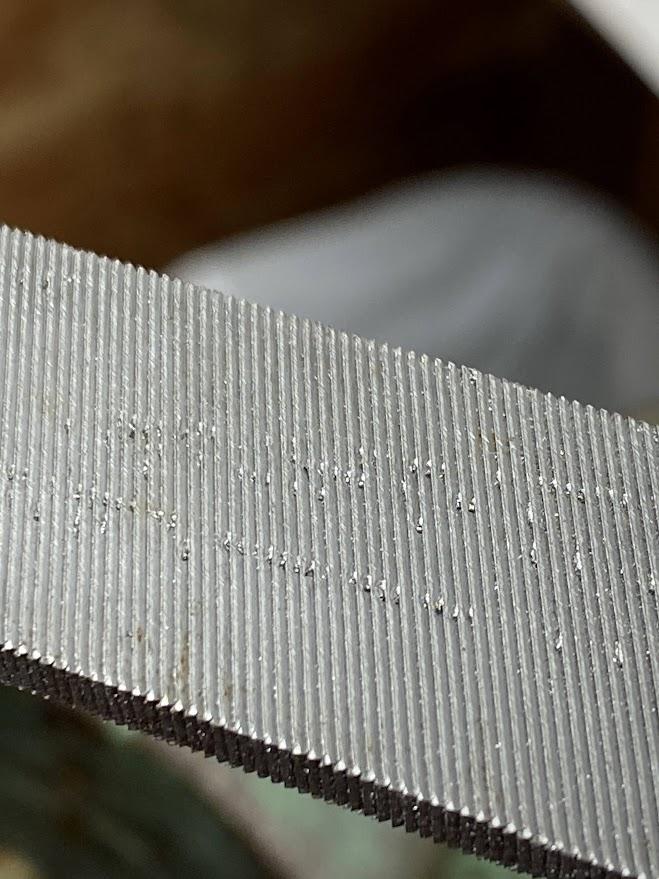
The cutting edges on a file extend from the heel to the point. When using a file, use the full length of the file when possible when performing long strokes. The cutting edges on a file are oriented toward the point meaning the teeth only cut on the forward stroke of the file. Excessive pressure applied during the return stroke may damage the teeth. Similar to hacksaw blades, the filings created reside in the space between cutting edges and care must be taken to manage the volume of filings. This is done by using both sides of the file by rotating from one side to the other when the teeth get full and then stopping and brushing the filings from the teeth. Using this technique will aid in faster filings and reduce the chance of pinning the filings into the teeth. Pinning is a term referring to a situation when filings accumulate in enough volume as to weld themselves into the space between file teeth. Pinning requires the use of a pick to pry the material loose.
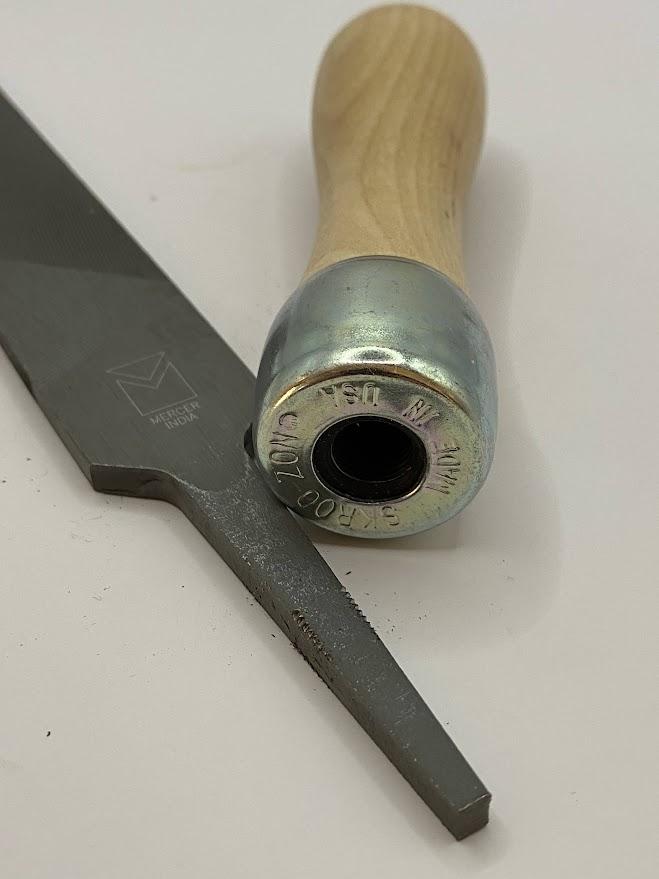
The tang on a file is the part designed for attaching a handle. Failing to use a handle on a file can cause personal injury. The file is hardened tool steel; however, the tang has been softened through annealing to allow the handle to thread onto the tang (figure above).
5.9 Tap and Dies
5.9.1 Tapping Threads
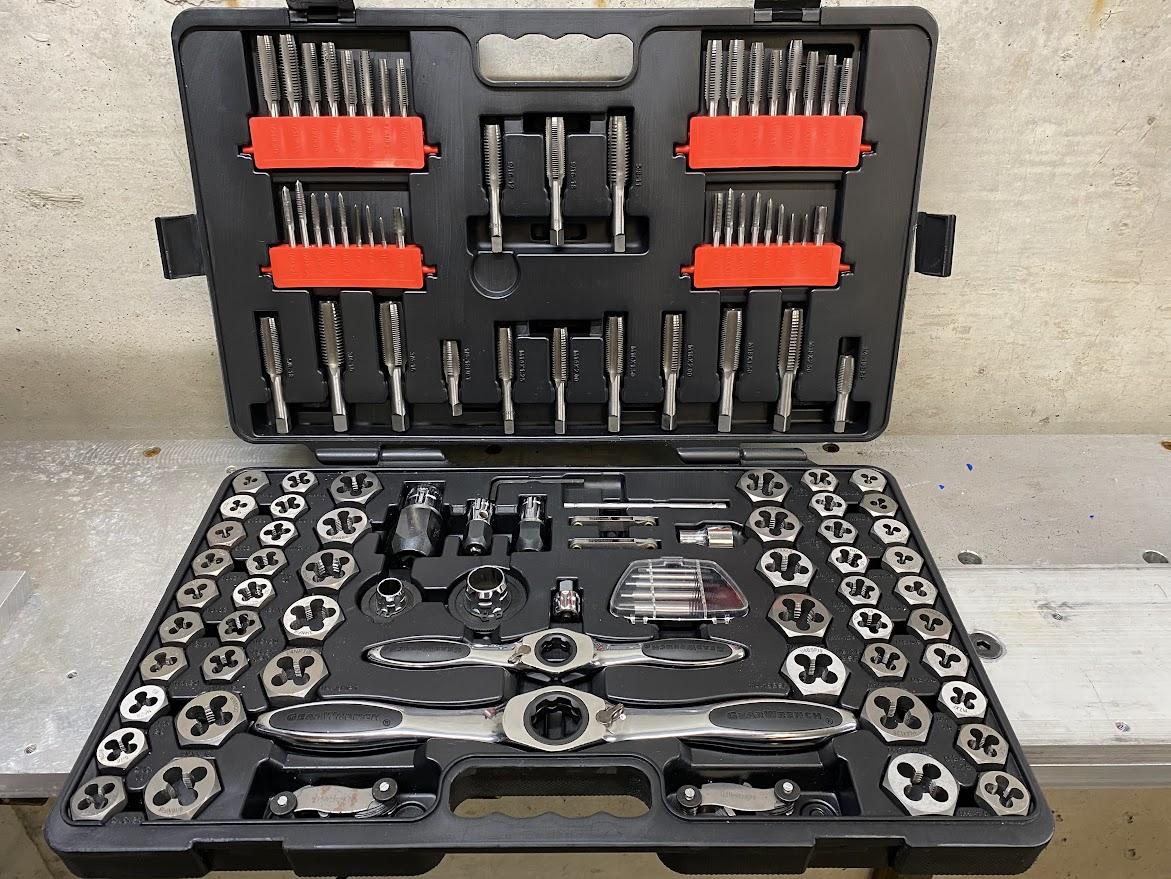
Cutting threads by hand is considered benchwork because it can be performed without machines. With the use of a hand drill to create the correct size hole, a machinist can create threads in many different materials which will allow the use of fasteners for creating assemblies or transfer motion.
The action of creating internal threads in a drilled hole is termed thread tapping. A thread tap is the tool used to create internal threads. The reason for this term is simple, the tool used to create the threads is called a tap. The term we use for performing this machine operation without the use of machines is referred to as hand tapping. The processes performed are the same as those used when tapping using a drill press, mill or lathe, but the machinist’s skill and technique determine how well this thread will perform. As an example, using a drill or mill to create a hole is rather simple because the work is held rigid in a vise, and the drill bit is just as rigid in the selected tool holding while the machine castings help in keeping both these systems perpendicular (at right angles) to each other which is essential to effective threads. Next, the force provided by machine equipment is substantially more than those on a hand drill, which is controlled by muscle control and visual alignment. And the third concern is keeping the drill bit in place until a hole start can be established which prevents the drill from wandering across the surface of the material.
To combat this disadvantage of hand tapping, we must employ solid technique (a way of doing something).
5.9.2 Layout and Punch
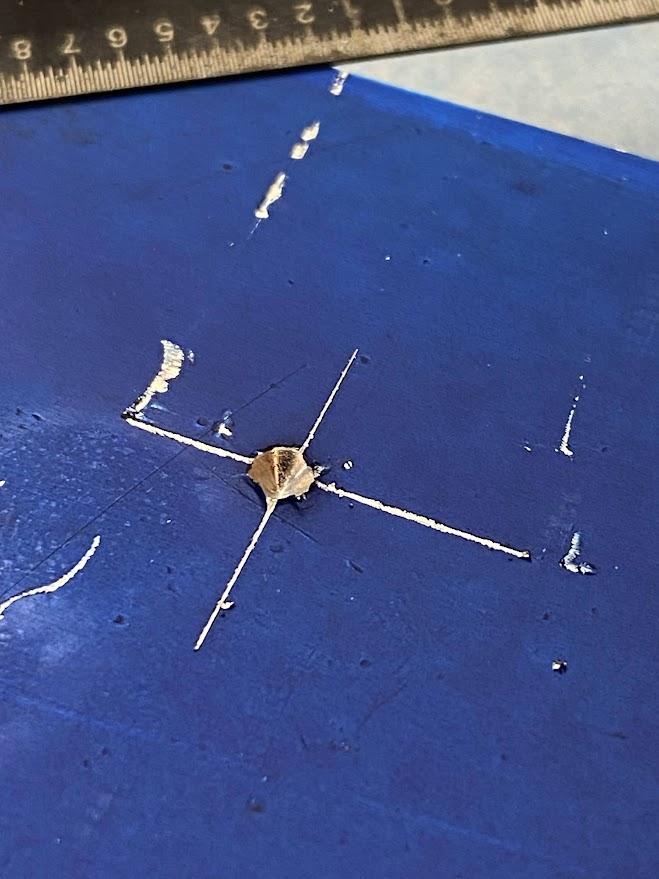
Hand tapping requires the use of layout lines to accurately position the hole since we do not have the scales of a machine’s control surfaces to guide us. To prevent the drill bit from wandering during the drilling operation, we must first center punch the location with a deep punch mark. This center punch mark will create a dimple in the work surface which the drill tip can locate and not spin off across the surface when turned.
5.9.3 Tap Drills
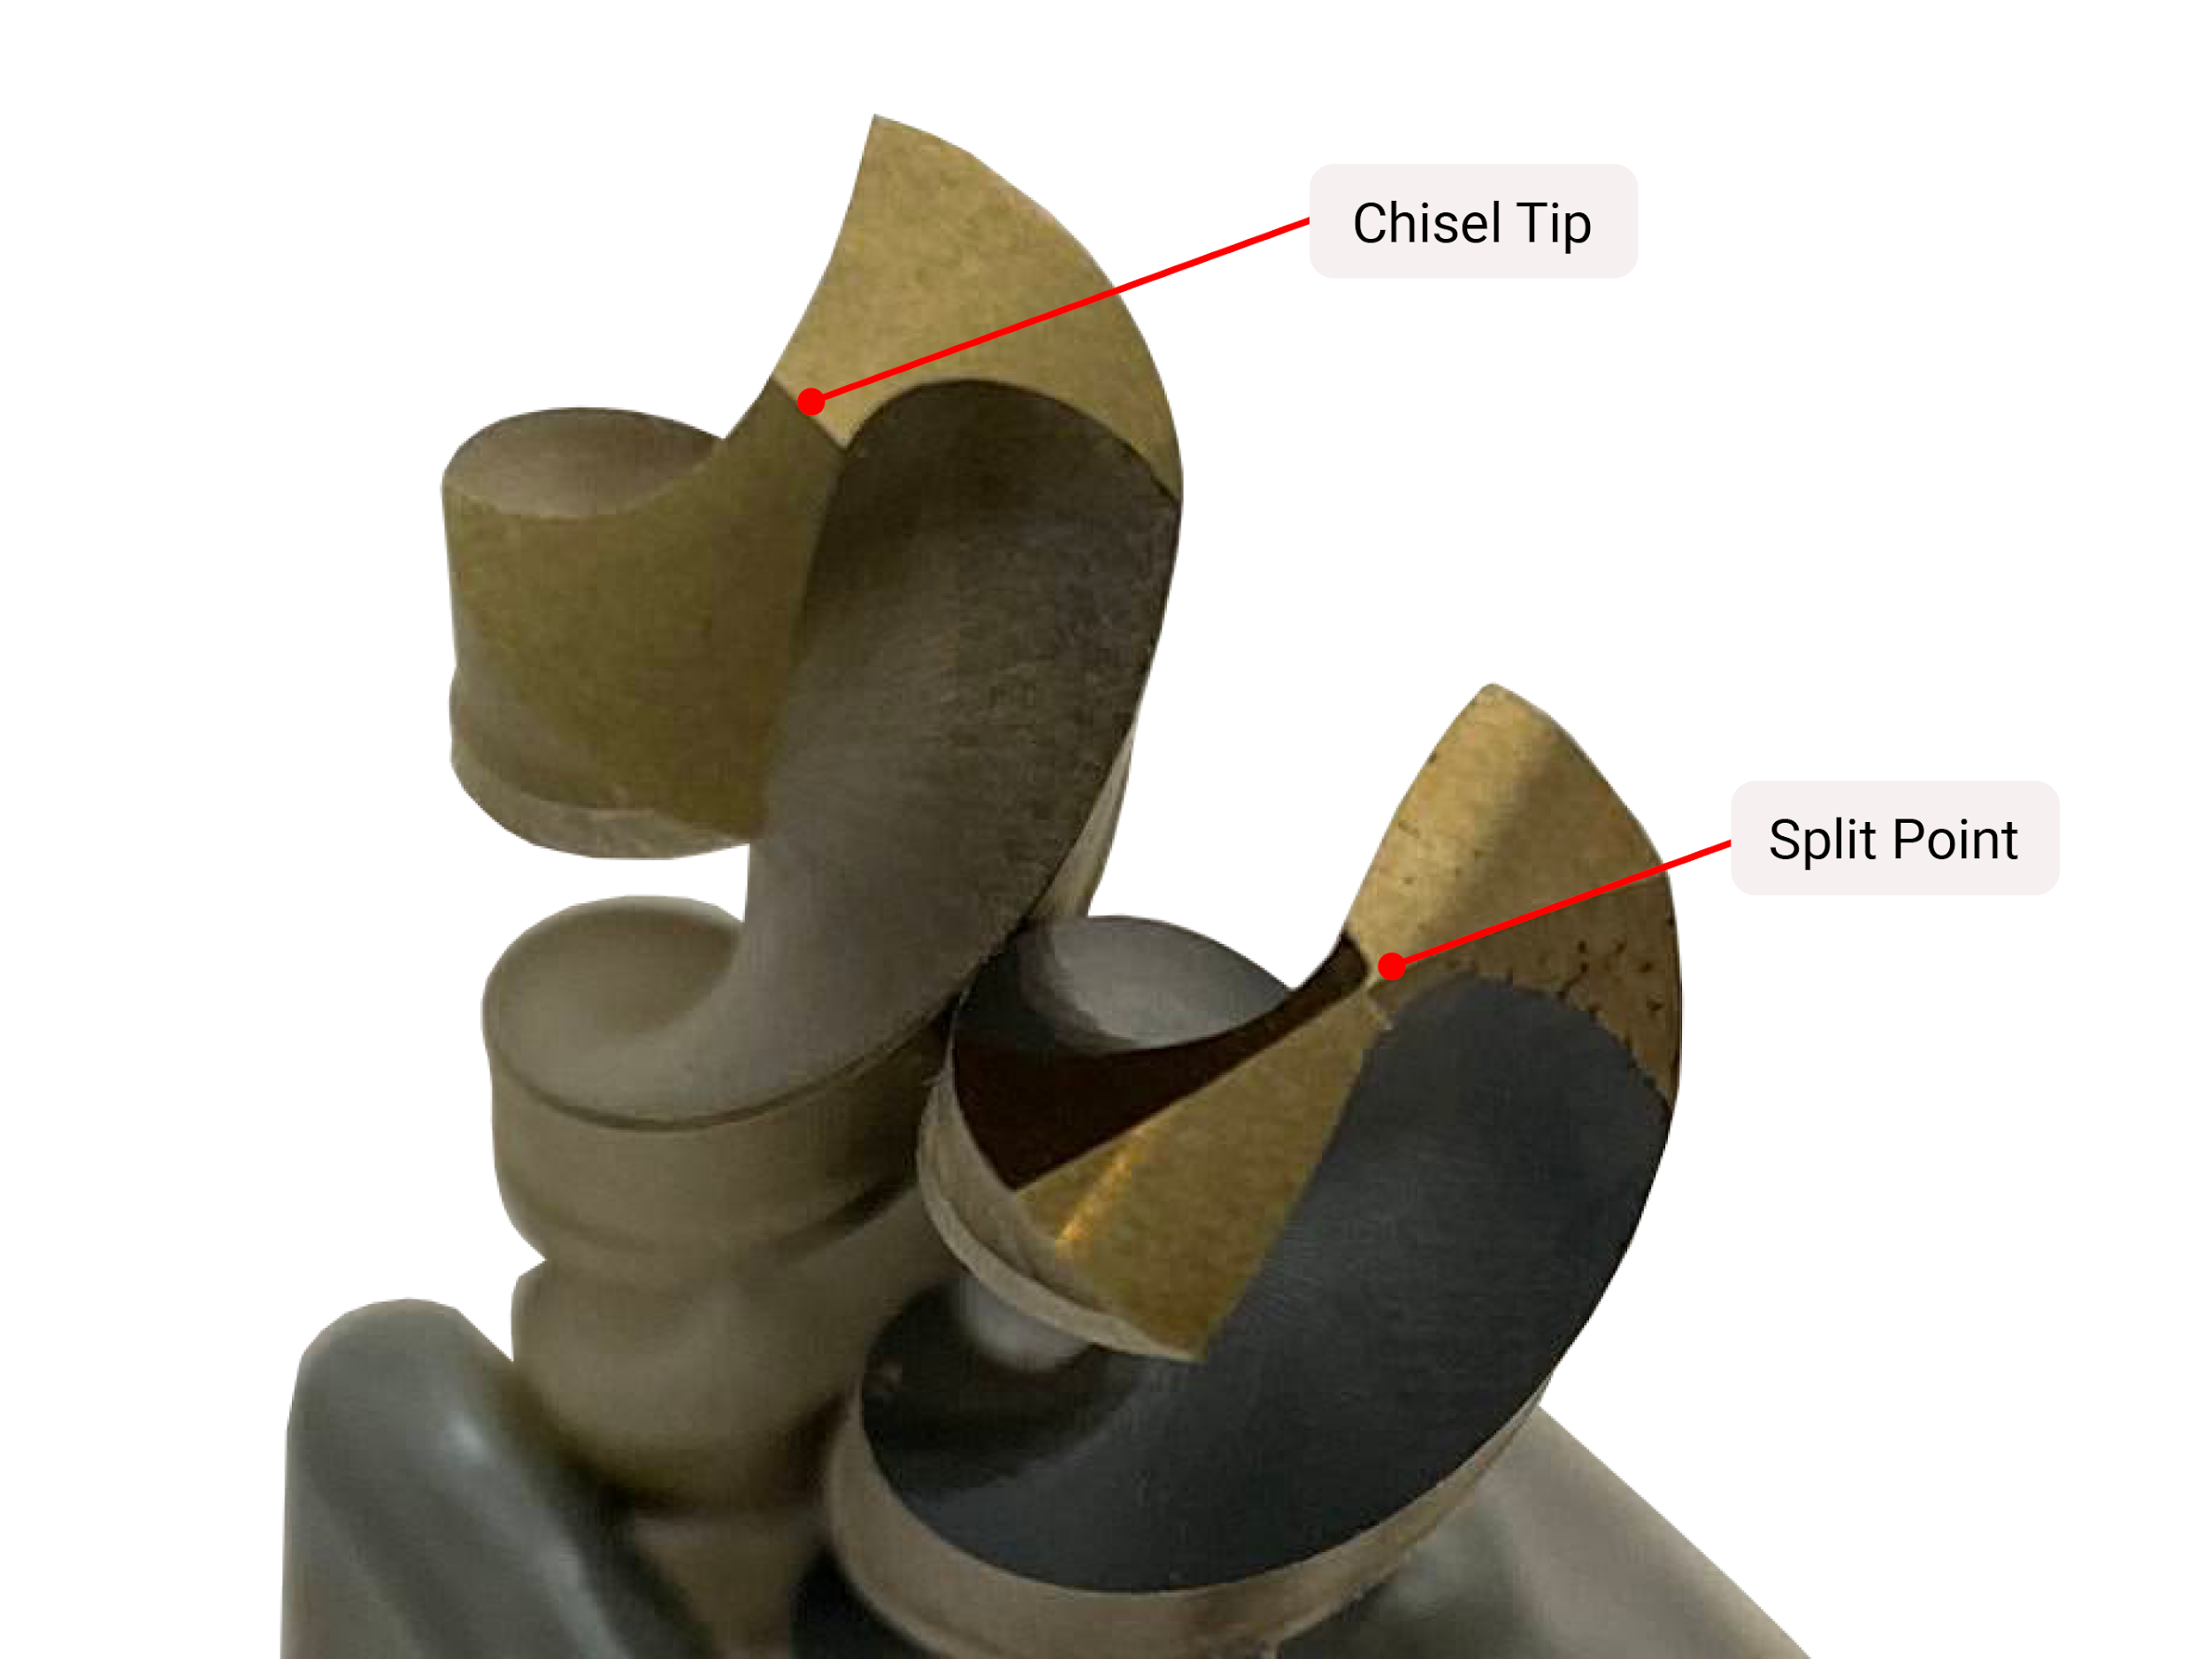
Next we need to select the correct drill bit tip which will also aid in restricting the wandering of the bit. The most common drill bit point illustrated on the left in the figure above is of a 118° drill bit. This drill bit is not desirable for this operation because of the tip formed on this drill profile where the web of the drill is ground into a chisel tip. On a chisel tip grind, the center does not make a chip but instead displaces material similar to that of a cold chisel (chisel used for metal).
What we need is the center cutting drill tip illustrated on the right example above. This 135° drill tip has a web thinning grind performed which means the cutting edges come all the way to the center of the drill bit forming a split tip. This feature is created by grinding on the back side of the cutting lips removing material to create the small exposed cutting edges. This is a center cutting drill tip, which will aid in preventing drill bit wander.
The proper size drill bit for a tap is referred to as a tap drill. To select a tap drill, the machinist can either utilize a tap drill chart or calculate the drill size yourself. This method is for 75% engagement cut threads only. 75% engagement threads refers to the allowance between the male threads of a bolt and female threads of a nut and is the most common for cut threads. Cut threads remove material by creating a chip. This is in contrast to form threading. Form threading does not cut the material but instead forms or pushes the material by exerting forces against the material. Form tapping uses different tap drills than cut threads and is beyond the scope of this text.
To calculate the tap drill needed for a thread, the pitch of the thread must be known. For inch threads, we utilize the TPI to find the thread pitch. The thread designation defines how many threads are in one inch, we need to know the distance between each thread. To find thread pitch, divide the one inch by the total amount of threads in that one inch. Once we have the pitch of the thread, subtract the pitch from the thread nominal size (¼”, 5/16”, ⅜”…) and this is the tap drill necessary for that given thread.
For a ½-13 UNC thread the 13 is the TPI and one inch divided by 13 is .0769”.
”).
The nominal size for a ½-13 UNC is ½”. So the equation is .5 – .0769 = .4231”. Referencing a drill index reveals a 27/64ths drill bit (.422”) is the correct tap drill for this thread.
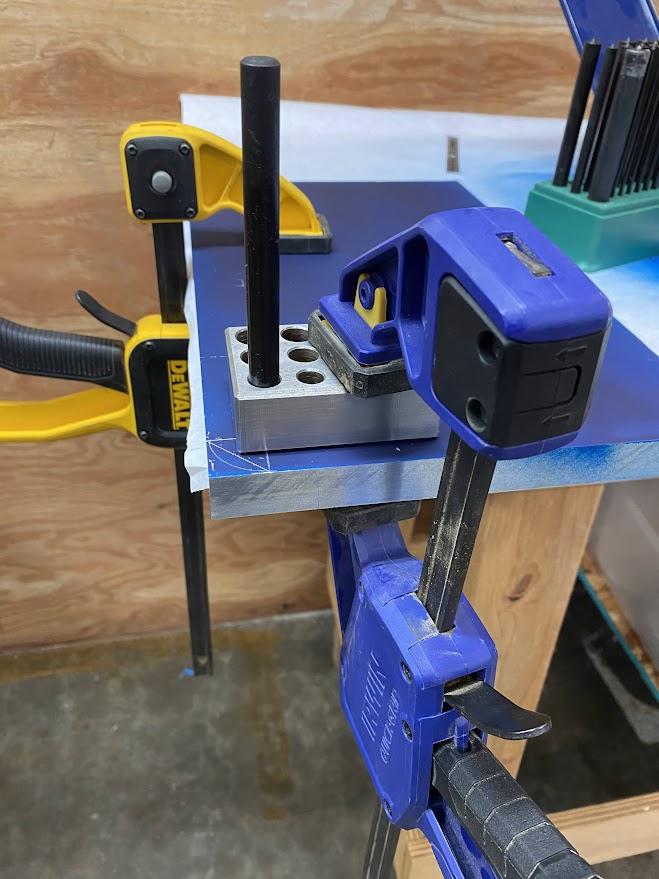
A set of transfer punches is useful for aligning the drill guide with the center punch mark created during layout. A drill guide is a tool that aligns the drill/tap perpendicular to the surface of the stock material. Transfer punches are a type of center punch used to transfer hole locations onto stock material for further operations. They come in a fractional set similar to drill bits. In the figure above, the center punch feature on the transfer punch is aligned with the layout center punch, and then a clamp is applied to the drill guide to maintain the aligned relationship.
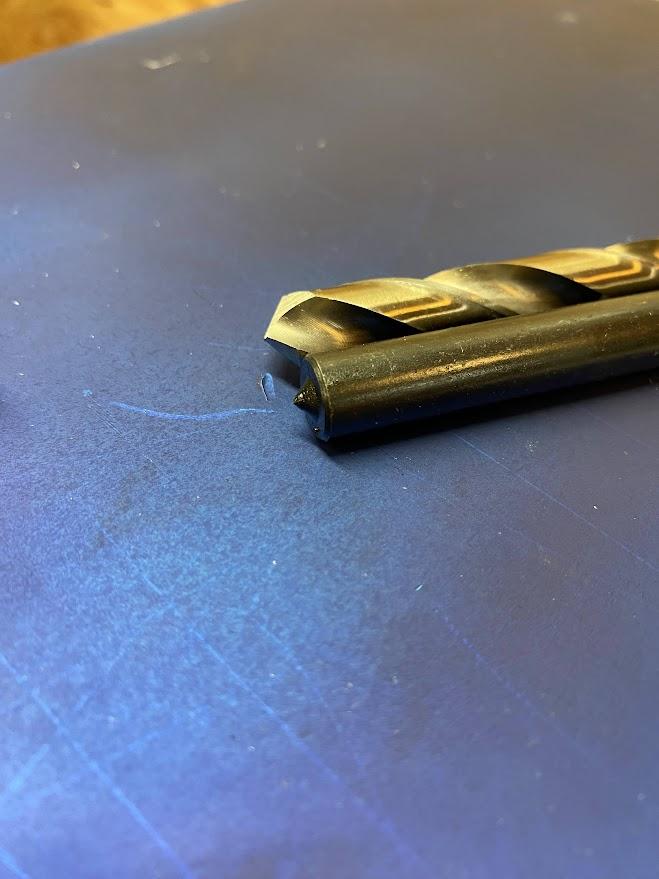
The figure above is a transfer punch next to the drill bit used for the hole. Notice the center punch feature on the end of the transfer punch. A transfer punch is a tool that is designed to be struck with a hammer and transfer the hole’s center point onto stock material, but here we are using it to align our tap and drill operation.
5.9.4 Tap Drilling Operation
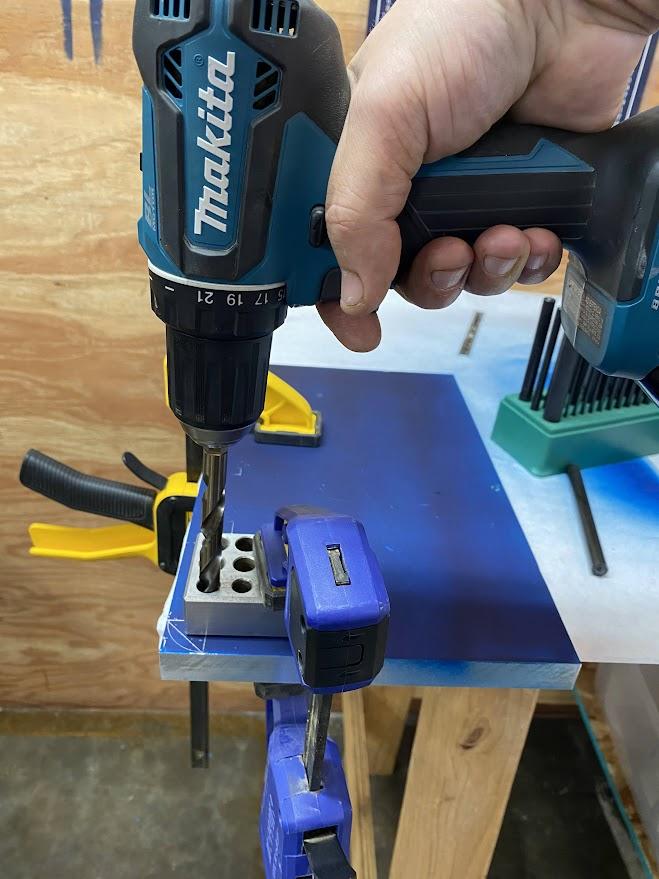
When you are finally ready to drill the hole, the drill bit must be held perpendicular to the work surface to ensure the hole will also be perpendicular. If the hole is drilled at an angle, the fastener screwed into the threads will not perform to the full strength of the threads or fastener because of this angle.
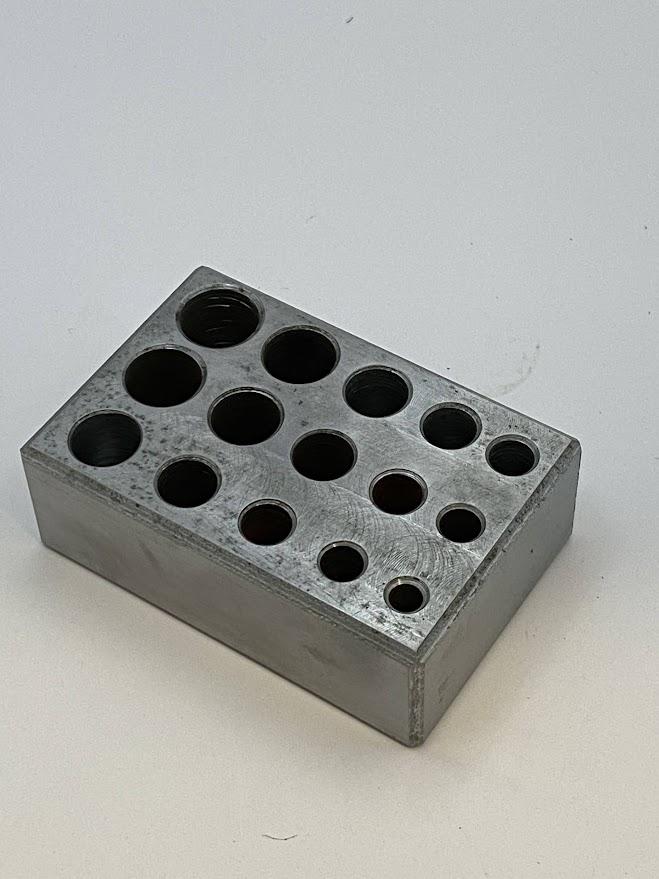
A drill guide block (figure above) is a tool with pre-sized holes that fit the drill bit diameter and is made from a material that can withstand the forces created when turning a drill bit. Clamping the drill guide to the work surface will aid in ensuring the block is not pushed around by the drilling process.
Add a bit of cutting fluid to the tip of the drill and apply enough pressure to the drill to produce a curled chip while drilling. If a chip does not form (resulting in slivers), first ensure the drill is set to the forward direction, then apply more force downward on the drill.
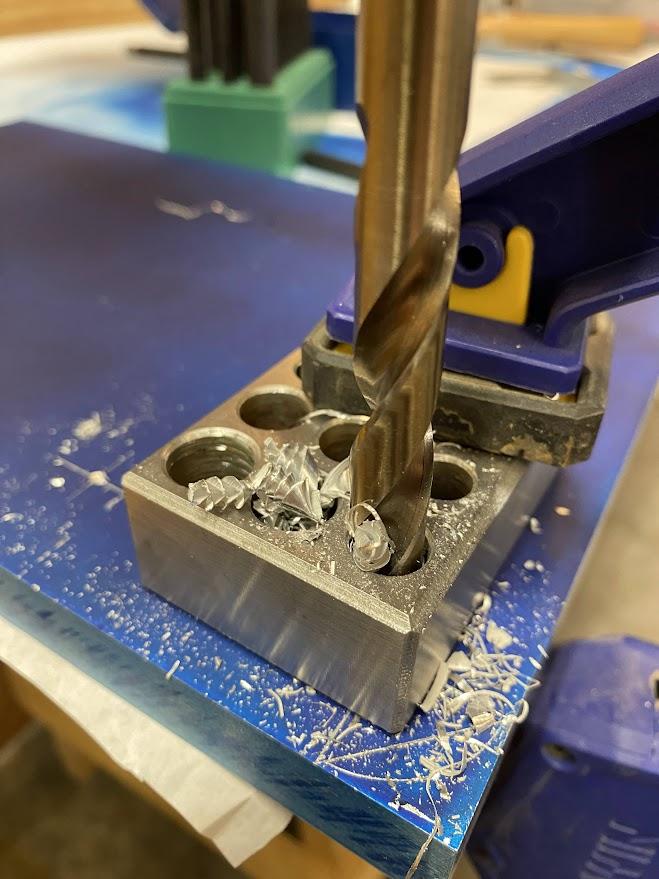
A lack of chip formation during drilling indicates not enough pressure or a dull drill bit. In the figure above, notice the long curly chips. This indicates the cutting edge is slicing the material correctly. Slivers or small flakes indicate improper chip formation, possibly due to a lack of downward pressure or a dull drill bit. If the drill tip is dull, replace it or sharpen the tip and proceed. When the drill tip approaches the other side of the material, it may tend to grab as the tip is pushed through. This can twist the drill body in your hand, causing injury, so reducing downward force at this point can help prevent this.
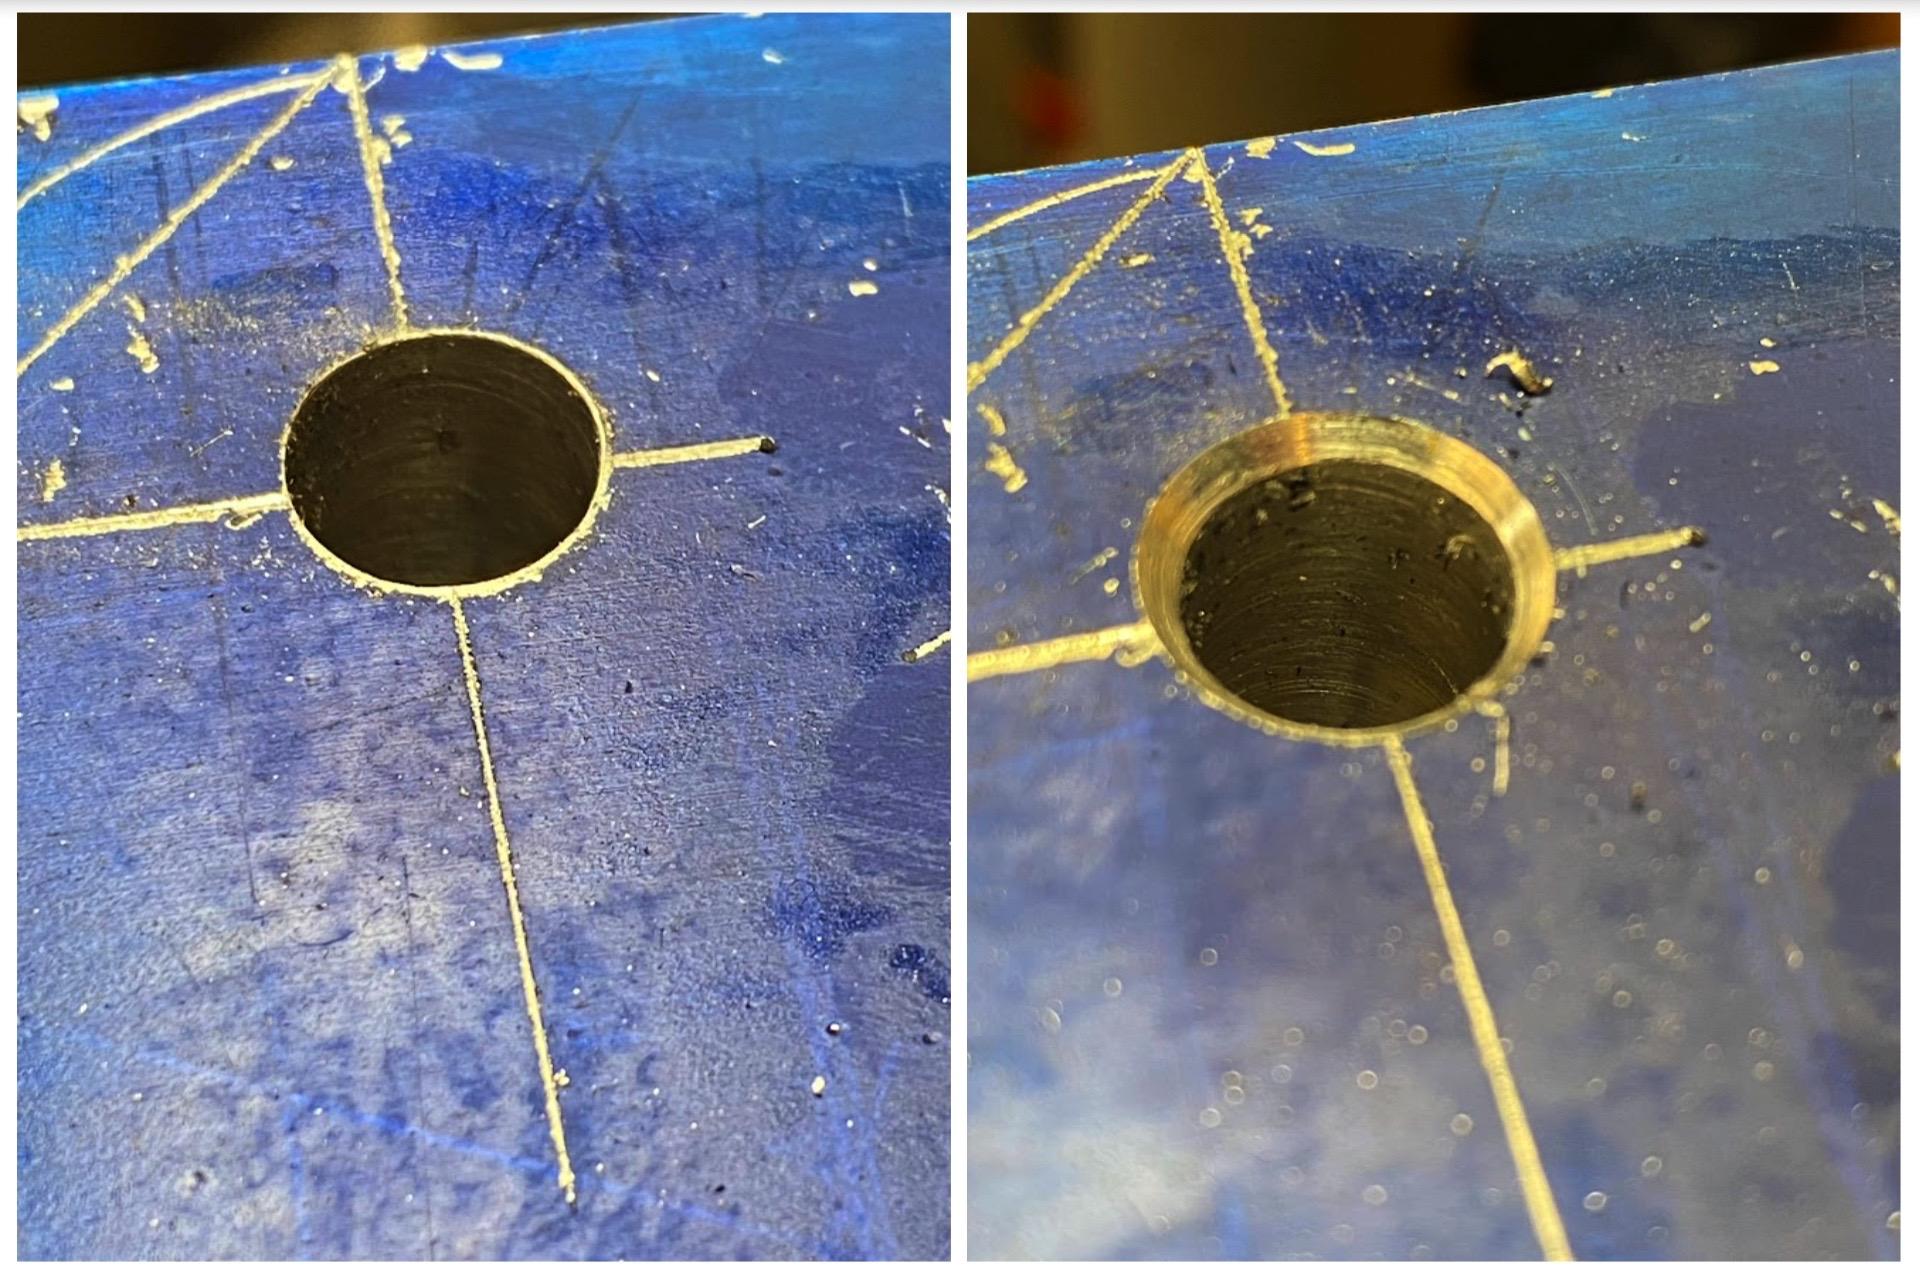
Once the tap drill hole has been created, the top of the hole needs to be chamfered to establish the profile of the first thread. Thread hole chamfering is the process of creating a taper on the top side of a tap drill hole to permit complete thread formation in this critical area. This is an important step, as the first thread is used to align the fastener threads to prevent cross threading. Cross threading is when a fastener’s threads do not follow the threads they are inserted into but rather cross over the existing threads, creating a situation that destroys both sets of threads.
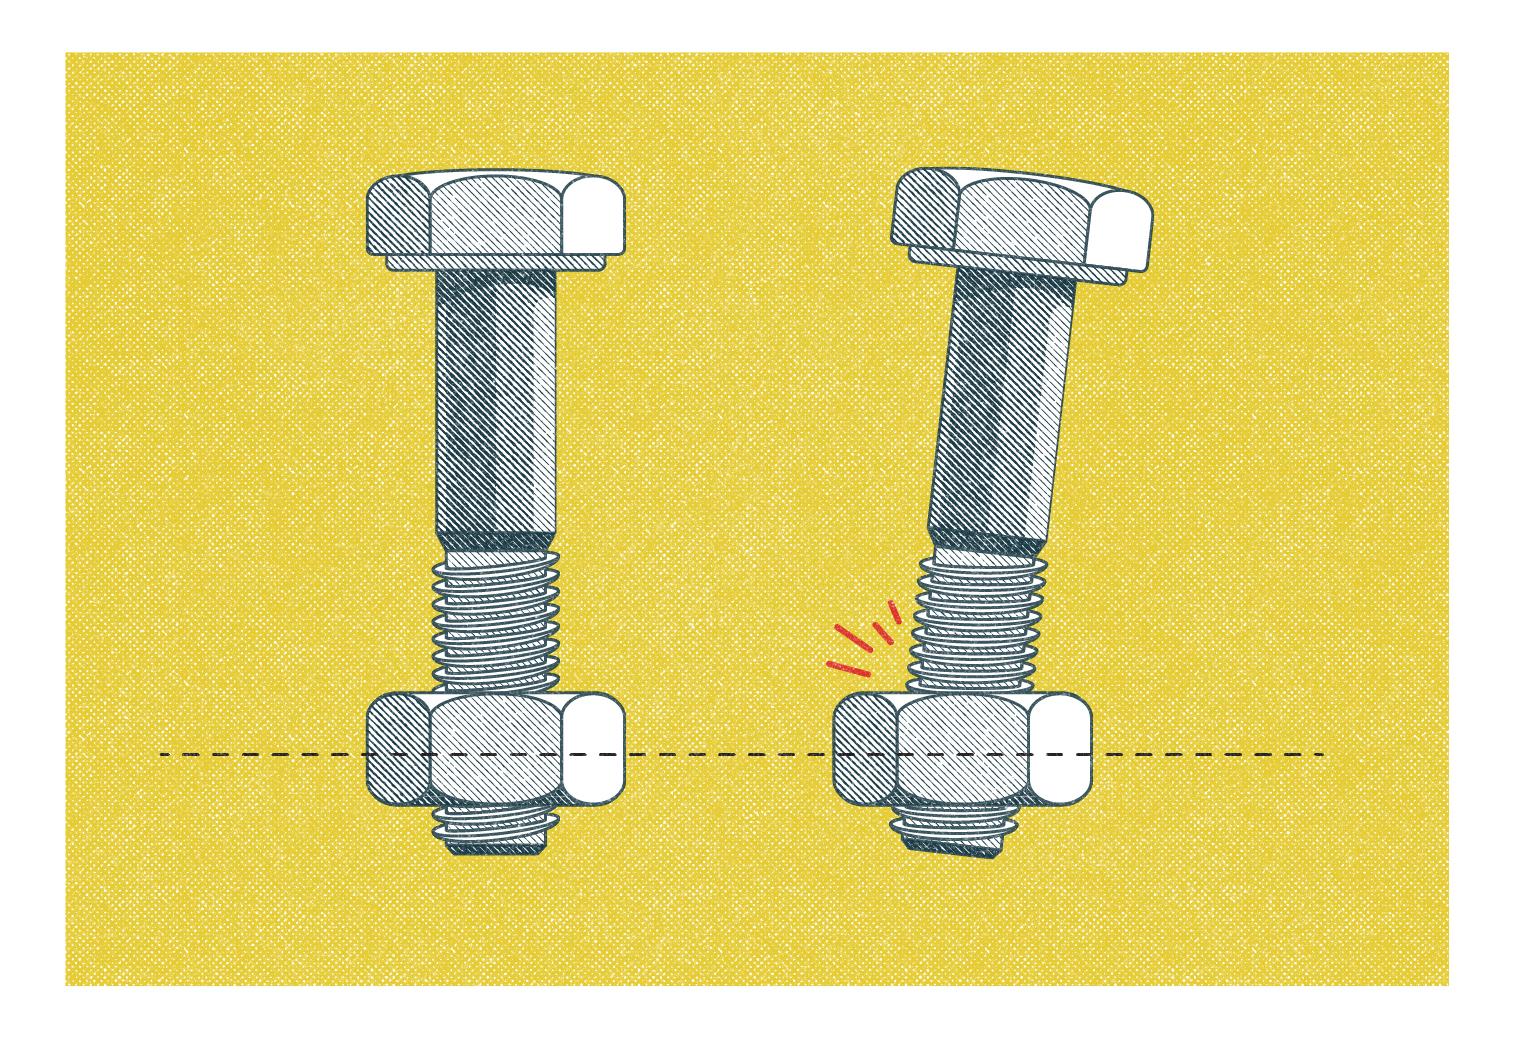
In the image above, the bolt on the left is threaded correctly, and the bolt is perpendicular to the top of the net. The bolt on the right is at an angle and is engaging the threads incorrectly, resulting in stripped threads.
AUTHOR’S TIP
Always start a fastener by hand so you can feel when misalignment occurs. Never start a fastener with a wrench or powered drive, such as an impact wrench.

5.9.5 Choose a Tap
We now have a properly located hole, drilled to the correct size, and the first thread chamfer has been added. We can now tap threads into the hole. It is here we must now understand the different types of taps. The figure above is of three hand taps. It is important to note that these are intended for hand tapping and not power tapping. Power tapping is when the tap or material being tapped is turned by a machine’s spindle. This exerts force on the cutting edges which the tap was not designed to withstand and can lead to broken taps. Taps are made from hard tool steel, the same material twist drills are made from. I make this point because a broken tap creates problems not easily solved and often ends in starting over.
5.9.6 Hand Taps
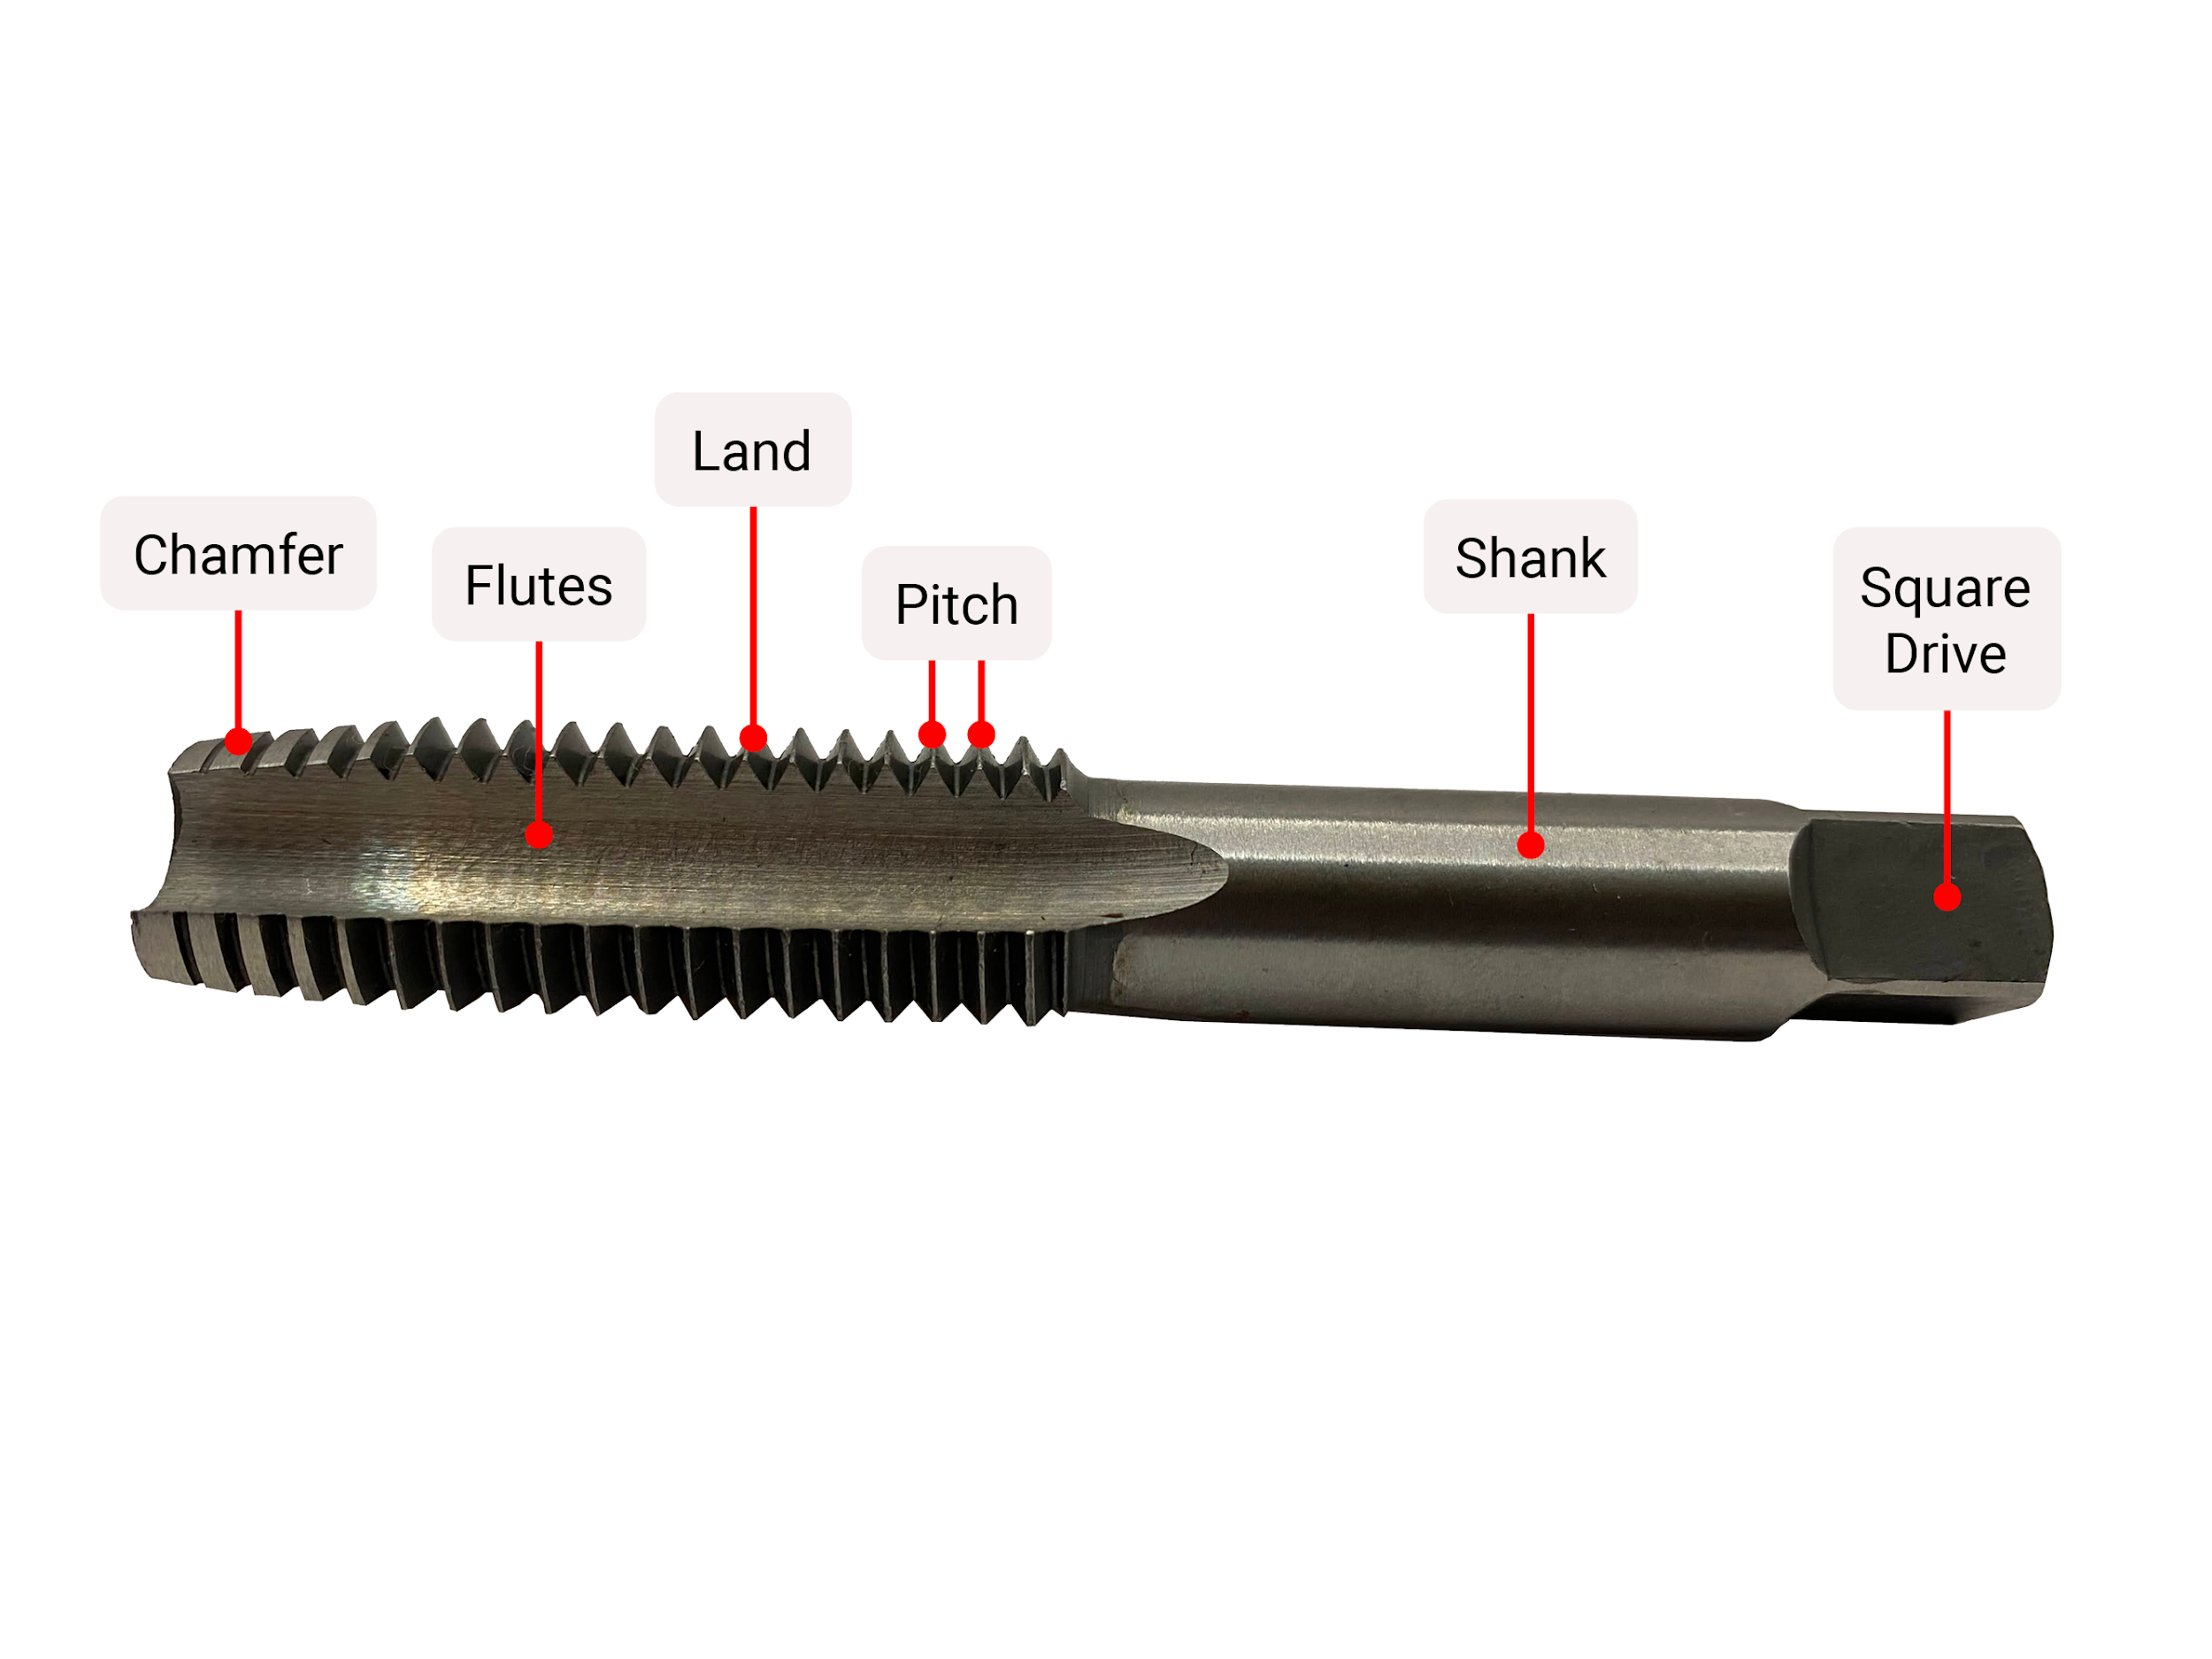
This figure above are the parts of a simple hand tap. This is the most basic of taps and a general understanding of what the parts do is important.
The tap chamfer assists in guiding a tap into the tap drill hole to prevent misalignment. The taper chamfer performs this the best and all threads are started using this tap if available and able to fit into the tap drill hole.
Tap chamfer refers to the first series of threaded lands at the beginning of the tap. For hand taps, there are three basic types intended for different purposes.
Tap lands are the location on a tap where cutting edges are ground and they create the chip by slicing the material away. The distance between the tips of the lands is called a thread pitch. Thread pitch gets more complicated on multi-start threads but for single start threads which we are discussing, pitch will be the distance between thread tips.
Tap flutes is the space between tap lands that provide a space for cut chips to accumulate during the tapping operation. Chip management during the hand tapping operation must be managed by the operator. Chips may accumulate and interfere with the tapping operation if their length is not managed.
Tap shanks control the reach of the tap or how far it extends out of a holder by varying the length of a tap. Specialty taps such as “pulley taps” have extended length shanks to prevent interference during the tapping operation.
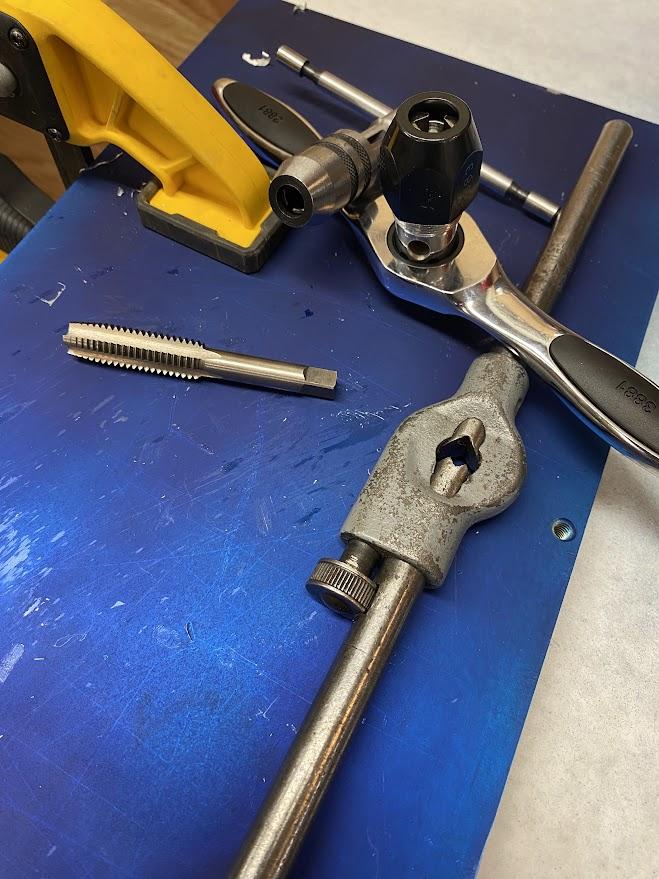
Square drives are the attachment point for tooling necessary to rotate the tap during operation. Dedicated tap wrenches adjust to fit varying drive sizes and have handles that provide mechanical advantage to the operator.
5.9.7 Hand Tap Chamfers
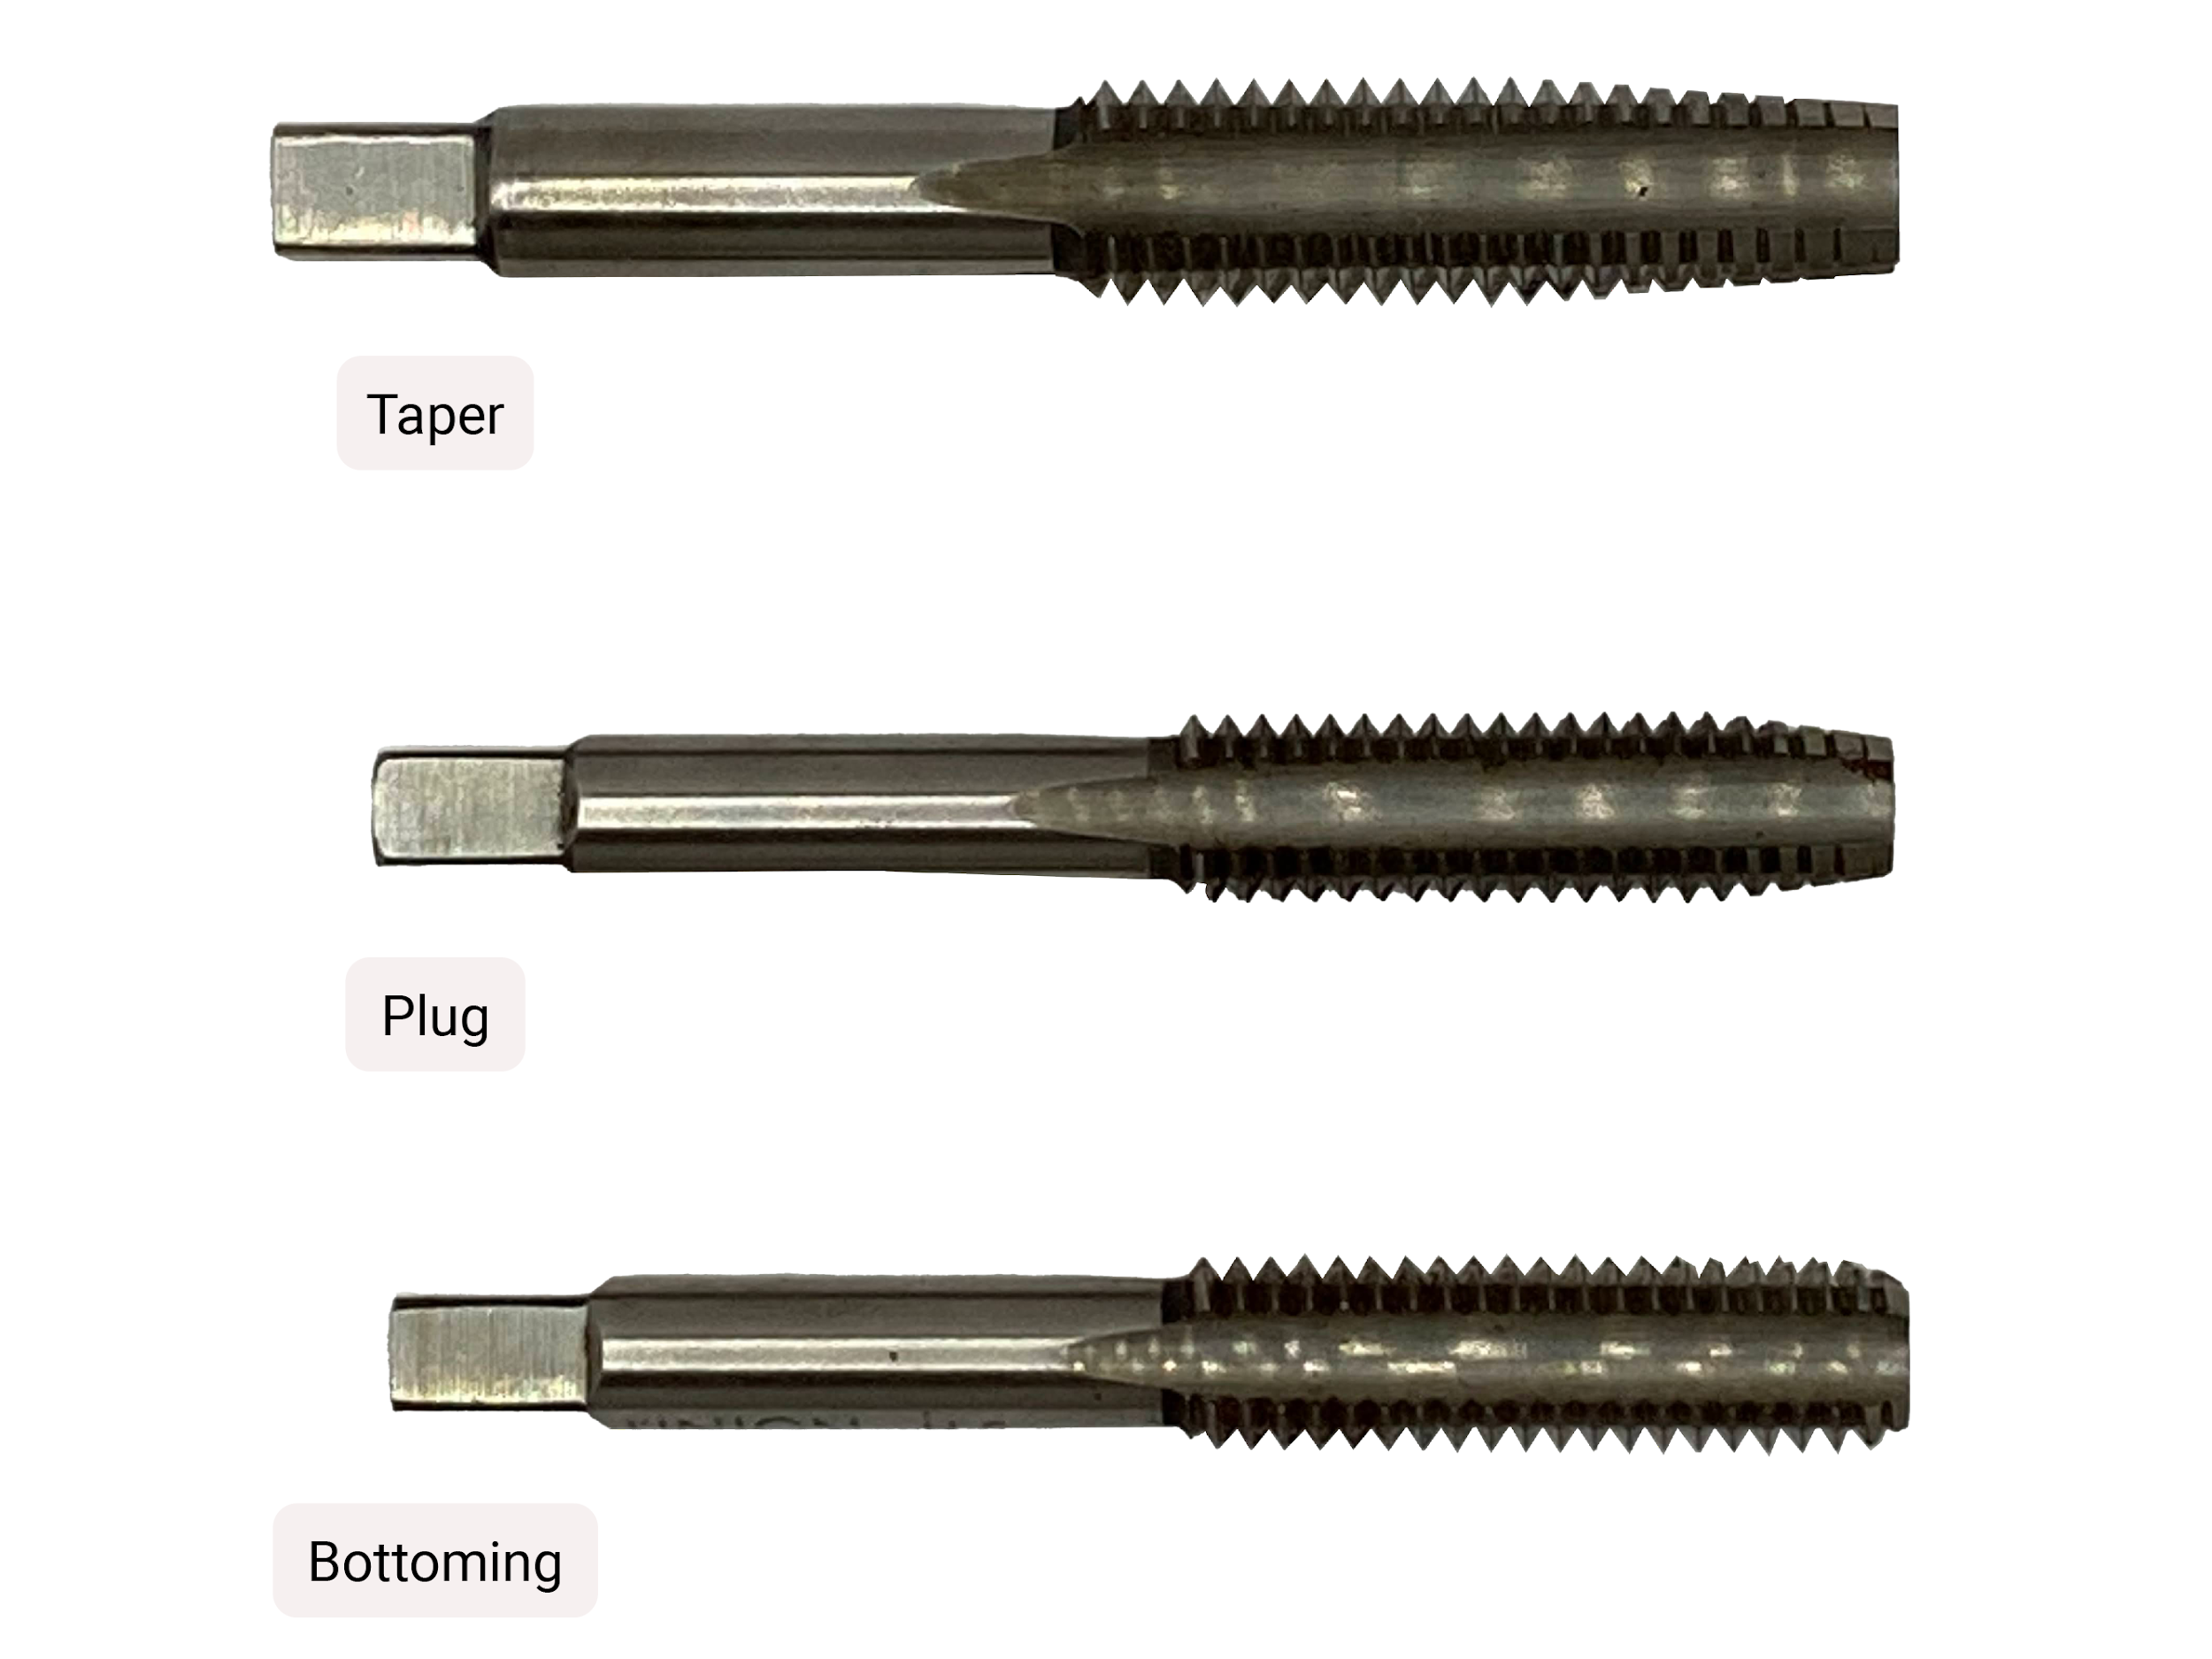
Hand taps have a series of partial threads on the end, and the diameter tapers within this area of partial threads. It is this region that determines what type of hand tap it is.
The taper tap, also known as a starter tap, has the longest taper, 7-10 threads, which acts as a guide to assist in keeping the tap perpendicular when starting a new thread. This tap can be used on thru holes where the threads exit the far side of the stock.
The bottoming taps have the shortest chamfer and the least number of partial threads, 1-2 threads, and are designed to thread blind holes that do not exit the other side of the stock but allow the most full threads possible.
Between these two extremes is the plug tap. This tap has a medium taper of 3-5 threads, is a good general purpose hand tap, and is the most common. Depending on the situation, this tap can thread through holes and blind holes if the hole depth is deep enough to have 3-5 incomplete threads.
In practice, we would use at least two of these taps for most applications. The taper tap is used first to ensure threads are started square to the surface and then switch over to either a plug tap if it is a thru hole or a bottoming tap if threading a blind hole.
5.9.8 Tapping Operation
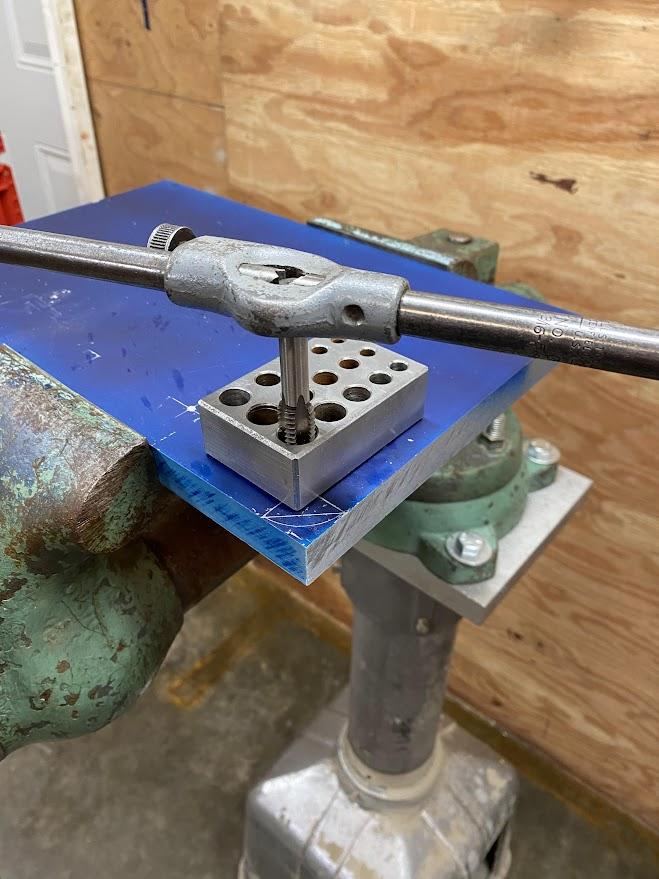
A taper tap is selected, and a tap guide is used to align the tap perpendicular to the tap drilled hole.
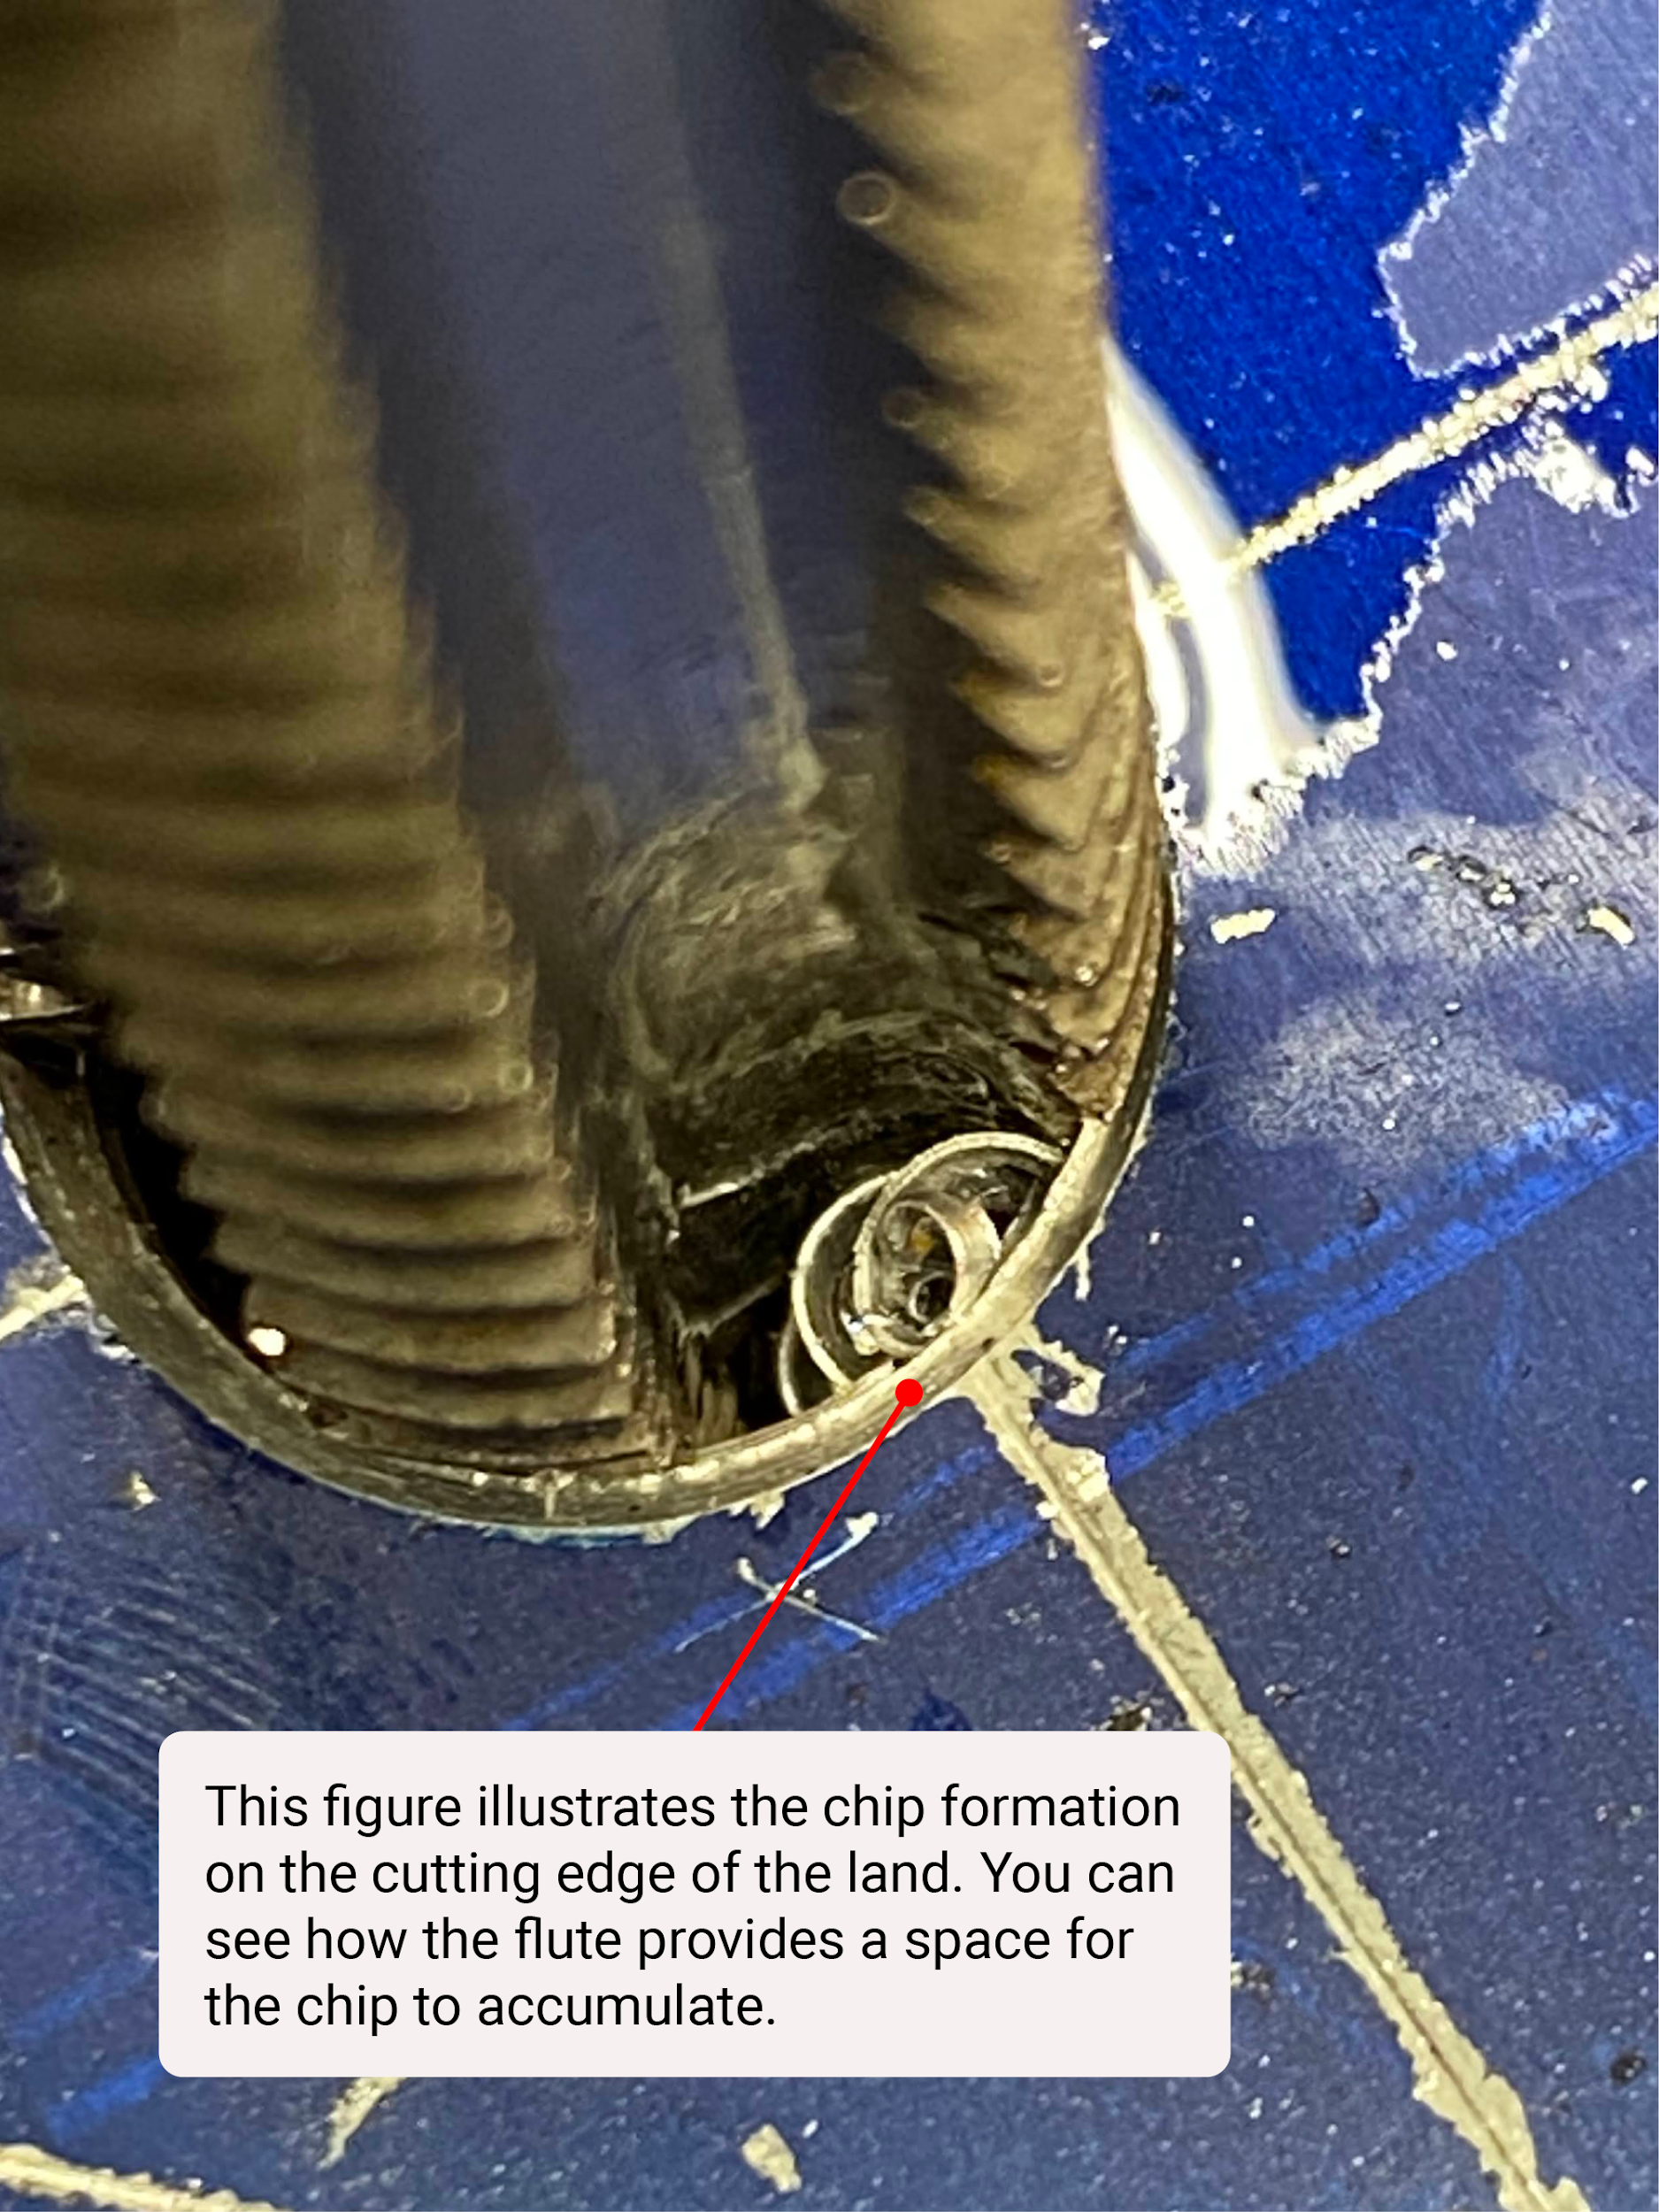
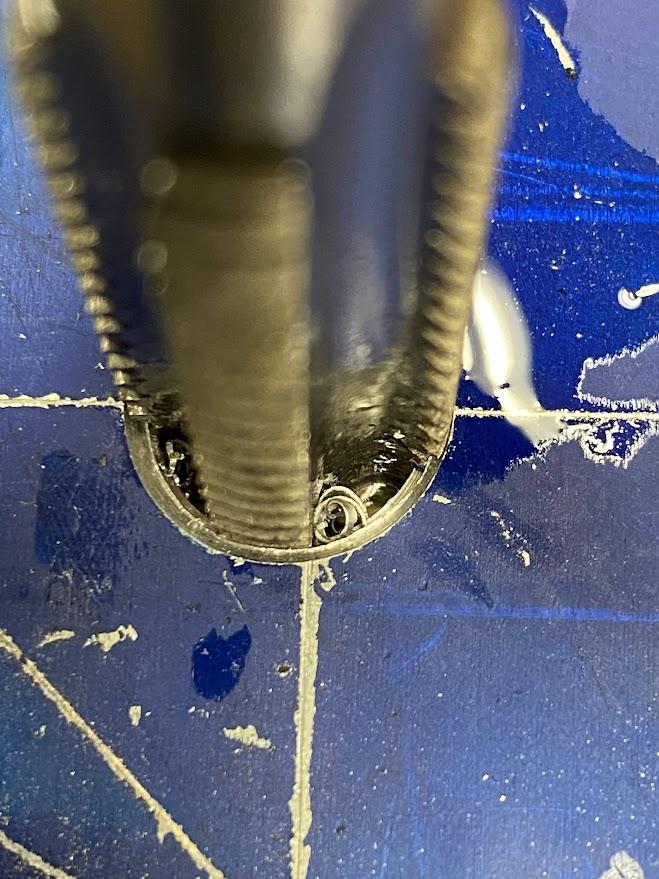
While the flute allows space for chip formation, excess chips will bind the tap creating the need to apply excess pressure to turn the tap. To control chip length, the operator must stop after every half turn of the tap handle and break the chips free. This is performed by rotating the tap handle backwards (counter clockwise) until you feel the chip break loose and fall from the flute. In the figure above, the chip is against the back of the cutting land and rotating the handle further breaks the chip loose preventing the chips from interfering with the tapping operation.
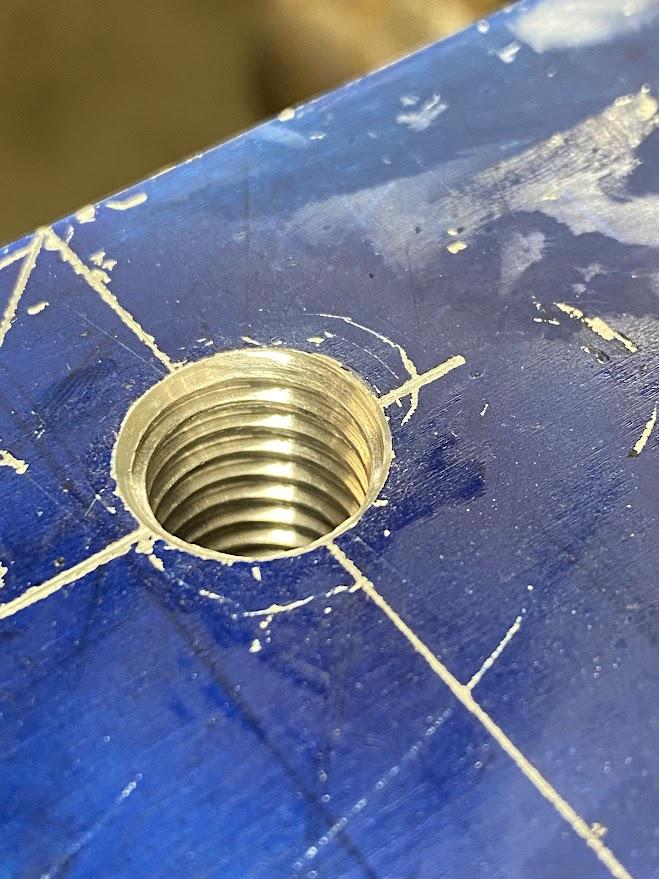
The figure above illustrates a finished tapped hole. The first thread chamfer allows for a complete profiled thread at the top of the hole which will help prevent cross threading.
5.9.9 Thread Dies
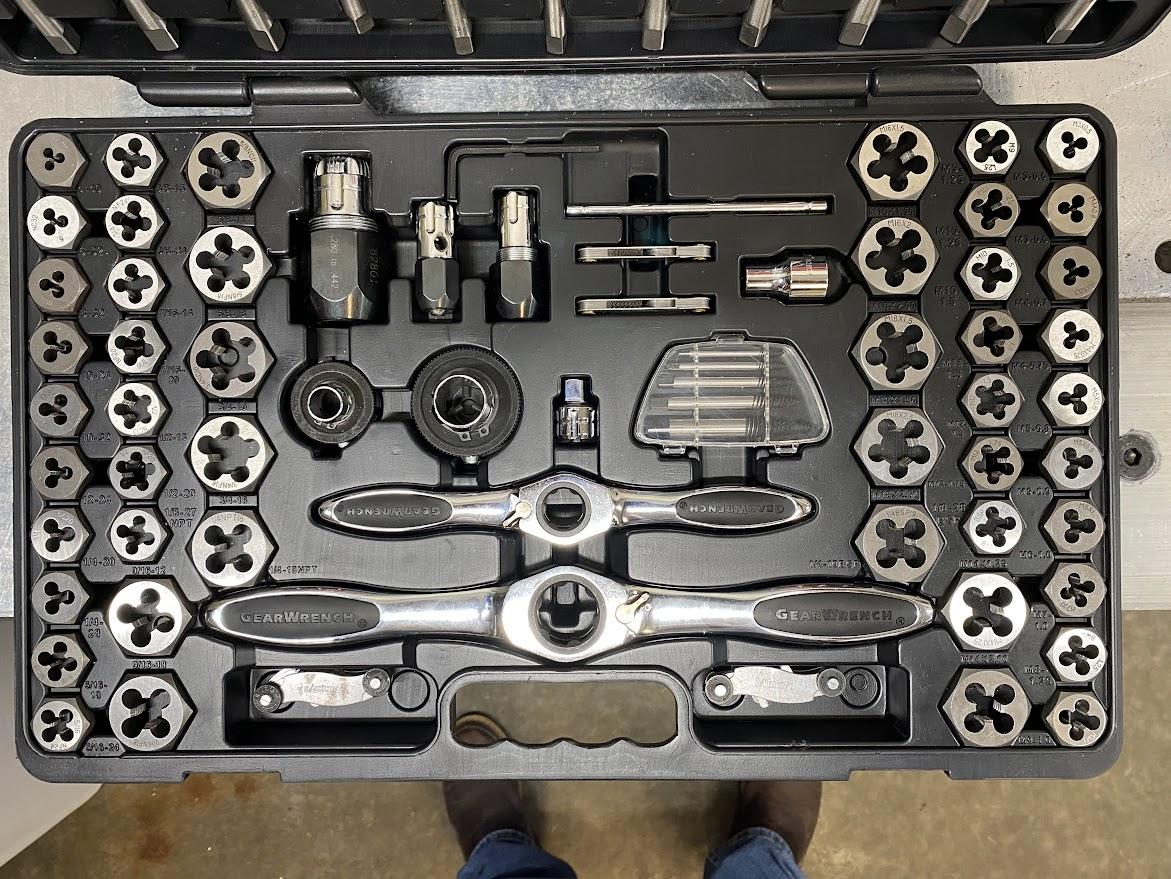
A thread die is a tool used to create external threads on a cylindrical workpiece, such as bar stock or a pipe.
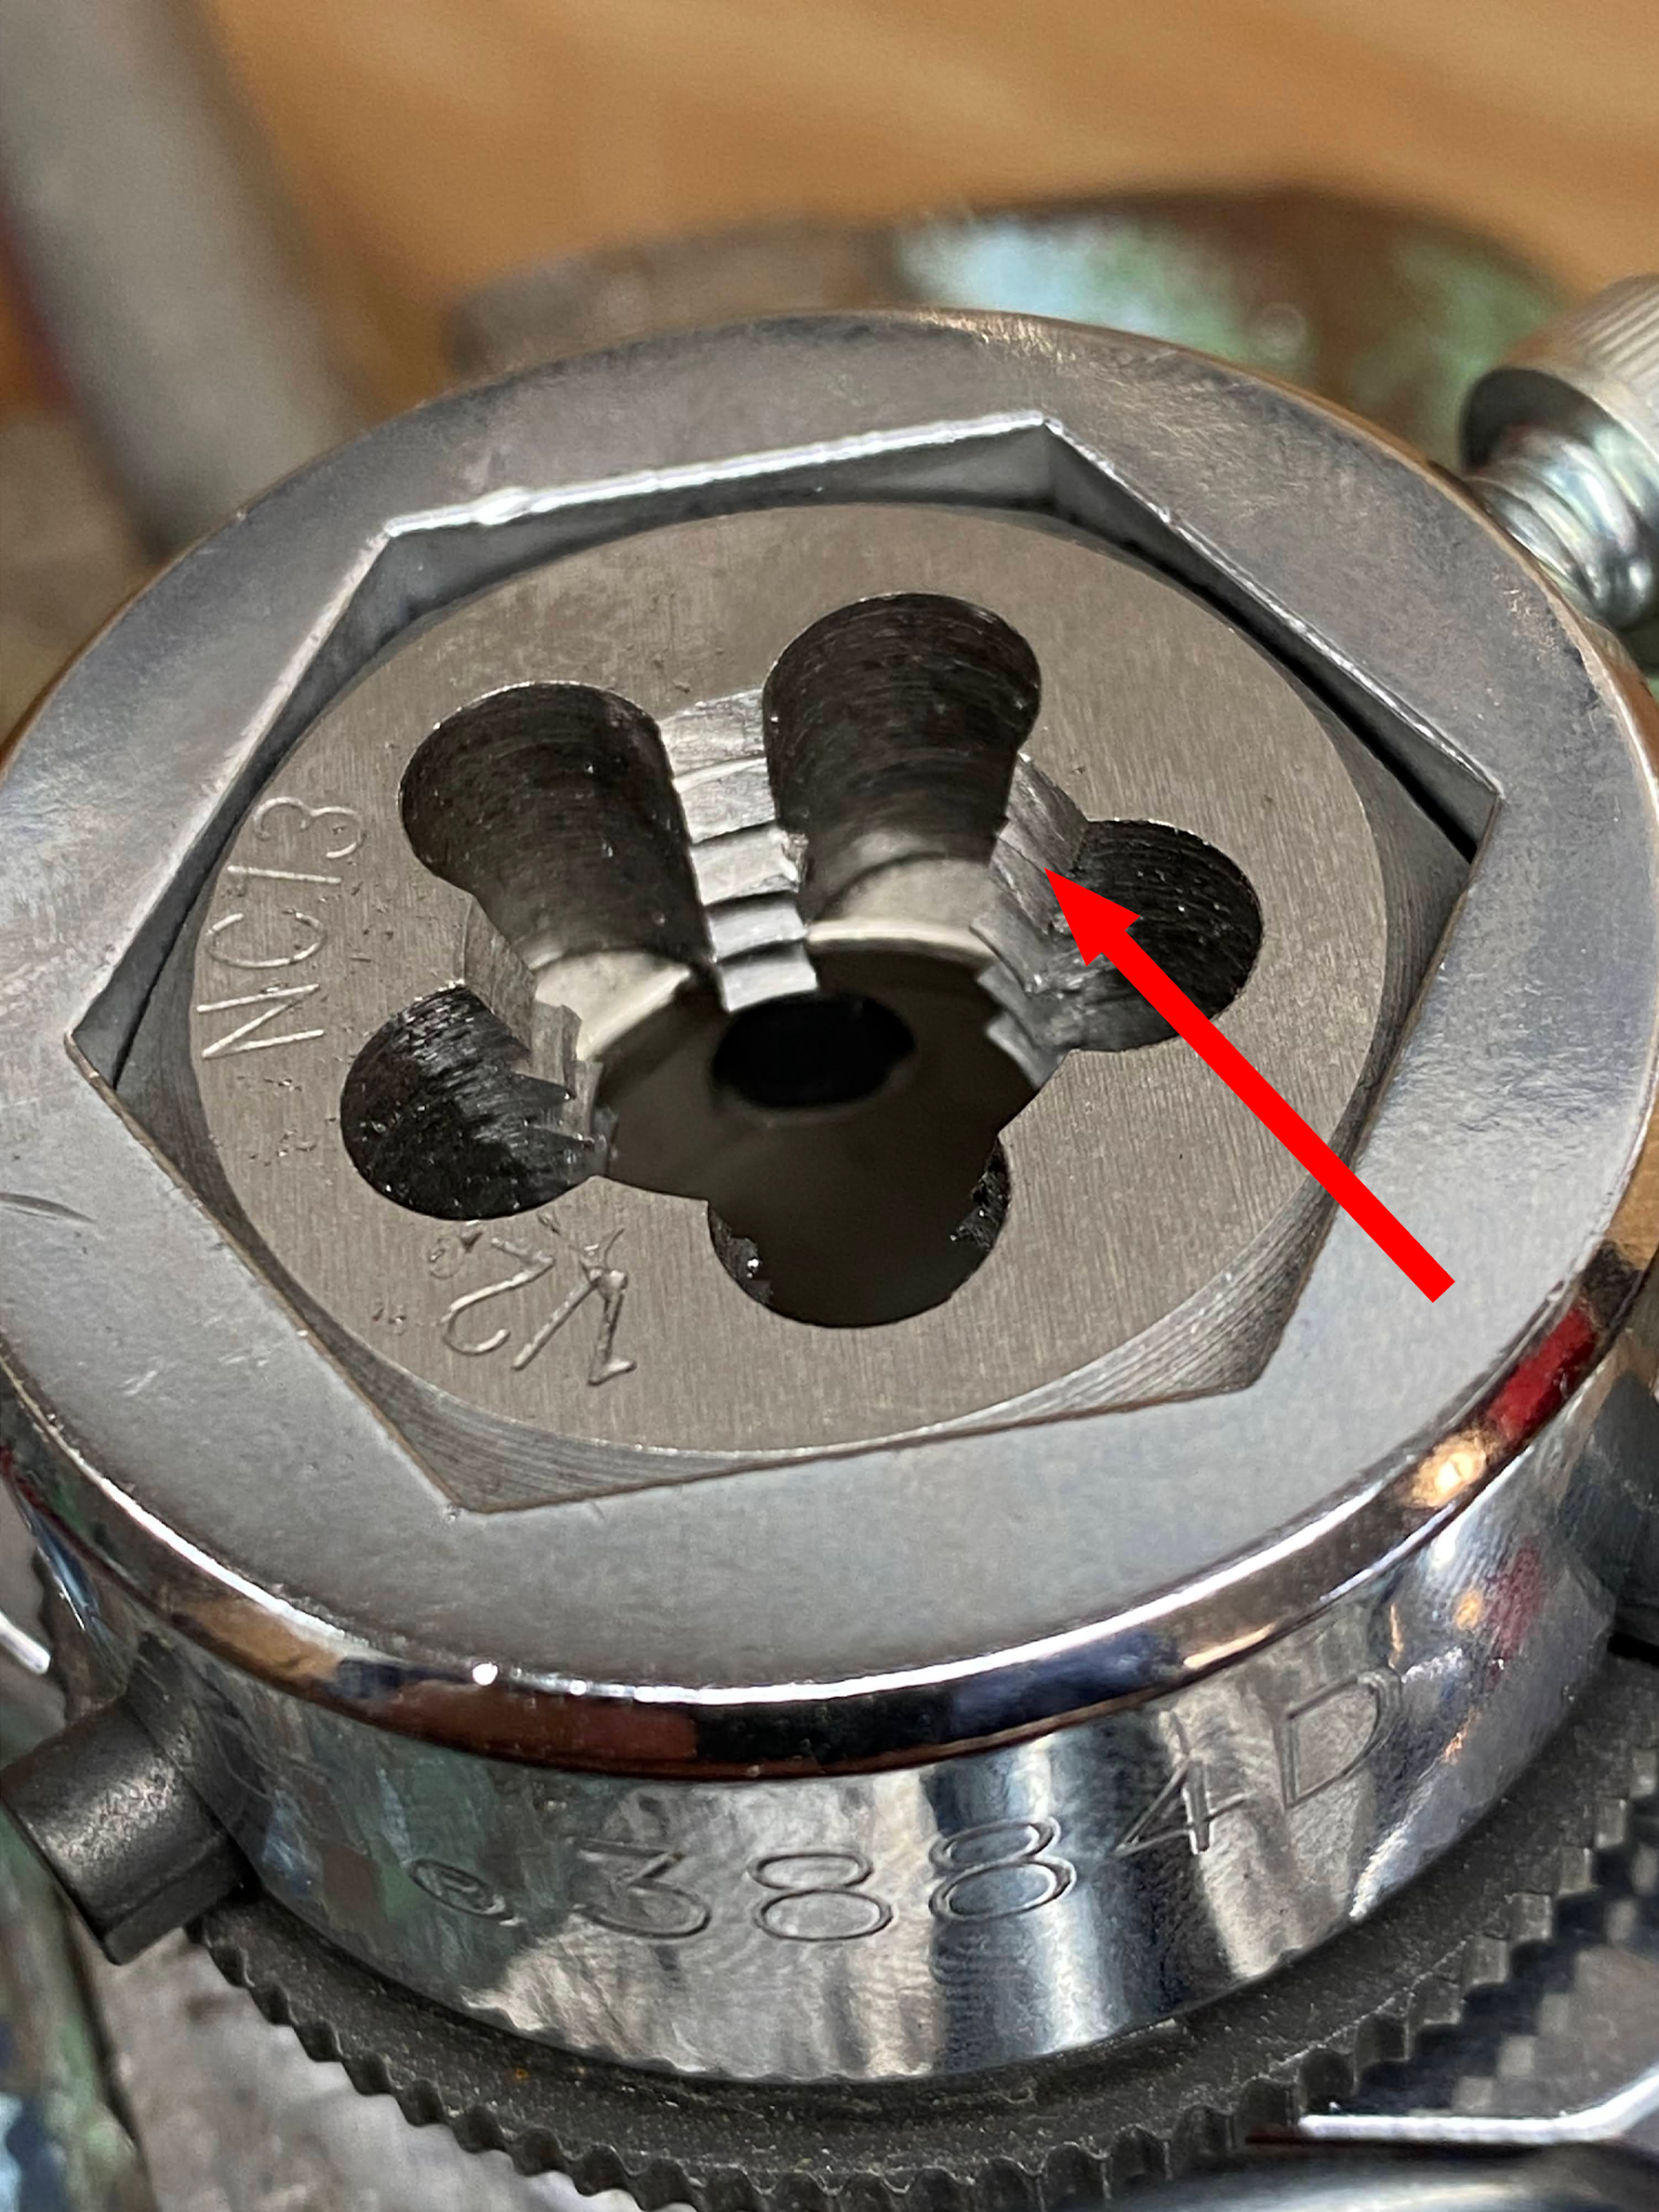
A die body comes in various shapes and sizes to accommodate the thread size and tool by which to operate the die. In the example above, the die body is hexagonal (six sided) and requires a holder of the same form. Lands provide the cutting edges for the thread making operation. One side of the die will have a chamfer (illustrated above) to allow the die to align with the bar stock.
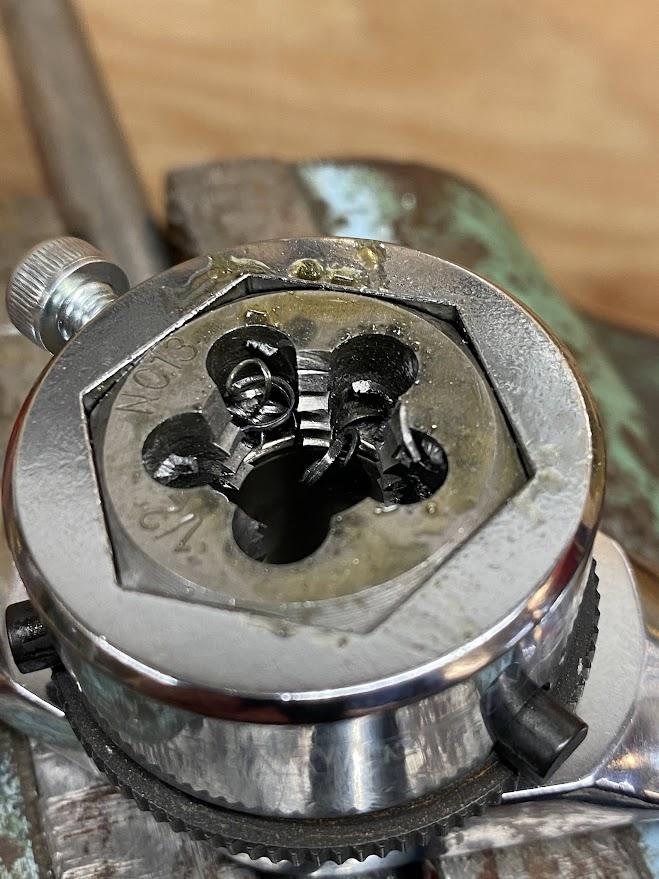
Threading die have flutes which provide space for chips to accumulate during the threading process.
5.9.10 Die Threading Operation
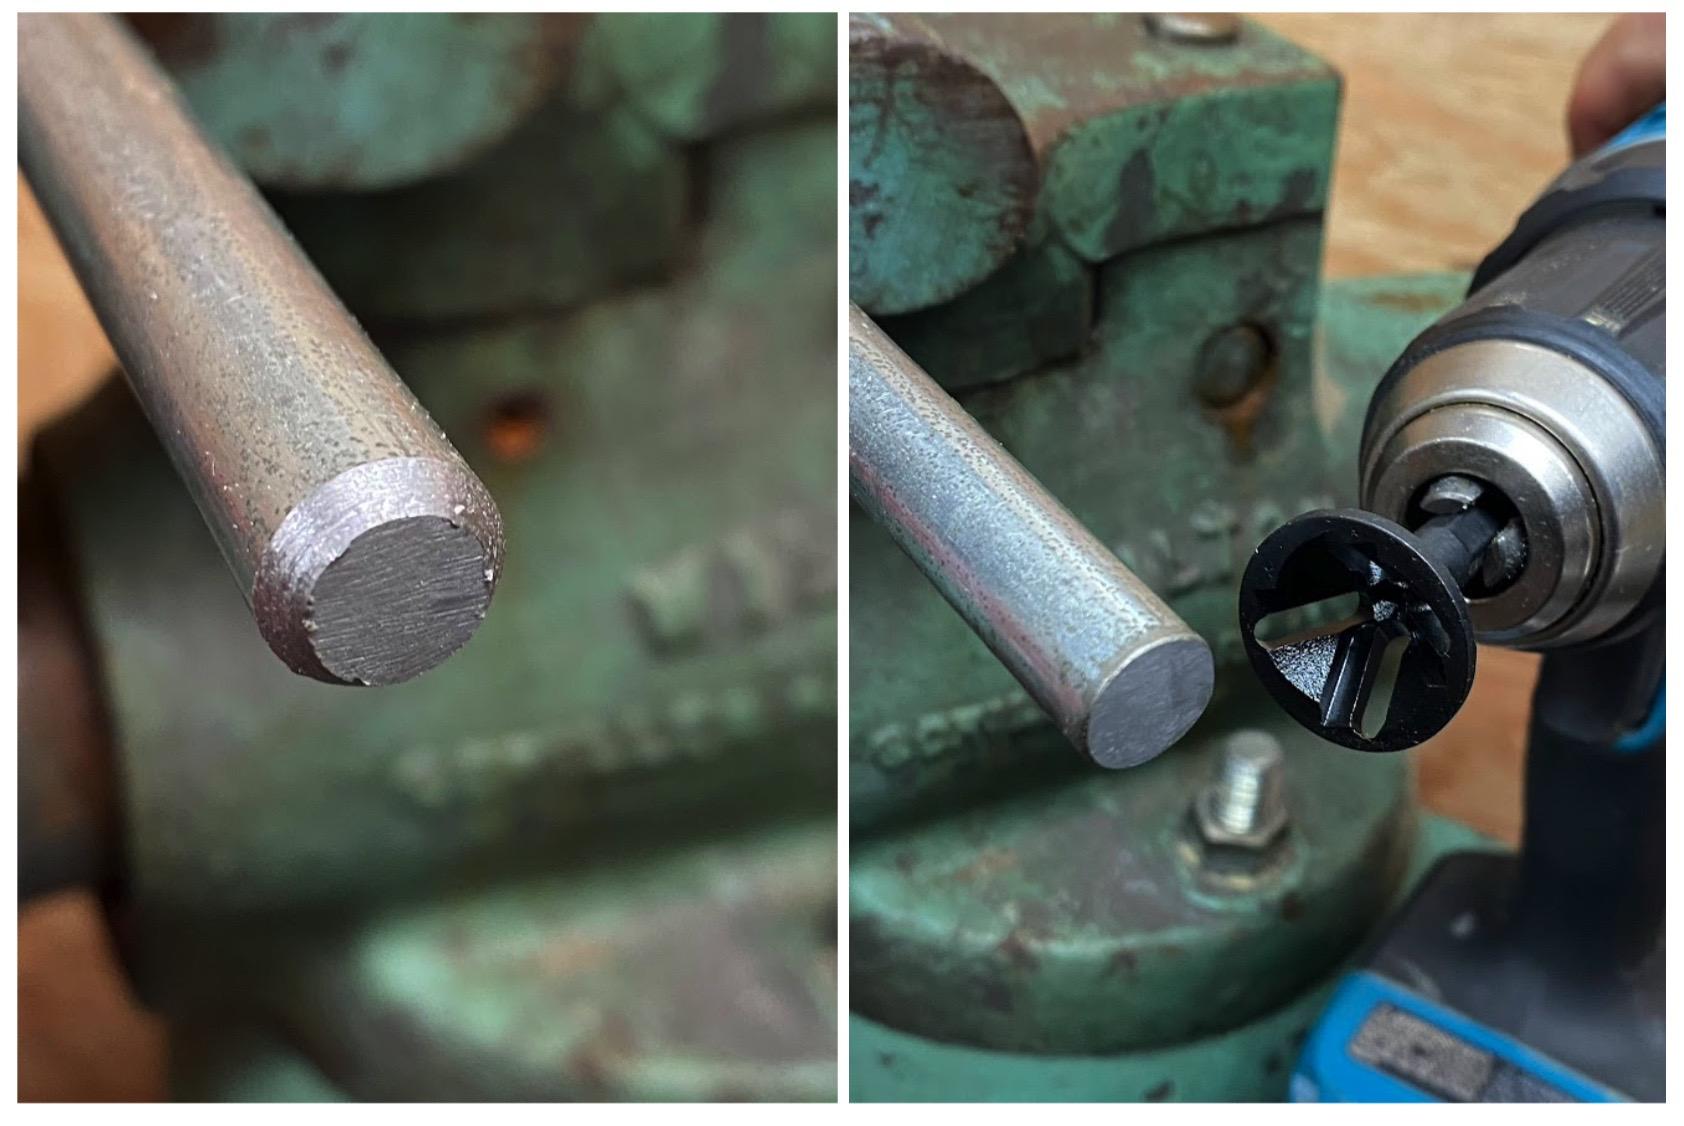
To prepare the end of the round stock to receive a thread, a chamfer must first be created in order to create a full thread at the start of the thread and to allow a better fit for the die chamfer to engage the stock material.
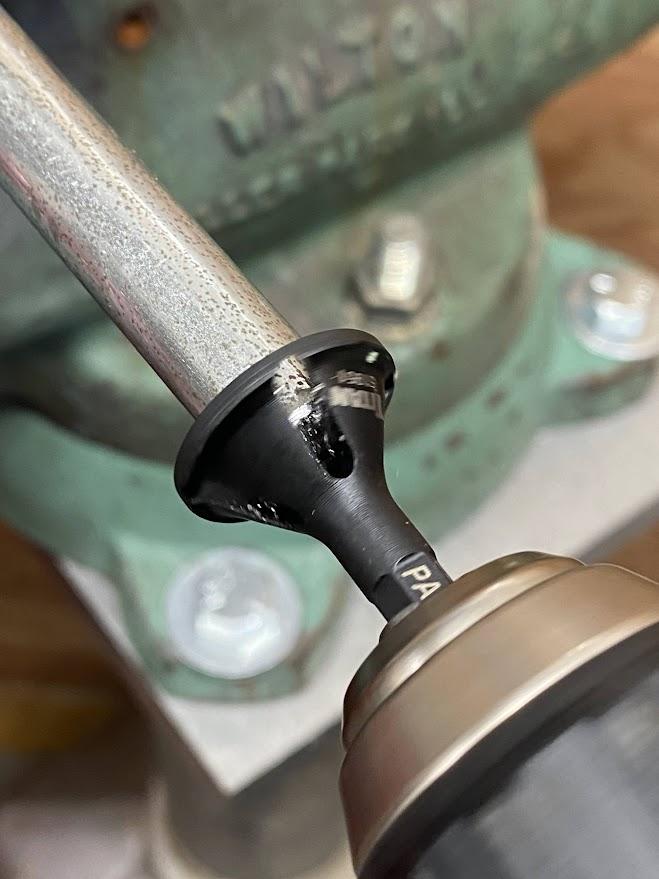
A drill motor was used to turn the chamfer tool. Chamfer tools are made from tool steel and require heavy force to create a cut on mild steel.
A large chamfer is required to create a surface which the threading die can engage. Benchwork operations lack the forces of machining equipment such as lathes and mills.
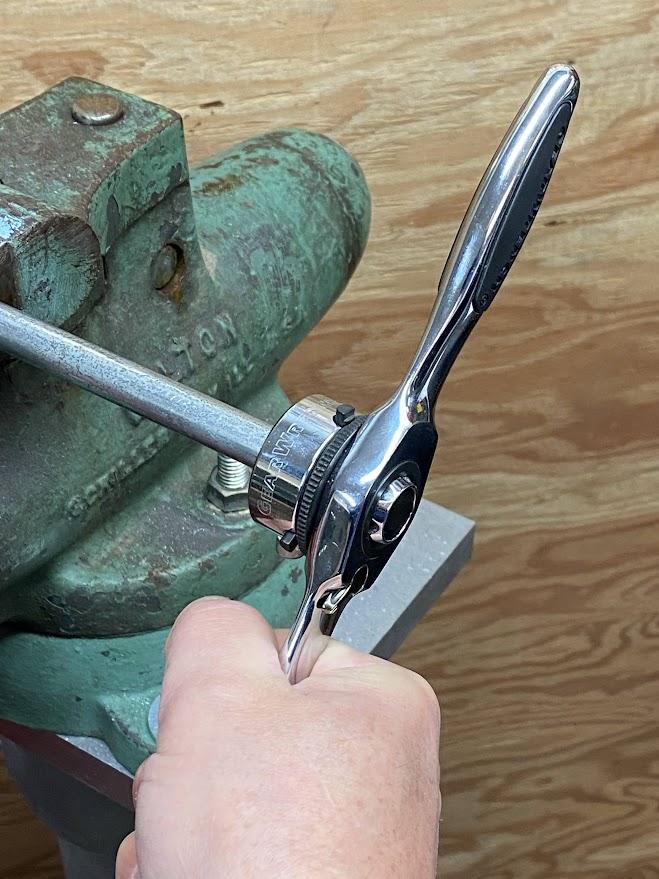
The figure above illustrates that the die handle assembly must be kept perpendicular to the stock axis to ensure straight threads are the result. On the ½” low carbon steel above, a very large chamfer had to be cut in order to start the die by hand.
Using two hands, turn the die handle clockwise to cut the threads. Just like cutting tapped threads, stop every half turn and break the chips loose. Continue with this cut and break process until the threads are cut to the length necessary.
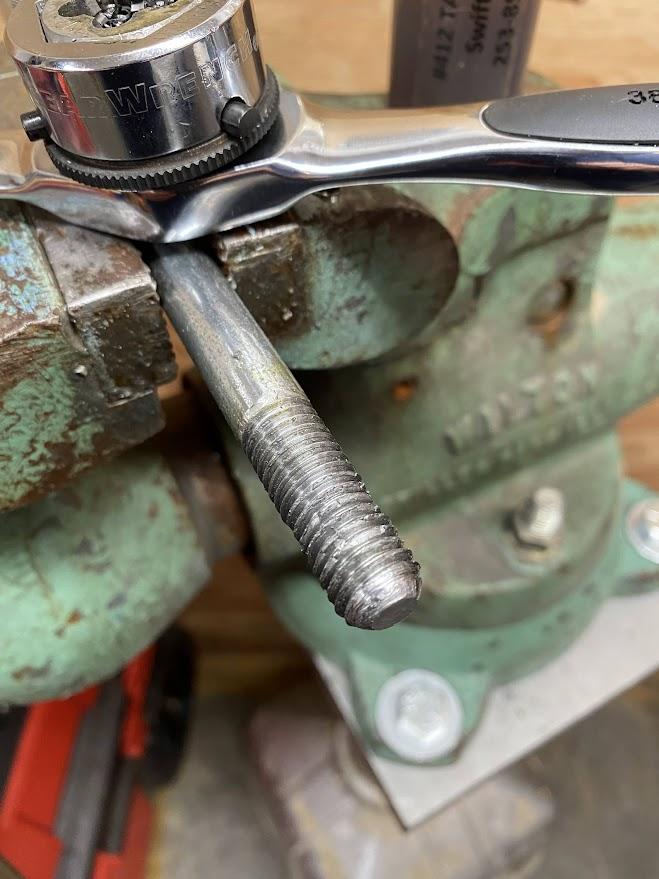
After the thread depth has been reached, remove the die and inspect and dress the threads. The thread profile may need to be dressed with a file to remove any burrs created during the threading operation.
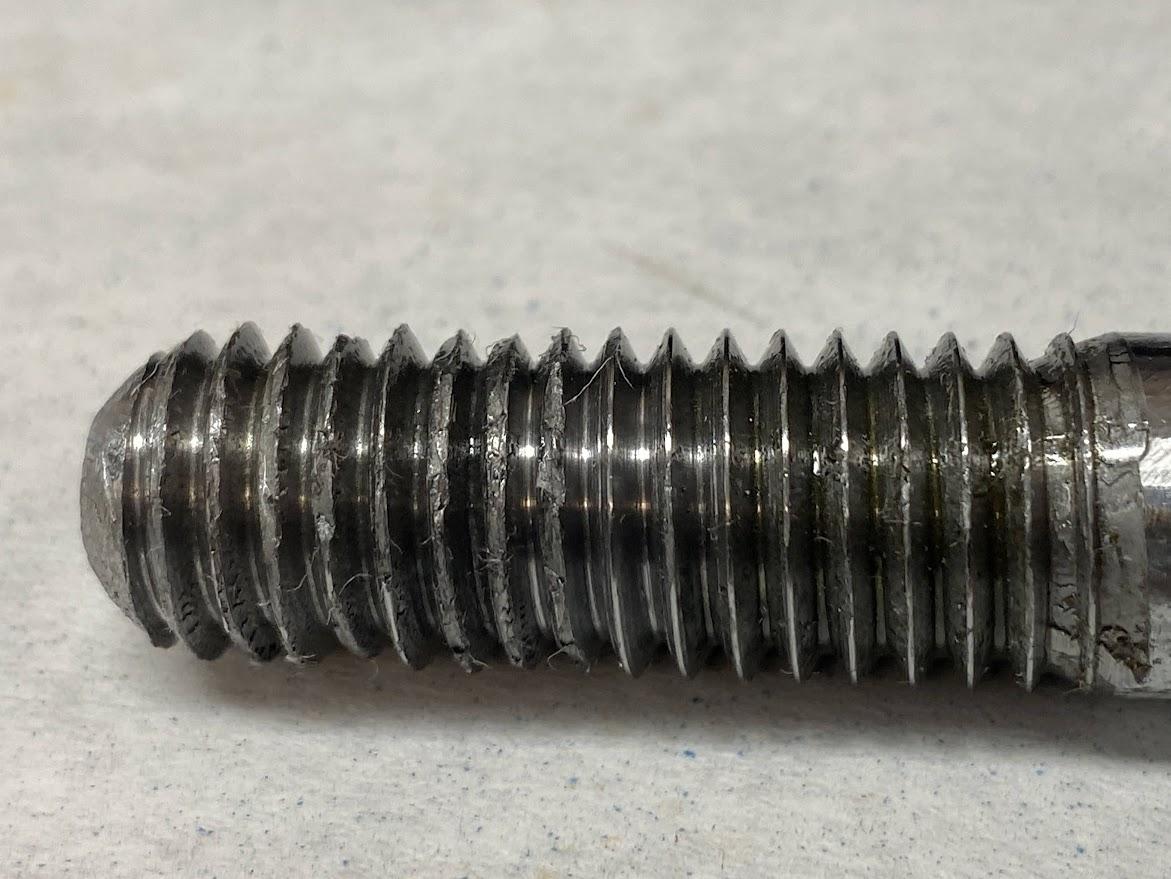
Notice the contrast in thread quality in the figure above. The threads at the start of the operation were cut dry (not using cutting oil), and the threads toward the end had thread cutting fluid applied.
Thread cutting fluid lubricates the cut, which reduces stresses created at the cutting edge of a die. Depending on the material being threaded, select the correct cutting lubricant to ensure optimal performance.

