66 The Process of Developing a WPS
David Colameco, M.Ed.
This section will introduce you to the general steps of developing a WPS so you are aware of the general process, however there are many details of WPS development that are beyond the scope of this chapter. It is important to note that this discussion is intended to be generic and not exact since different welding codes and fabrications have different requirements that will make those processes look different, however the basic process will be common to what is presented here.
Going back to the cooking examples, imagine you are hungry and want to make a meal, but you want to use the ingredients available to you at home. If you haven’t done this yourself before, you may have had friends or someone who loves to cook do this in front of you. First, a look at the ingredients that are available is done and ideas form as what to make. Inside their mind they are thinking through what they can cook, how best to cook it, and details about spices or processes such as on the stovetop, oven, or grill.
With welding a similar process occurs for code welds, where a fabrication is made to the requirements of a welding code. An engineer or senior certified welding inspector, depending upon the complexity of the build and familiarity with the type of fabrication will develop an initial educated guess as to what welding process, machine settings, and technique will create a successful weld. This information is written down on a preliminary WPS or pWPS, and a welder or welding operator will try it out while someone records the essential variables such as the important settings and characteristics of the weld on a Procedure Qualification Record (PQR). The sample weld is then visually inspected and mechanically tested. If it passes all of the requirements of visual and mechanical testing and the PQR is reviewed and accepted in accordance with the company procedures and the quality program, then the PQR is qualified.
Let’s look at each of these closer:
Preliminary Welding Procedure Specification
The preliminary welding procedure specification, or pWPS, is an initial educated guess at what the welding essential variables are, based upon the code being used, manufacturer’s recommendations and experience welding the same or similar material. If the material or process is not one that is often used by the company, a welding engineer will very likely research the joint design and setting needed to create a successful weld.
This information is then used by the welding or welding operator to create a weld. The PQR is then used to record the settings used.
Procedure Qualification Record
A pWPS provides a range for the essential variables that the welder or welding operator uses to create the weld. For example, if welding with SMAW, a range could be 90 to 110 amps. The welder would use a value within that range to perform the weld. As the welder is welding, another person would write down all of the essential information on a procedure qualification record, or PQR, to record the inputs used. A single value is typically written down for each essential variable, such as an average current used. This single value is important because welding codes will provide ranges of +/- X% (plus or minus the percentage) so a range can be listed on a WPS.
As a welder you may be asked to weld for the development of a PQR. It is common for companies to ask a relatively new welder to do the welding for a PQR because a newer welder will typically listen more and follow directions more easily than a welder that has been welding for a long time. If you weld for a PQR and it passes visual and mechanical testing, the welding codes typically make you a qualified welder for that weld. It is worth asking if your welding in support of the PQR has qualified you as a welder, as this could be mistakenly overlooked by those asking you to weld.
Welding Procedure Specification
The PQR is then used to create a Welding Procedure Specification (WPS). A single PQR can be used to create many WPSs depending upon the rules of the welding code being used. There are various reasons for creating multiple WPSs from one PQR. One reason is that different alloys might be welded, and creating many WPSs might make the WPS easier to read rather than containing many options. This will depend upon the company preferences. Another reason would be finer control of the welder’s machine settings. The ranges that are developed from the PQR come from single values. If a welder uses the low end of voltage range for GMAW, and the high end of the range for wire feed speed, the welder is technically within the WPS; however those settings are likely not the best for success. A certain level of common welding sense that is learned by the welder is assumed.
Standard Welding Procedure Specification
Developing a PQR for a WPS is a time consuming and expensive process. The American Welding Society, American Society of Mechanical Engineers, and others have welding codes that allow for Standard Welding Procedure Specifications (SWPS) which are developed for common welding configurations of geometry, welding processes, base materials, and filler materials. A company will purchase an SWPS for an application that they wish to create WPSs for. The SWPS has the advantage of having the backing of the various welding codes and societies that allow them. This reduces liability of the company if something were not 100% with their PQR.
Common Hand Tools and Their Functions
(see Chapter 6 for a more thorough discussion on shop tools)

After your welding machine, probably the most common tool you will use is an angle grinder. “Grinding and paint make me the welder I ain’t!” “Weld your best; grind the rest!” These jokes abound, but the truth is that electric and pneumatic angle grinders, end grinders, die grinders, and even bench grinders are indispensable tools for joint and surface preparation as well as weld cleaning and repair.
The next most common tool you’ll likely use is from the variety of hammers (chipping hammers, sledgehammers, engineer’s and shop hammers) and struck tools (chisels, punches, stamps, and wedges). A third category of hand tools we will discuss in this chapter are clamps such as C-clamps, bridge clamps, clamping pliers, and half clamps.
Why cover these tools? Because we are discussing safety, and these tools tend to cause more injuries on the job than soapstones and tape measures.
Safe Use of Welder-Specific Tools
First and foremost, only use tools in accordance with the manufacturer’s recommendations. This goes hand in hand with using the correct tool for the task at hand. For example, a screwdriver may seem like a good chisel or pry bar; however, it may chip when hit with a hammer and could send fragments into your eye or perhaps bend or break, and lead you to drop the heavy item it was supporting onto your hand or foot. Improper use of a tool may cause injury or damage to the workpiece.
Further, do not modify or remove a tool's guards or other safety features. Tools are designed the way that they are partially because it makes for the best way to get a job completed as efficiently as possible while still being safe. Even though your tool modification idea may seem clever at the time, when you are seated on the witness stand in a courtroom explaining to a lawyer how the accident caused by your modification happened, your enthusiasm for the idea may fade a bit.

A third rule for the safe use of tools is that if a tool is or becomes damaged, immediately remove it from use. Have it repaired by a qualified service person or replace it. You may not appreciate this rule unless or until you are injured by a damaged tool.
And finally, always wear the appropriate PPE for the task you are performing.
Handheld Grinders
Handheld grinders may be powered by either electricity or pneumatics. Before using a grinder, always inspect the tool for damage. Is the power cord or air hose damaged? Its powerful supply of 110V of electricity and water can be fatal. Also, a one-inch diameter air supply hose that has a connection failure during use can subject you to a severe beating. Make sure all the safety features work, including any trigger guard mechanism, like a glade guard, and be sure the handle(s) are all in proper working order. Verify that the glade wheel is the proper one for the material you’ll grind and that it has the correct RPM rating for the grinder tool. Using an improper grinding wheel may cause it to break, which would send fragments flying and potentially cause severe injury.
When using a grinder, be aware of which way the wheel or blade rotates and understand how the grinder will react when under load. When you grind with it, which way does the tool want to move? It is not unheard of for a grinding wheel to catch and unexpectedly throw itself into the welder’s face. Make sure the handle is properly located and you have a good grip. Some handheld grinders generate 3.5 horsepower: that is similar to holding a running lawnmower engine in your hands.
Also, be sure you do not have loose or dangling clothing, hair, or jewelry that can get caught in the grinding wheel. A grinding wheel rotating at 4500 RPM will entangle itself in a hoodie’s drawstring and yank itself into your face before you can react. Unfortunately, this really happens. Never use a grinder without a guard and do not remove the guard.
Hammers and Struck Tools
Welders very commonly use hammers and struck tools like punches, stamps, wedges, and chisels. While these are much less complicated than grinders and more on the level of Stone Age tools like rocks, they can still hurt you. I vividly remember working in a shop, swinging a four-pound hammer in one hand at a number stamp held in my other hand and accidentally smashing my thumb. After jumping around for a time, clutching my rapidly swelling thumb, I took a second attempt at stamping the number into my workpiece and hit my thumb again.

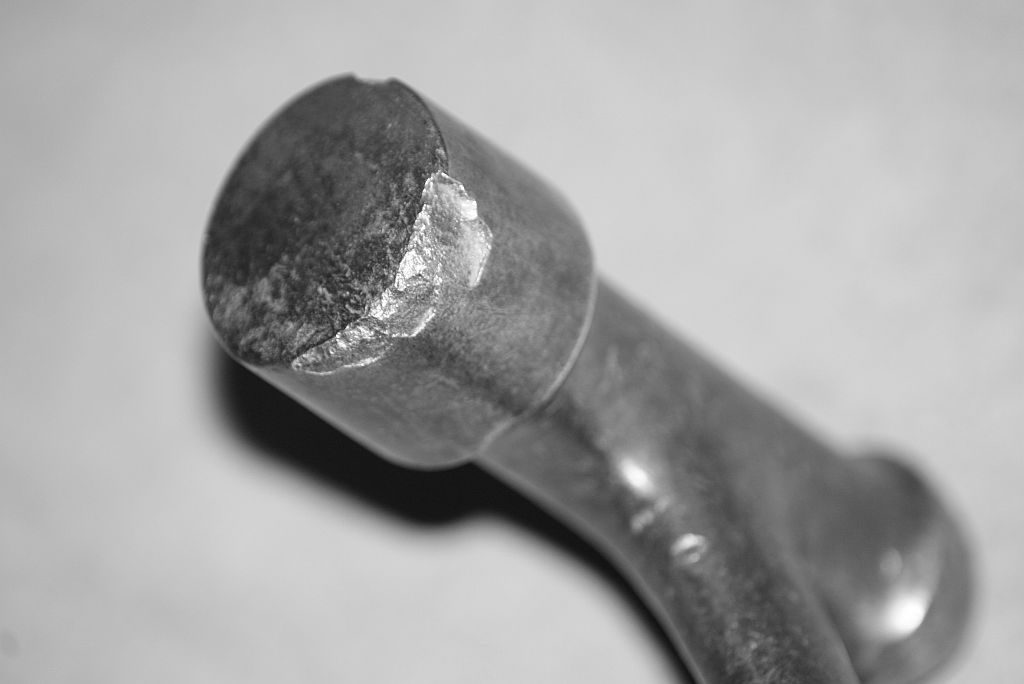
Besides hitting yourself, the primary hazard you face when using hammers and struck items is the risk of fragments breaking off and becoming projectiles. Mushroomed heads on chisels, punches, and stamps may look like cool marks of usage, but they should be ground off before they break off. Be sure that any cracked or otherwise broken hammer handles are replaced. Do not tape them up and hope for the best. If working in an environment where sparks should be avoided, such as a refinery, be sure to use a brass hammer that does not produce sparks. And when using wedges, do not stack them on top of each other: pressure and force on them will increase and the stacked wedges will pop out at you. The more you have to pound them in, the harder they will hit you when they fly out.
Clamps

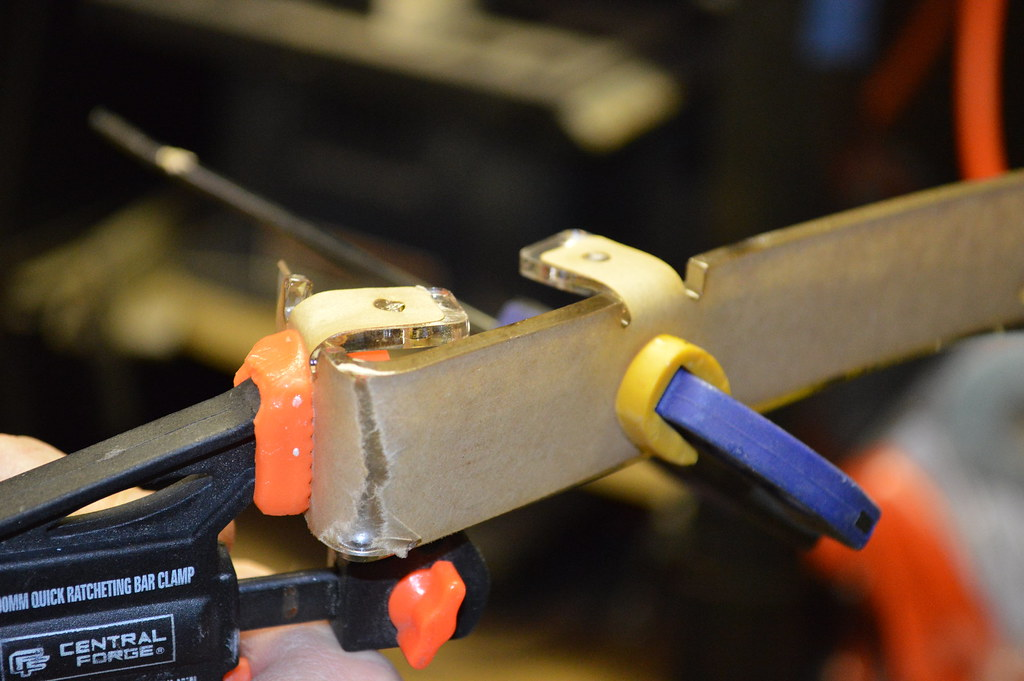
The hazard from using clamps—such as C-clamps, bridge clamps, half-clamps, and bar or pipe clamps—is the possibility of failure under load. Clamps are used to hold things in place and, sometime, to force things into place. They may suddenly fail when under a heavy load, which would mean parts flying out. This is especially dangerous when clamps are used to secure heavy components that may fall or shift if clamps fail. Never position yourself in any place that would put you in harm’s way if clamps were to fail.
Other safe practices to note are that bridge clamps, while especially strong, should never be used as an anchorage for fall protection. When clamping pieces together, be aware that surfaces that are not flat but rather at an angle, such as the legs of a channel, have a chance of slipping as pressure with the clamp is increased. And keep an eye out for a clamp that begins to bend and distort as you tighten: it is trying to warn you that danger is imminent.
Safe Use of Related Tools
The variety of hand tools and small power tools is quite wide, with new types of tools still being developed. With this in mind, keep these safety practices in mind regardless of what tool you are using:
- Always use tools according to the manufacturer’s recommendations.
- Never modify tools from their original configuration.
- Use tools only for their intended purpose.
- Repair or replace any damaged tool.
Above all, remember this: creativity and power tools are a bad combination. Only use tools for their intended purpose!
Attributions
- Figure 4.1: image released under the Pexels License
- Figure 4.2: A hammer which is rusty, damaged and poorly repaired. Colour Wellcome L0026413 by Wellcome Collections is released under CC BY 4.0
- Figure 4.3: Damaged Hammer Head by Noel Hankamer is released under CC BY-NC-SA 2.0
- Figure 4.4: 140627-Z-IL540-017 by U.S. Department of Defense Current Photos in the Public Domain; United States government work
- Figure 4.5: Irwin Quick-Grip bar clamp white by J.C. Fields is released under CC BY-SA 3.0
- Figure 4.6: ST3DSC_0682 by zittware is released under CC BY-NC-ND 2.0
