Chapter 9: Microsoft® PowerPoint®
What We’ll Cover >>>
- Presentation Software
- Microsoft PowerPoint
- Slides
- Slide Formatting
- Slideshow Design
- Transitions
- Review and Distribution
Presentation Software
Presentation software is designed to allow the user to present information in an engaging way with text, pictures, sound, and video. It is a way to communicate ideas in a powerful, organized manner. It utilizes sequences of slides that accompany an audio presentation. The presentation may also be recorded and posted online. The slides are consolidated in virtual files called slide decks. Communication skills are necessary for many careers. Presentation software can help to deliver a message online or in-person to a large audience or small group. The goal is to create a presentation that will leave an impression on the audience, and not distract them from the message you are delivering. The ultimate goal is to create dynamic, interesting presentations that engage your audience.
Presentation software can be part of an integrated suite of tools, or be stand-alone. It can be installed on a computer for full and robust features and integration with other resources; it can be accessed on the web in a light format, and it can be a basic utility tool, like text editing applications. Some programs/suites are payware, such as those used in many workplaces; others are shareware or freeware. Information in this chapter should offer you transferrable skills for use in any word processing application.
Common presentation software programs
- Microsoft PowerPoint: Available across many platforms including mobile devices for ease of use. Integrates well with Microsoft Office.
- Apple Keynote: Included with most Apple devices. Real time collaboration. Use Apple Pencil on your iPad to create diagrams or illustrations that bring your slides to life.
- Google Slides: Integrates with other Google Apps, Q&A feature, Advanced web publishing features.
- Smartphone apps that allow for quick use and editing on-the-go.
- Word processing apps in free/open source office suites.
Microsoft PowerPoint
Since Microsoft® PowerPoint® (MS PowerPoint, PowerPoint) is widely used in business, and we are using Windows, we will focus on this presentation software. There are many similarities across presentation software, so the skills we are learning can be translated to other systems. Some of the tasks in PowerPoint may seem familiar because they were used in other applications. The following Try Me activities are designed to be completed using Microsoft PowerPoint in Office 365 on a PC with Windows 10 or higher.
DEMO EXAMPLE follow-through
Accessing PowerPoint
- In your Computer, use the relevant start menu to open MS PowerPoint (look for little red icon). On a PC this is a start button on the keyboard, and/or menu on the lower left of the screen. On a Mac, this should be in the top-screen Menu option.
- PowerPoint will open with options to create a blank slideshow, open an existing file, and use templates.
- Observe the various Menu ribbons to learn what they offer.
The User Interface (UI) menus
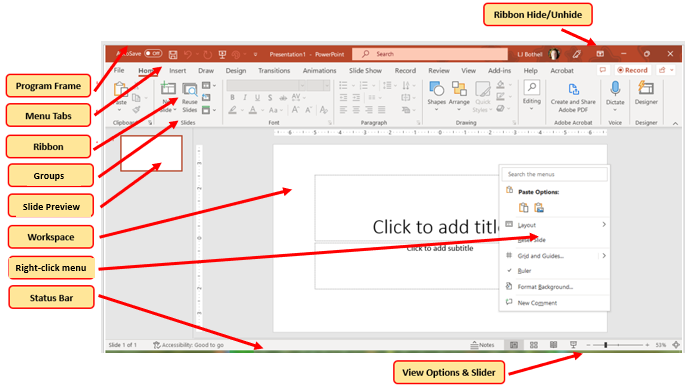
MedAttrib: author-generated. MS PowerPoint user interface screen.
In PowerPoint, the user interface contains several menu tabs (tab), with ‘Ribbons’ (ribbon) that display icons (like buttons) with text descriptions of various activities related to a task. On a ribbon, you will often see groups (group) of icons for tasks that relate to one another, like the Home ribbon’s Font group, Paragraph group, etc. Some of these icon buttons will do a simple task in one step, while others may open a panel (panel) which is a detailed, multi step or tab window of options. Sometimes you may instead see a context dropdown (dropdown) menus of options. Shown (in the program’s order) are:
- File: Accesses the program backstage area for various options. Set your preferences for workflow and productivity.
- Home: Basic text functions – formatting, positioning, styles
- Insert: tables, images, shapes, charts, page sections
- Draw: For more effects your can add to a slide, like “circling” an important point.
- Design: Layout of the slides – margins, themes, colors, etc.
- Animations: Transitions and sound.
- Slideshow: For timing and practice.
- Record: For audio recording the slideshow, and for exporting the show to video.
- Review: Spelling, language, tracking, etc.
- View: screen views, rulers, gridlines, windows.
- Additional add-in/specialty tab menus: These are dependent on having MS Word-related add-ins like Acrobat, a reference manager, etc.
- Contextual tab menus: These are contingent on a specific item in the program’s workspace being activated. For instance, clinking on an image, table, or header / footer will activate a context menu/ribbon on the right side of the UI that shows a menu dedicated to actions that can be done specifically for the active item (picture editing).
About Presentations
Presentations are a multi-page slideshow used to present a cohesive set of information/images. They are routinely used to support other documentation, not be the primary report or documentation. This means that a slideshow should focus attention on a few key points with a few bulleted supporting points, not use long paragraphs of text. Use a consistent layout, color palette, image layout/type, and transition style for professionalism.
- Information to be shared should be highlights of main points, which are shared in small amounts that can support a more detailed audio presentation with report and other print handouts. The slideshow highlights, it doesn’t act as the main word-processed document,
- Customary is Title Page, Title and content pages, and Image/Caption pages, with as-needed comparison pages and blank pages with a specific image/content design you need for the show.
- Use rulers and guides to help align your work.
- Presentations can be short to very long, use audio media, and be timed for a specific flow of information.
- Create transition slides for large section transitions.
- Use section and subsection titles to break up information in long shows.
- Use an easy-to-read font/color/style for excellent contrast info reading. Using a good sized-font at every hierarchy level makes the whole slideshow readable, even from the back of a room.
Slides
Slideshows are made up of slides with content. Their common MS PowerPoint native (editing) file extension is .pptx, and their PowerPoint show file extension is .ppsx. They can contain:
- Text paragraphs and lists.
- Images, tables, and clip art.
- Headings, subheadings, captions, and paragraph text.
- Transitions, animations, media, and timed content.
Slideshow Workspace
The default workspace for slideshows is a left-hand pane of slide thumbnails, the active slide being edited in the workspace, and a Notes pane below the workspace.
You can navigate through your slides by clicking on the thumbnails, or scrolling down the main workspace.
MedAttrib: author-generated. MS PowerPoint user interface thumbnails, workspace, notes pane.
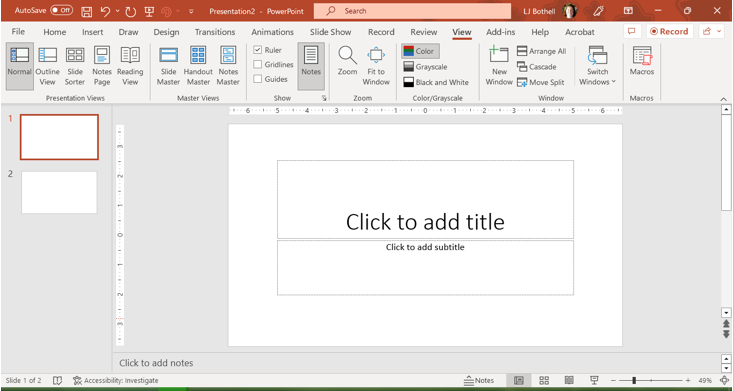
Views – View Tab
- You can see different views as part of the main interface – lower right-hand side of the user interface, and also from the View tab’s ribbon.
- You can set rulers on or off.
- You can also set guides for aligning text and images.
- You can choose the window view you like to work in, such as normal, outline, slide sorter, notes page, or reading view layouts.
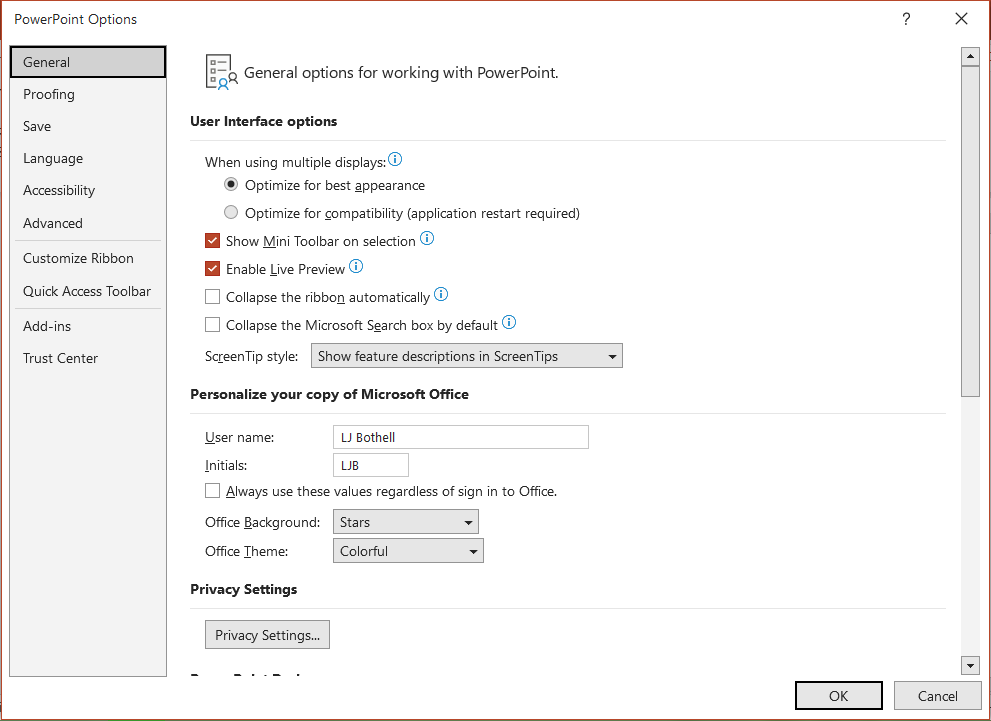
Preferences – File tab
Like MS Word and MS Excel, PowerPoint has a File tab Backstage area which lets you save slides in different formats, prepare them for print, and change the program’s options. You can set your PowerPoint program preferences for slides and program workflow, for smoother productivity, in the ‘backstage’ area of the program.
Same layout as Word, Excel, and Access and allows personalizing, print, save, and publish settings.
Slideshows are saved in the native editing format of PPTX, and when a show is meant to be actually shown when it opens, it is saved as a PPSX (show) format. They can also be saved in PDF format, and individual slides can be saved in image formats.
- You can set a slideshow up for printing out using the Print preview screen. Open the Print Preview screen to see the similar layout to Word and Excel.
- Go into the Info screen to inspect the slideshow for Accessibility and compatibility, and to protect a slideshow.
- Go into the File tab Options section, which you can use the change program settings.
MedAttrib: author-generated. MS PowerPoint user interface screen.
Slide Formatting
Text placeholder fields
In slideshows, you input text into editable fields (placeholders), with headings, paragraphs, lists, tables, images, etc. Text formatting includes indenting, spacing, and alignment. For instance, the alignment of text can be left, right, centered, or justified alignment; this paragraph is in Left alignment.
These fields also guide the kind of content you might put in them. Gor instance, a slide might have placeholders that state “Click to add title”, “click to add subtitle”. Etc.
Placeholder fields let you add text, and they also offer the option to add other items instead by showing icons that represent a table, an image, a video clip, and more.
Also, when you use a placeholder field for text, the text will routinely be added already in bulleted format. To decrease the level of the text, you need to click tab for an indented second-level of bulleted text. The thing to keep in mind here is that the bulleted text can get smaller quickly, so it is useful to look at your text formatting, make the bulleted text large enough to read, and to make the sub bulleted text, and sub-sub bulleted text, also sized to be readable.
Creating new text
If you don’t yet have text to work on yet when creating a document and setting paragraph formatting to use later as a saved style, consider using Lorem Ipsum, or one of its variants. Fun text fillers can include KittyIpsum, BaconIpsum, or ZombieIpsum. You can find Ipsum generators free online and copy/paste gibberish paragraphs into your document so you can play with some chunks of text. Let’s try some KittyIpsum now!
[Nap all day cat dog hate mouse eat string barf pillow no baths hate everything but kitty poochy. Sleep on keyboard toy mouse squeak roll over. Mesmerizing birds. Poop on grasses licks paws destroy couch intently sniff hand. The dog smells bad gnaw the corn cob.]
Home tab – Clipboard Group
At the very left of the Ribbon is the same clipboard group as we worked on in the Word and Excel chapters, which is a small set of tools you can use in relation to when text, images, and styles have been saved to the clipboard as you work. Clipboard-related activities include copy, cut, paste, and the format painter.
Home tab – Slides group
Every slide can be the same, or a slideshow can use a mix of pre-designed slide formats.
The slide text fields indicate what kind of slideshow page you are working on. A fully designed slideshow might have a title slide, title and contents pages, section header pages, comparison tables, image slides, and/or content (or a picture) with caption slides. You also can choose a blank slide without the editable regions on it fir full flexibility. The Slides group gives you the common slide layouts to choose from.
Home tab – Font Group
“Fonts” refer to the letters (characters) used in text. Font formatting includes resizing, changing the font family, adding bold or emphasis, adjusting spacing between letters, and more. You can right-click on a word or cluster of words for the contextual menu, or use the Home Tab’s font group options. These include font style, size, color, effects like bold / italics / underline, highlighting, and spacing formatting.
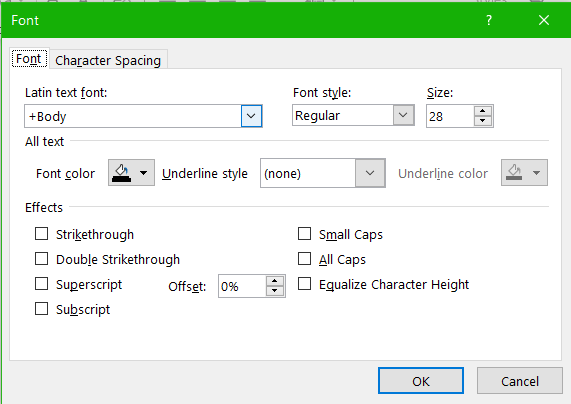
MedAttrib: author-generated. MS PowerPoint Fonts panel.
Home tab – Paragraph Group
You can modify your slide text paragraphs/bulleted lines in several ways. You can right-click on a piece of text, and choose “Paragraph” from the contextual menu. You can instead select some text, and use the Home ribbon’s one-touch paragraph group icons. You can also select some text, and choose the Home Tab’s paragraph group panel opener. With any of these, you can do alignment, spacing, indents, lists (bullets and numbers), shading, and borders.
Paragraph panel
The paragraph panel, which you can open from the lower right corner of the Home ribbon’s paragraph group, reveals a panel with several tabs of options: spacing before and after bulleted lines, specific indents, and line spacing.
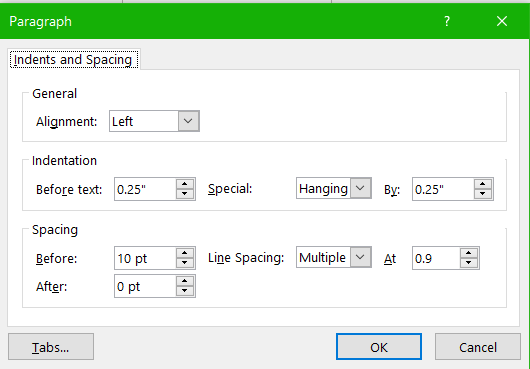
MedAttrib: author-generated. MS PowerPoint Paragraph panel.
Inserts
Inserts are basically anything you can insert into a slideshow that supplements your text content. You use the Insert Ribbon to choose what you want to add into a document: pictures, online art, icons, shapes, SmartArt, media, and text-related effects like WordArt.
Options for inserts – Insert tab
Just like Word and Excel, you can modify inserts using a contextual menu designed for the specific insert type: size, color, theme, position, etc. These Tab menu options only appear when you select an inserted item you want to modify.
ACTION: MS PowerPoint Try Me Activity #1
Let’s create a new slideshow, and then learn a few slide formatting tasks.
- Open PowerPoint.
- Open a blank presentation.
- Before you do anything else, save the new file into your Examples / MS_PowerPoint folder as PP_formatting.pptx.
In the blank slideshow, you should see a single page, It shows placeholder text boxes that PowerPoint uses to help creators guide slide content creation and display. You type into them with your content, and PowerPoint styles the content – per the in-use theme – by hierarchical bulleted lists.
Before adding any text, let’s add more blank slides.
- On the Home ribbon, Slides group, click the New Slides, which gives a dropdown of possible slide layouts.
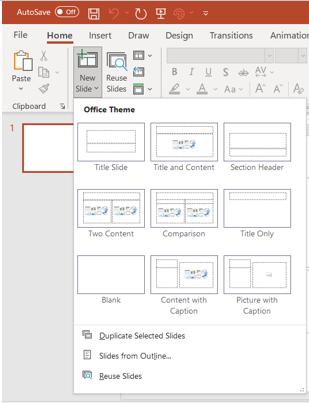
MedAttrib: author-generated. MS PowerPoint new slides panel.
Since the new slideshow already opens with the Title Slide, lets add a few pages that represent other slide layouts.
- In the New Slide dropdown, choose Title and Content.
- Add another slide using the New Slides icon: Two Content.
- Add another slide using the New Slides icon: Content with Caption.
- SAVE your work: CTRL S / MAC CMD S.
You should have mostly blank 4 slides in your show now – blank except for the placeholder fields.
When using the editable fields, PowerPoint’s default is to offer common heading and subheading styles, text styles, and bulleted hierarchy styles. This design becomes more important when using animations in a show, and how they are prioritized during a finished presentation.
- Go to the first slide. In the first placeholder that reads Click to Add Title, click inside and type First Show.
- In the second placeholder, type By YourName.
- Go to the second slide. In the first field, which reads Click to add title, type Slide Basics.
TIP: Slide Title placeholders. The placeholders that are for adding titles don’t mean that ever slide with one needs the title of the whole slideshow added there. They can also act as titles for a page, or within a section, to help a slideshow’s organization seem more cohesive.
The second placeholder is multi-purpose. You can immediately start typing text in it and use it in that way. However, a semi-transparent set of icons is also in the placeholder, which indicates that you can instead click on one of them to add content that the respective icon represents.
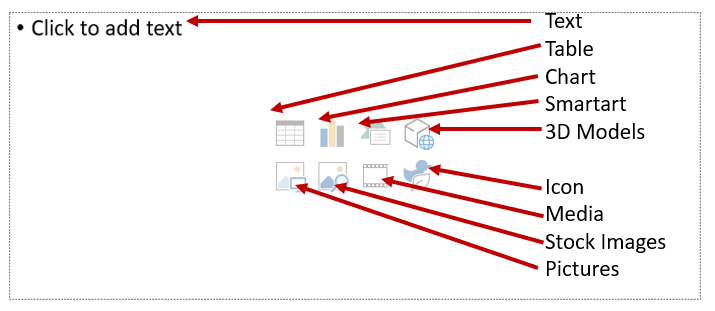
MedAttrib: author-generated. MS PowerPoint placeholder content field options.
In this slide, we’ll just add text to see how it works.
Type these lines, pressing your keyboard’s Enter key after each:
- Main point
- Supporting point
- Third-level point
- Paragraph text
- Place your cursor in from of the line Supporting point, and press Tab.
- Place your cursor in from of the line Third-level point, and press Tab twice.
- SAVE your work: CTRL S / MAC CMD S.
Observe how PowerPoint “demotes” the bullet levels so that they get smaller. This is a good time to learn that using more than one or two levels of bullets is as far as a viewable presentation should use, although you can also enlarge the size of the text of each bullet.
- Place your cursor in front of the line Paragraph text.
- On the Home ribbon, Paragraph group, click the Bullets icon to ‘turn off’ the bullet on this line. This demonstrate that you do not have to use bullets.
Go to the third slide, which has 3 placeholders. This is a standard comparison slide, which simply describes that you can have two sets of information side-by side. These could be text and graphic, table and graphic, two fields of text, etc.
- In the 1st placeholder, type Comparison Slide.
- In the 2nd placeholder (left one), type Item Description.
- In the 3rd placeholder (right one), click the Online pictures icon, and use the search field that opens to search for (and insert) an image you like.
Go to the fourth slide, which has 3 placeholders. This is a standard content with caption slide, which simply describes that you can have captioned information side-by side with a table, a graphic, etc.
- In the 1st placeholder, type Text header.
- In the 2nd placeholder (left one), type Add some text here.
- In the 3rd placeholder (right one), click the Table icon, and use the dialog box that opens to type 3 in the Number of columns, and 4 in Number of rows.
- SAVE your work: CTRL S / MAC CMD S.
Now we have a basic slideshow with components we can practice manual font formatting.
Like in Word and Excel, formatting options happen mostly in the Home ribbon, with the Font group and Paragraph group.
Go to the first (Title) slide.
- Select the title text and use the Home ribbon Font group to make the text Bold, and dark blue.
- Select the subtitle text (your name) and use the Home ribbon Font group to make the text italicized.
Go to the second slide. Let’s make the content text larger.
- Select the 1st bulleted item, and use the Home ribbon Font group to make the text 36 pts.
- Select the 2nd bulleted item, and use the Home ribbon Font group to make the text 32 pts.
- Select the 3rd bulleted item, and use the Home ribbon Font group to make the text 28 pts.
- Select the paragraph text, and use the Home ribbon Font group to make the text 32 pts.
Go to the third slide. Let’s edit the image.
- Click on the image. Like in Word and Excel, an activated image (or other insert) opens a new contextual menu/ribbon. For this image it is a Graphics Format ribbon.
- With your online image active, use the Graphics Format ribbon, Size group, to make the image 6 inches wide.
- Use your cursor to click and drag the image to make it seem more centered, if the resizing moved or altered its centered appearance.
- Click the image, and use the Graphics Format ribbon, Accessibility group, to add accessibility content.
- Click the Alt Text icon, which will open a docked Alt Text panel on the right of your workspace.
- In the Alt Text field, you may already see some text. However, replace it with: “Stock image of a (whatever the image is of).” This tells a screen reader that there is an image and what the image is.
Go to the fourth slide.
- Make the Text Header line bold and a medium-dark gray.
- Use the Home ribbon Font group to make the paragraph text below the Text Header 24 pts in size.
Let’s work on the table. Like in Word and Excel, tables should have a header row, and PowerPoint defaults to adding formatting form one to an inserted table.
- Click in the table’s first cell, which should be in a darker colored row – the header row.
- In the 1st header cell, type Fave Weekday.
- In the 2nd header cell, type Fave Activity.
- In the 3rd header cell, type Saturday Fun.
- If you’d like, you can fill in your faves in the table cells below.
Click on the table, and observe that a Table Design ribbon and related layout ribbon to its right appear.
- In the Table Layout ribbon, Table Styles group, choose a different table color and intensity.
- SAVE your work, and close the file. POWERPOINT ACTIVITY #1 FINISHED.
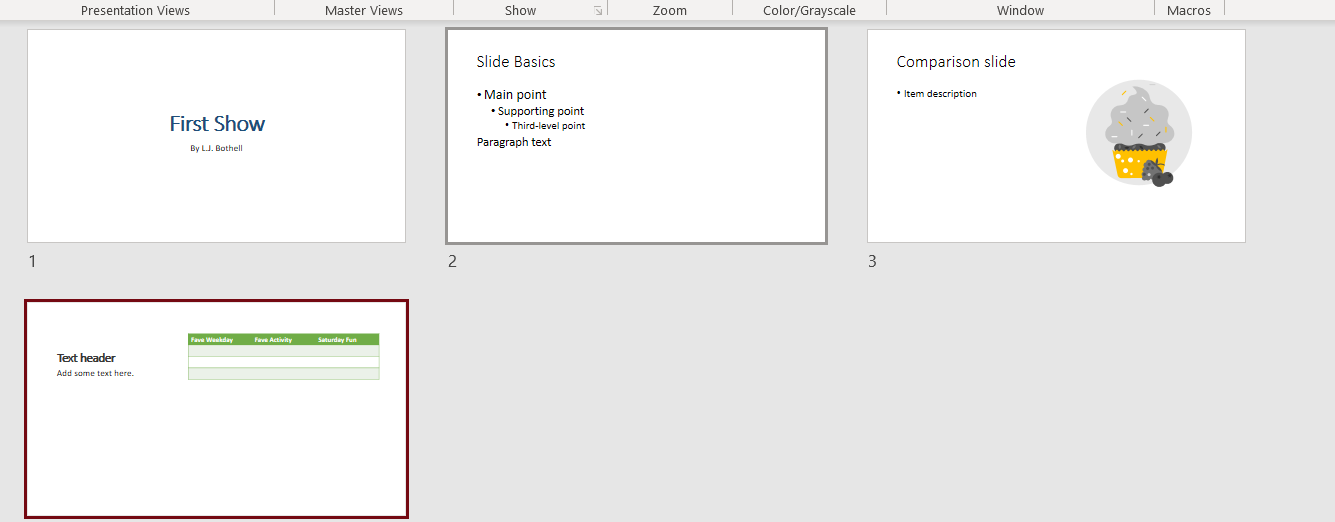
MedAttrib: author-generated. MS PowerPoint example 4-slide show with edits.
Now we’ve had a good introduction to new slides and basic manual font formatting.
Slideshow Design
Text and paragraph formatting are parts of what happens in a slide. This section is about the overall slideshow itself – how it will present when given as an active animated slideshow, printed out, and consumed by users. Slideshow formatting is characterized by actions that can affect the whole document, and in so doing, add efficiency and steps-saving to general text and paragraph formatting. These include document layout, themes and styles, headers and footers, and some use of sectioning. Much of this will seem familiar from Word and Excel.
Master Slides – View tab
In the View tab Master Views group, you can access a slide master view to show all the potential pages that you can use in a slideshow theme. This is useful, and a good first step to using a theme, so that you can add footer information, make sure your show’s title usage is consistent and correct throughout the show, and make specific style changes to the actual master pages of the show’s theme. You want to minimize having to touch individual slide designs.
The footer section in the slide master lets you add a page number, date, other footer content, and style it so that it appears the same way each time that slide is used.
One thing to not, and this is a reason why the master slides are considered more intermediate in skill; each and every possible style page in the master view needs to be edited for consistency, or else you may insert slides from your modified theme and still see some differences. For instance, if you change the size and content of a slide’s footer in one master view page, you need to make the same change to all the master view slide variations.
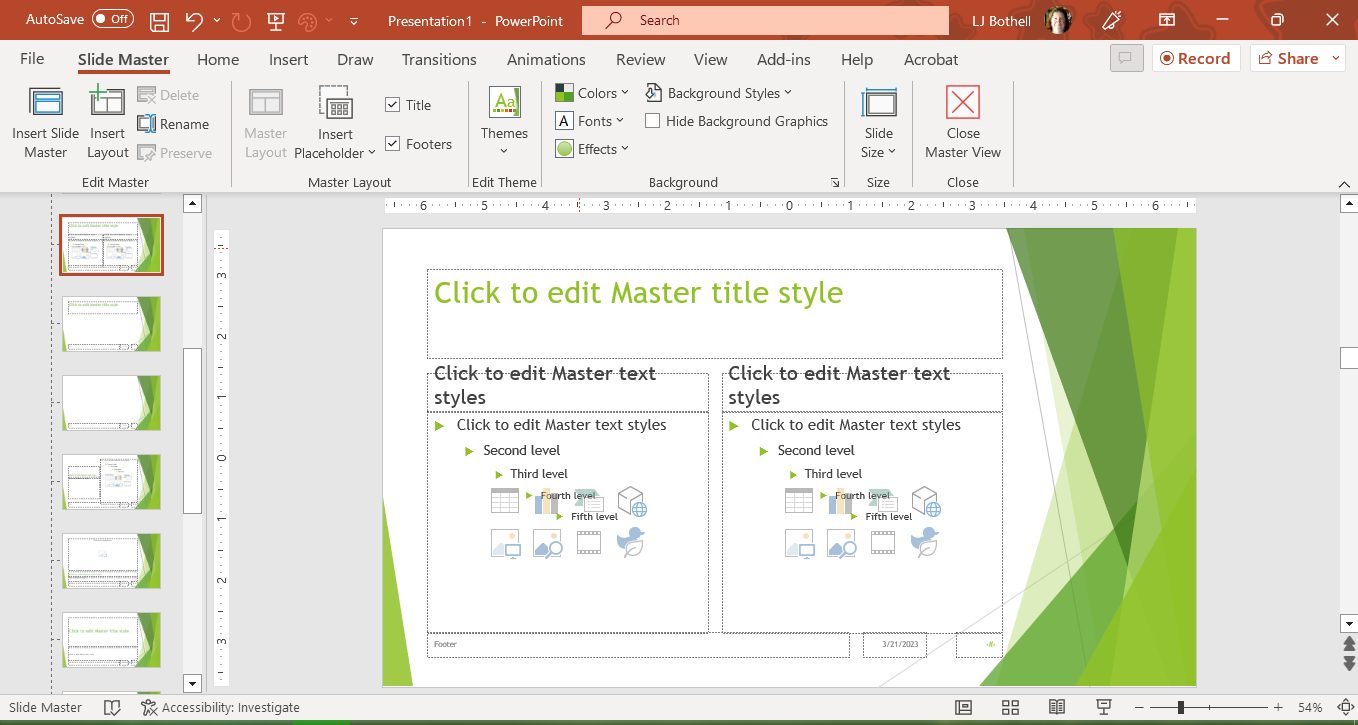
MedAttrib: author-generated. MS PowerPoint Slide Master interface.
Setting up slideshows – Design tab
The Design tab allows you to set the physical format of your slideshow, which is a good first starting step in developing a slideshow. This determines how large the slides will be, the orientation of the document, etc. In the Design tab Customize group, the Slide size icon dropdowns lets you choose an existing size or set a custom slide size.
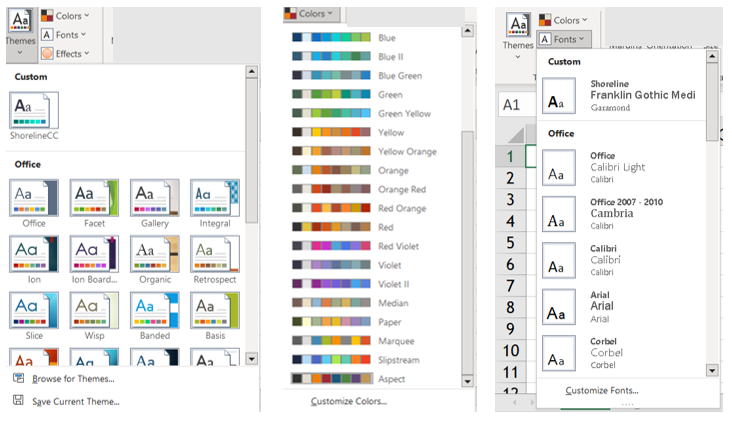
MedAttrib: author-generated. MS PowerPoint themes, and color / font palettes.
Designing documents – Design tab
Themes apply decorative styles to your PowerPoint document (just like in Word and Excel), such as fonts, colors, effect options, paragraph spacing, etc. They can give a slideshow a consistent and attractive appearance and efforts look more professional. In business, they are best used as part of a “package” of documents, such as a slideshow accompanying an annual report with Excel graphs and charts inserted. They can enhance what you want to communicate by adding company branding colors and fonts. You can also:
- Make your slideshow more readable than just black-and-white text
- Tie consistent inserts, like shapes and borders, together with the rest of the document’s “look”
- Use different colors and font styles to punctuate headings from text
- Help your reader respond and/or act in the way you need, and
- Easily update the whole look of your document just by changing the color or font variants
Design: Theming / Design Tips
Like Word and Excel, using themes can be a double-edged sword. While they can add attractiveness to your documents, they can also, if misused, make your work look confusing, be hard to read, and muddy your communication message. Certain types of work should not use themes, like cover letters and resumes, which are routinely expected to be plain and standardized and which the receiver will likely scan into a program for database acquisition.
- Choose theme colors that make sense for the product, service, or idea(s) you are trying to communicate
- Choose theme backgrounds that have good contrast and allow text to be very easy to read
- Choose fonts for readability, based on need for headlines, lots of paragraph texts, easy bulleting, etc.
- Remember that less is more – more colors and font variations in one document can look unprofessional and take away from your message.
- Use themes only when you have full control over your own document – if you have an instructor or employer who does not want them used, then instead focus on using a template of the required styling.
Design: Theme Variants
Theme variants let you change aspects of a theme you select to apply a different core font family to it, or to change the color palette it will work with.
- Fonts: Font families in themes are designed and sized to be readable and hopefully scannable by screen readers for accessibility use. The style will offer a font for titles/subtitles, and another for general text. Available font families come installed with the computer’s operating system, and may also be accessed from the word processing software’s installation or cloud-based accessories.
- Color Palettes: Like fonts, color palettes are included in a style, and can also be changed independently to modify and create a new style. For instance, the overall design style of a theme may work for you, but the color palette assigned to it may not have enough contrast for your audience, or your company may focus on a different rage of core colors.
- Effects: These are subtle styles that can be attached to some inserted items, like image borders, shapes, SmartArt, etc.
Theme Variants
- Page Color: This allows assigning a color to a slide template, with previews of several colors in the theme’s palette.
- Design: The Design tab has a Designer group, with a Design icon that can help you generate additional layout ideas for your show.
ACTION: MS PowerPoint Try Me Activity #2
Let’s work on slideshow design.
Before you start, you should use your file manager utility to make a copy of the PP_design.pptx file that is in your DataFiles folder, then paste the copy into your Examples / MS_PowerPoint folder.
- If MS PowerPoint isn’t open yet, open PowerPoint.
- Go to the Tile tab Backstage and Open a file, then use the browser dialog panel to find the PP_design.pptx file that should be in your Examples / MS_ PowerPoint folder, then open the file.
You should have a show with six slides of different layouts. We’ll use this for slide formatting practice. Our goal is look at Master slides, set a theme, and view the slideshow layout.
- Let’s choose a theme. Use the Design ribbon, Themes group, to pick the Facet theme.
- Scroll through the slideshow to see how the theme affects each slide.
- If you see that some text looks off center, you can drag the text box to center it, and also use the Home ribbon’s Paragraph group to change the alignment of the text (like centering).
- Use the Design ribbon, Variants group, to pick a variant color of the Facet theme that you like.
- If you don’t like the selection, click the small arrow at the lower right-hand corner of the Variants group to open a dropdown menu that offers a colors palette, font palette, and effects options.
- Choose a different color palette from the selection.
- Choose the Effects option from the Variants group dropdown, and pick one you like.
In the last activity, we manually changed the font size of some of the bulleted text. Let’s do that here, using the Slide Master view, so that existing slides, and new ones, have larger body text (first three levels of bullets).
- Go to the View ribbon, Master Views group, and click Slide Master. The Slide Master view will show thumbnails at the left of each kind of page the show has built-in, so that you can touch any of them up and have newly created slides follow these Master Page changes. It also provides a Slide Master ribbon, which has the themes and background options, as well as a button to Close Master View.
- From the Thumbnails, choose the top slide, which has the key styles for all bulleted text for the slideshow. Clicking this thumbnail will place an editable version into your workspace.
Notice that there are several placeholders, including three at the bottom that act as footer information.
- In the Slide Master, select the 1st line of bulleted text, and use the styles toolbar that opens (or the Home tab Font group options) to change the font size to 28 pts.
- In the Slide Master, select the 2nd line of bulleted text, and use the styles toolbar that opens (or the Home tab Font group options) to change the font size to 24 pts.
- In the Slide Master, select the 3rd line of bulleted text, and use the styles toolbar that opens (or the Home tab Font group options) to change the font size to 24 pts.
- Close the Slide Master view.
What this does is enlarge the base size of the overall slideshow text. To get more granular changes to every slide, we would need to touch every master slide.
- SAVE your work: CTRL S / MAC CMD S.
- Let’s find out what the slide size is. Use the Design ribbon, Customize group, and choose the Slide Size.
The Slide size defaults to Standard (4:3), with an alternative of (16:9) and of Custom Slide Size. Do not change the size.
TIP: Changing slide size. When slides change to a new size, but any Master Slide changes will revert to the new size’s Master Slide defaults.
- SAVE your work, and close the file. POWERPOINT ACTIVITY #2 FINISHED.
Transitions
Transitions are one design item that is unique to PowerPoint. Because a slideshow is meant to be active and engaging, and because it may have many slides, one way to keep viewers from having a jolt from immediate slide changes is to program in transitions. A transition might take a couple of or a few seconds, provide a ‘slide separation’ effect, and help keep a show engaging.
Slide transitions – Animations tab
PowerPoint offers a number of build-in animated transition and layout actions. They can be used for an entire slide transition, or a specific in-slide item transition/animation. These give the feel of interaction and movement in presentations and allow creation of complex animated slideshows that can look like Flash Movies..
- Common animation thumbnails appear in the Transitions ribbon.
- The left-most is the Current animation theme.
- Clicking other thumbnails to the right of the Current will change to that of the thumb you choose.
- You can also change the transition speed and sound.
- You can set slide advancement timing so that the presenter stays on a specific schedule.
- A transition can be applied to the current slide, or all slides in the show at one time.
- For a professional and non-jittery feel, you can consider applying the same transition to all the slides.
ACTION: MS PowerPoint Try Me Activity #3
Let’s do some work with transitions, and maybe a simple animation.
Before you start, you should use your file manager utility to make a copy of the PP_transitions.pptx file that is in your DataFiles folder, then paste the copy into your Examples / MS_PowerPoint folder.
- If MS PowerPoint isn’t open yet, open PowerPoint.
- Open a file, and use the browser dialog panel for the PP_transitions.docx file that should be in your Examples / MS_ PowerPoint folder, then open it.
You should see six formatted slides. A theme has already been selected, and the Master Page has been updated to have larger base fonts. Our task here is to set slideshow transitions, maybe an animation, and to test the slideshow.
Transitions can be applied one page at a time, or on all slides. We’ll start small then learn more efficient practices.
- Go to the first page of the slide show.
- Activate the slideshow as it currently is. We want to observe how the slideshow works. When you start a slideshow viewing, by default it will begin from the slide you are currently on, unless you tell PowerPoint otherwise.
- Using the Slideshow ribbon, Start Slide Show group, choose the From Beginning icon. You can also use the Status bar’s Slide Show icon. The Function 5 key also starts a slide show.
Okay, now we see the first slide. It is just stuck there. What’s up? The default for moving pages along is to press the keyboard enter button, to click the mouse, or the keyboard Page Down button.
- Press the enter button, and the slide show changes pages. Keep pressing Enter, and the slideshow will progress until you reach the last slide, then it will exit back to the Edit mode.
That was nice. It will be nicer if the pages transition with some kind of effect.
- On the first slide, go to the Transitions ribbon, Transition to this Slide group.
- Click the dropdown to open the dropdown transitions selector. Choose Random Bars from the “Subtle” area.
- SAVE your work: CTRL S / MAC CMD S.
Look at the thumbnails of the slides. The first slide, which we applied a transition to, has a small star to its left – this indicates there is a transition.
- On the Transitions ribbon, a Preview Icon becomes available at the left. Click it once to preview the transition.
- Now, use the Function5 key (F5) to start the slide show.
The slideshow starts with the transition. You need press Enter to advance the show, and. . . there are no more transitions.
- Use the Escape button to escape the slideshow.
A transition needs to be applied to every slide for every slide to use it. You can set transitions on every slide at one time two ways:
- Select all slides by clicking the first thumbnail, pressing the shift keyboard key, and then selecting the last thumbnail. Once all slides are selected, choose the transition, which will apply to all. Or,
- Use the Transitions ribbon, Timing group, and choose Apply to all.
In our case, make sure you are on the first slide which has the transition, then click the Apply to all. Now all the slides have the star icon.
- Use F5 to run the slideshow, and press Enter to advance the slides. Note that the most pronounced version of the transition happens when the show opens; the remaining pages transition more subtly.
- On the first slide, choose a different transition, such as the more “exciting” Honeycomb.
- On the Transitions ribbon, click the Apply to all, so that the new transition replaces the old one.
- Use F5 to rerun the show.
Can we change the time on a transition? Yes. Make sure you are on the first slide
- Using the Transitions ribbon, Timing group, change the Duration to 1.50.
- Add sound by using the Transitions ribbon, Timing group, and clicking the Sound dropdown. Choose the Chime sound (or another you prefer).
- From the First slide, use the Transitions ribbon and click the Apply to all to add the timing and sound to all the slides.
- Use F5 to rerun the show. The show is more dynamic, and seems to run faster.
Can we use some other method to advance the show besides the Enter button or mouse click? Yes!
Be on the first slide again.
- Using the Transitions ribbon, Timing group, and unclick the On Mouse Click. Put a check in the After checkbox, and adjust the time to read 00.03.
- From the First slide, use the Transitions ribbon and click the Apply to all to add this change.
- Use F5 to run the show. The slides will automatically advance every 3 seconds.
- SAVE your work: CTRL S / MAC CMD S.
Animations
Animations are another design item that is unique to PowerPoint. An animation can be as simple as using a transition-like effect on an item, like fading out a picture. Or it can be used to bring in a list of text one bulleted line at a time. You can create an animated and programmable ‘button’ to advance pages on a slideshow with a click. You would use the Animations tab to add and time animation content so that the show feels like a movie. Animations can be applied to text, to pictures, and to ither inserts like shapes, clipart, WordArt, etc.
You can also open an Animation pane in the Animations tab Advanced Animation group. This pane is necessary because if you have multiple animations in a slideshow, and even on the same page, you will need to tell PowerPoint several things:
- What order to serve the animated items. The standard order is that the first things on a slide animate first – BUT, this can mean the first thing created on the slide, not the first thing in the order you ‘see’ the items.
- The timing of and between animation actions.
- The speed of an animated effect.
- How an animation should start – on a mouse click, on a timed delay, etc.
- How you choose to change the order of animations.
Let’s try an animation.
- First, go to the first slide, and then reset the Advance Slide option back to On Mouse Click, and uncheck the After checkbox. Otherwise, the automatic slide timing will conflict with any animation you create.
- From the First slide, use the Transitions ribbon and click the Apply to all to add this change to all the slides.
- Go to Slide 2, and in delete the contents of the right-hand placeholder, so that you can see the icons to add content.
- Choose the Stock Images, and find some vacation image from another country to import. Once the image imports, it will size itself to the size of the placeholder field.
- Click on the image, then go to the Animations ribbon, Animation group, and choose the Fade animation.
- On the Animations ribbon, Preview group, and click Preview.
- On the Animations ribbon, Timing group, and set the Duration to 1.2, then preview again.
- Go to slide 1, and use F5 to run the show. It should need you to press enter or use a mouse-click to advance the slides.
- Advance to slide 2 and stop. Notice that there is no image.
- Click the mouse or press Enter. The image should fade in.
- Press Enter again to continue advancing the show, or press Escape to escape the show.
- SAVE your work.
Shall we try an animated list of text? Go to Slide 3, which has 4 lines of bulleted text. Let’s determine how we can make each of these line appear one at a time from top to bottom.
- Click on the Slide 3 placeholder with the 4 lines of bulleted text.
- Go to the Animations ribbon, and choose Fly in from the Animation pane.
- Use the Go to the Animations ribbon Preview icon to see the animation. This is how the lines should ideally come in, considering timing, etc.
Look at the Placeholder box’s text, and notice that to the left of each bulleted line, a number appears.
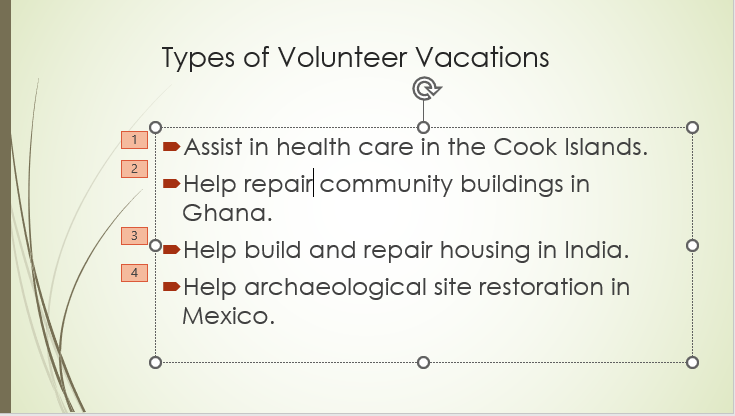
MedAttrib: author-generated. MS PowerPoint text slide.
The numbers display the order in which the text will appear. In this case, we do not need to change the order.
- On the Animations ribbon, Timing group, and set the Duration to 1.5, then preview again. The lines appear more slowly.
- On the Animations ribbon, Timing group, look at the Start field, which shows On Click. There are other options, but we’ll stay with this default.
- SAVE your work.
- Go to Slide 1, then run the slideshow with F5. Use your mouse click or Enter button to advance each slide and animation.
For your own practice, you can try animating the text placeholder contents on slides 4 and 5.
On the final slide, let’s add a large image from your favorite travel place. In this case, you will need to remove the text-only placeholder, and simply import an image in to the page.
- Use the Inserts tab, Images group, Pictures / Online pictures, and search for an image.
- Import the image, and resize it to be about 10 inches wide.
- Use the Picture Format context ribbon to add a predesigned border from the Picture Styles group gallery.
- Click the image, and use the Animations ribbon, Animations group to pick an emphasis animation to apply to the image.
- Use the Animations ribbon, Timing group to change the Duration to 1.25.
- SAVE your work.
- Run the slideshow from the beginning.
- SAVE your work, and close the file. POWERPOINT ACTIVITY #3 FINISHED.
Review and Distribution
PowerPoint is about presenting work – in person, as timed online presentations, etc. It is used in meetings, conferences, sales contacts, on websites, in streaming threads, etc. The various illustration, transitions, and animation tools make PowerPoint uniquely capable of having interactive data presentation.
You can also create slide notes, to appear below slides, and/or to be printed out for a separate handout in a meeting.
Output – File tab
Review and distribution of your work is about preparing it for who will be consuming it. Will it stay in a Word document format, be saved as a PDF, printed onto paper, added as website content, populate an add or newspaper article, or be part of a book? Like Word and Excel, a PowerPoint file needs to be:
- Spell checked
- Grammar- and language- reviewed
- Accessibility enabled (alt text, proper use of heading styles, accessibility for screen readers).
- Have versioning considered.
- Have hyperlinks tested.
- Be cited and attributed properly for intellectual honesty.
- Passed for plagiarism and other content integrity needs.
- Presented for readable print viewing.
- Secured for limited/no editing.
- If meant for team collaboration, prepared for making shared/trackable changes, comments, and notes.
Output/distribute work
- You can test and adjust your documents and review your content before it goes live by looking at the File/Print sections Print Preview and settings.
- You can make sure you have added metadata for web/online reference by updating information in the File/Info page.
- Slideshows can be saved in as a slideshow, native slide prepared format, as a template, and in other formats, like images and PDFs.
- You can save files in different formats for distribution in the File backstage areas, like Save As (for current and older versions, RTF, text, and HTML), save as PDF, export, etc.
This should give you a good overview of MS Word skills that you can use in school and as a starter for basic workplace support tasks.
