Sketch-Based Features
Extruded Boss/Base
We had exposure to Extruded Boss/Base in the last chapter but didn’t explore its full potential. The Extruded Boss/Base feature has many options controlling the depth of a feature: how deep the feature is extruded, which direction is the feature extruded, does the extrude taper, does it go up to a certain point or is offset from a certain point, etc.
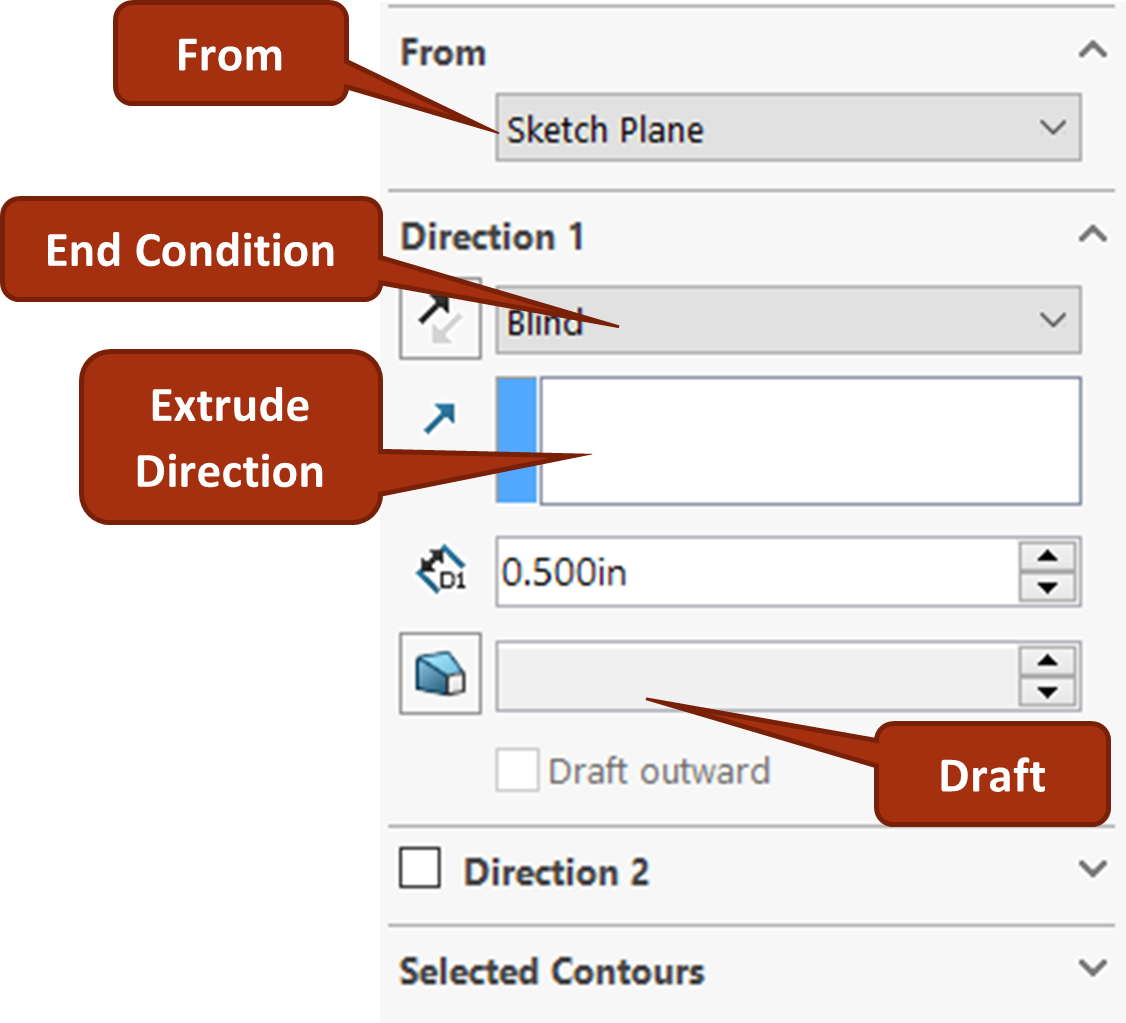
When you start a boss extrude, either from a sketch or with intent to specify a new sketch, you are able to modify the property manager for the extrude feature. The following options are available:
From
Specify where your extruded feature will begin. The most common option is from the sketch plane, but you might want to start it from a different face/plane/vertex or offset it from the sketch plane for special situations.
End Condition
Specify where extruded feature will end.
- Blind: You can have it end a distance from the sketch plane
- Up to Vertex: The feature will extrude to the depth of a selected point.
- Up to Surface: The feature will extrude to the depth of a selected face or plane.
- Offset from Surface: The feature will extrude to the depth of a selected face or plane plus/minus a specified offset distance.
- Mid Plane: A popular option that allows the extruded feature to be centered about the sketch plane and end an equal distance from the sketch plane on both sides.
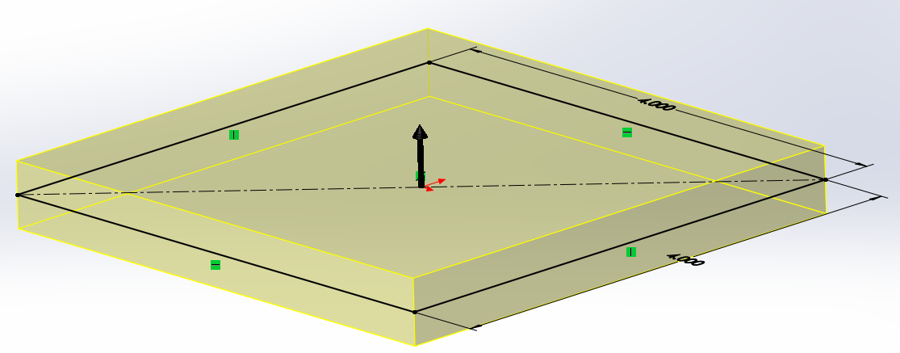
Extrude Direction
The default direction is 90 degrees from the sketch plane so you don’t usually need to specify anything in this box, but for instances when you want to extrude at an angle different from 90, you can select a model edge or reference line to specify a new direction.
Draft
Draft adds a taper to the extruded feature along the depth of the feature.
Direction 2
You can specify a second direction usually going in the opposing direction of the first. This is useful for specifying different depths/conditions from the sketch plane (which becomes the center of the extrude in this scenario).
Selected Contours
If you don’t want to extrude your entire sketch, you can specify the areas (or contours) that you want to extrude. This is a great efficiency tool we will learn about later that when used can reduce sketch time by almost a factor of ten. It eliminates the need to trim which is one of the most time-consuming tasks in sketching!
Exercise 4.1 Extruded Boss/Base Options
Let’s practice manipulating a few of the Extruded Boss/Base options to get familiar with what each does and how we can use them to model towards design intent. With the model we are going to begin creating, be sure to save it and keep it open as CAE1001 because we will continue to use it in following exercises to complete a multi-feature part.
- Open a new part in SolidWorks with IPS units and your preferred drafting standard.
- Create a simple sketch on any of the default planes in a new SolidWorks part.
- Extrude the sketch and practice changing various parameters in each of the sections described above.
Extruded Cut
The Extruded Cut tool is another extrude feature that is used to make cut outs, pockets, etc. into your existing solid model.
An extruded cut can’t be your first feature in a part because you must cut into something, so you at least need to have one extruded feature in the model before you can use cut extrude. Extruded cut is a Sketch-Based Feature, so you start a sketch on a plane or a face in the model, sketch your cut profile, and then use cut extrude to specify the details of the depth of cut.
Sketching on Model Faces
Sketching on a model face is very similar to sketching on a plane. The key advantage however is that when you sketch on a model face, your extruded features will by default originate from that face. This fact is very useful in making the part shown in figure 4.4.
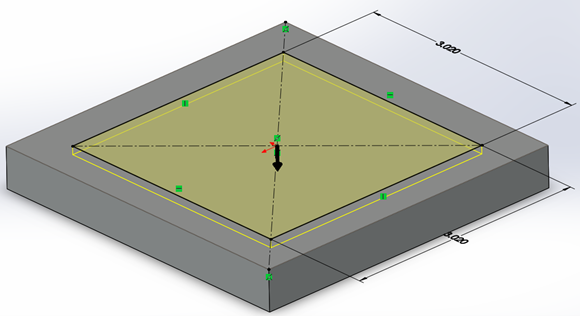
When sketching in a model that already has a feature in it, in your new sketch you can utilize the edges and faces from that already existing feature. For example, say for the model in figure 4.4 instead of specifying a length and width for the rectangular cutout, you wanted to specify that the rectangular cutout be an offset distance away from the exterior rectangle. You can then select the face of the exterior rectangle and use the offset command to offset the internal rectangle the distance you desire. You can also use Convert Entities to reuse model edges in a new sketch.
Cutting with Open Sketches
Another option that exists with the Cut Extrude tool is cutting models with open sketches. For example, if you wanted to saw off tubing at a 45-degree angle, instead of drawing a closed sketch that would completely miss your design intent, you can just draw a line at 45 degrees (Figure 4.5).

Exercise 4.2: Using Cut Extrude in SolidWorks
Using the same model from the previous exercise, CAE1001, we will create a cut-extrude on the top face of the part and explore the different cut extrude options.
- From the CAE1001 model, start a sketch on the top rectangular face.
- Draw a 3.020″ by 3.020″ center rectangle centered on the origin.
- Extrude a blind cut .100″ into the material.
- Explore other options with the cut extrude and with using existing model edges in a sketch on a model face.
Hole Wizard
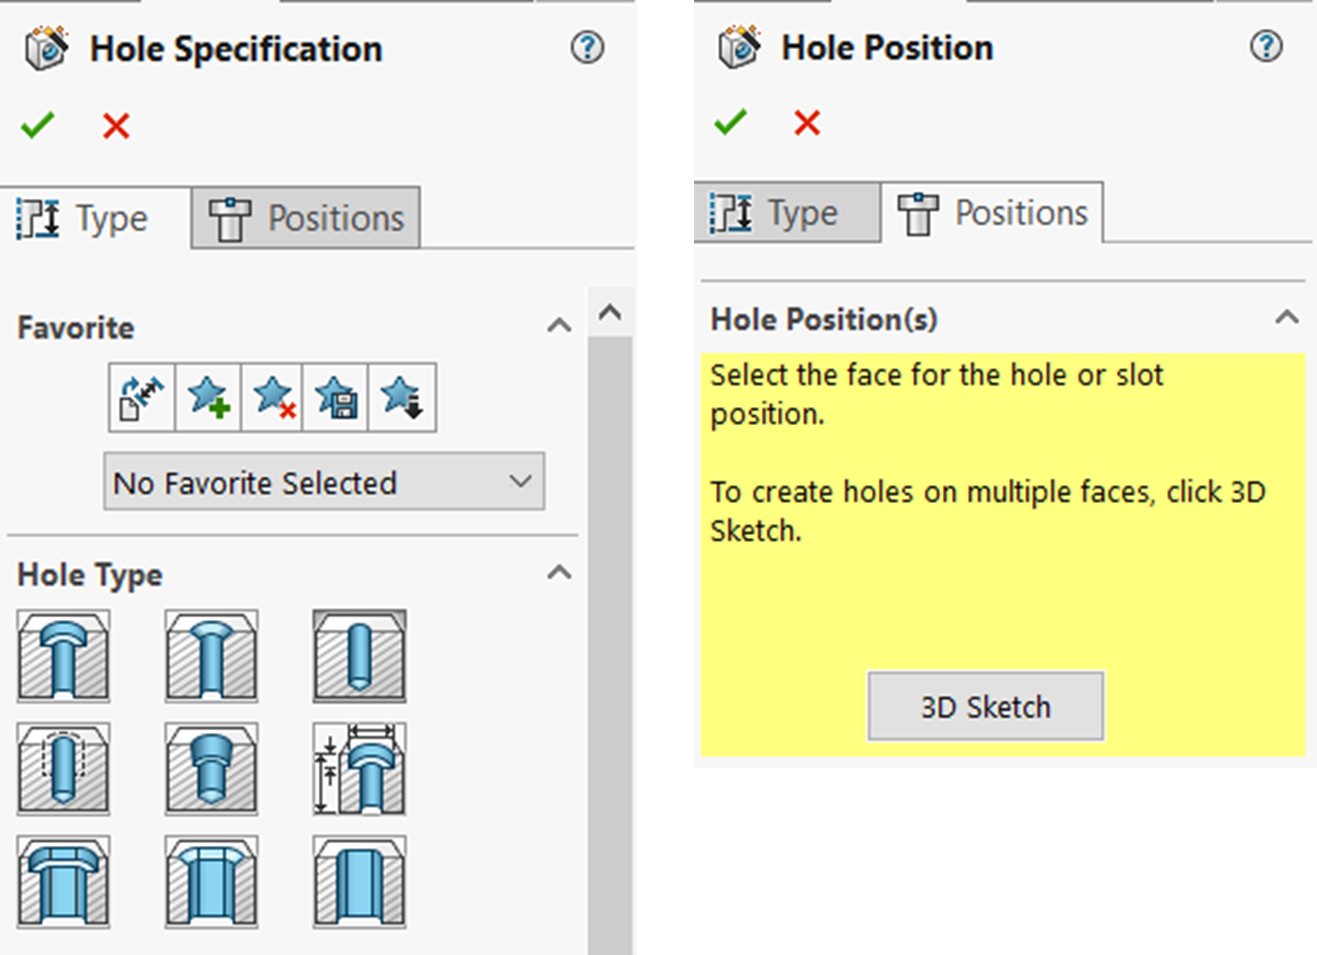
The hole wizard is a macro tool that combines sketching, extrudes, and revolved features into one highly customizable tool for creating standard holes. Think of the holes that fasteners and pins go into; this is the tool to quickly specify these kinds of holes! The hole wizard has two tabs: The type tab and position tab (Figure 4.7).
Type Tab
The type tab is used to specify the type of hole you want to specify such as whether it is a counterbore, countersink, tapped hole, etc. This is also where you specify the depth of your hole or if your hole goes all the way through the part, if it has a nearside or far side countersink, if the hole bottom needs to be flat or can have the shape of a drill bit, and much more.
Positions Tab
The positions tab is for placing your hole. This tab works more as a sketch where you select the face (this can be a planar or a curved face) where your hole will start and then sketch to define the location. Holes are placed with the point sketch tool . You have access to all the sketch tools you usually have in a sketch when on the positions tab of the Hole Wizard.
Exercise 4.3 Using Hole Wizard Holes
Here we will experiment with the various hole types available within the Hole wizard tool. Most standardized hole types used in mechanical design are available within the hole wizard tool.
- With CAE1001, place a hole on the bottom center of the part thus far by activating the Hole Wizard command, switching to the positions tab, selecting the bottom face, and then placing a hole at the center.
- Note that holes are placed in Hole Wizard using the point sketch tool on the sketch tab of the CommandManager.
- To best get familiar with the Hole Wizard tool, experiment with changing different settings such as the hole type, end condition, check boxes, etc. on the Type tab.
See more information at SolidWorks Help: Extruded Cut
Convert Entities is a sketch tool that allows you to convert existing model edges visible through a sketch plane into sketch entities such as lines, arcs, and points. See SolidWorks Help: Convert Entities.
Hole wizard makes it fast and easy to model standard holes in a mechanical design. The macro tool consist of a Type tab, where the hole specifications are set, and a Positions Tab, where the position of the hole(s) is specified. See SolidWorks Help: Hole Wizard for more information.


