Sweep
Sweep is an extrusion tool that allows you to extrude a profile such as a circle or a square or a complex shape along a sketched path. When you think of swept features, think of complex pipe routing or guard rails or springs. Because swept features are made up of a swept profile and a path that profile follows, they generally require two sketches (except when the profile is a simple circle or tubular shape).
Sweep has four main applications:
- Circular profile along a simple path
- Tubular profile along a simple path
- Custom profile along a simple path
- Profile along a helical path
Sweeps must follow these rules (Taken from SolidWorks Help on Sweep Rules):
- The profile must be closed for a base or boss sweep feature; the profile may be open or closed for a surface sweep feature.
- The path may be open or closed.
- The path may be a set of sketched curves contained in one sketch, a curve, or a set of model edges.
- The path must intersect the plane of the profile.
- Neither the section, the path, nor the resulting solid can be self-intersecting.
- The guide curve must be coincident with the profile or with a point in the profile sketch.
Circular Profile Along Simple Path
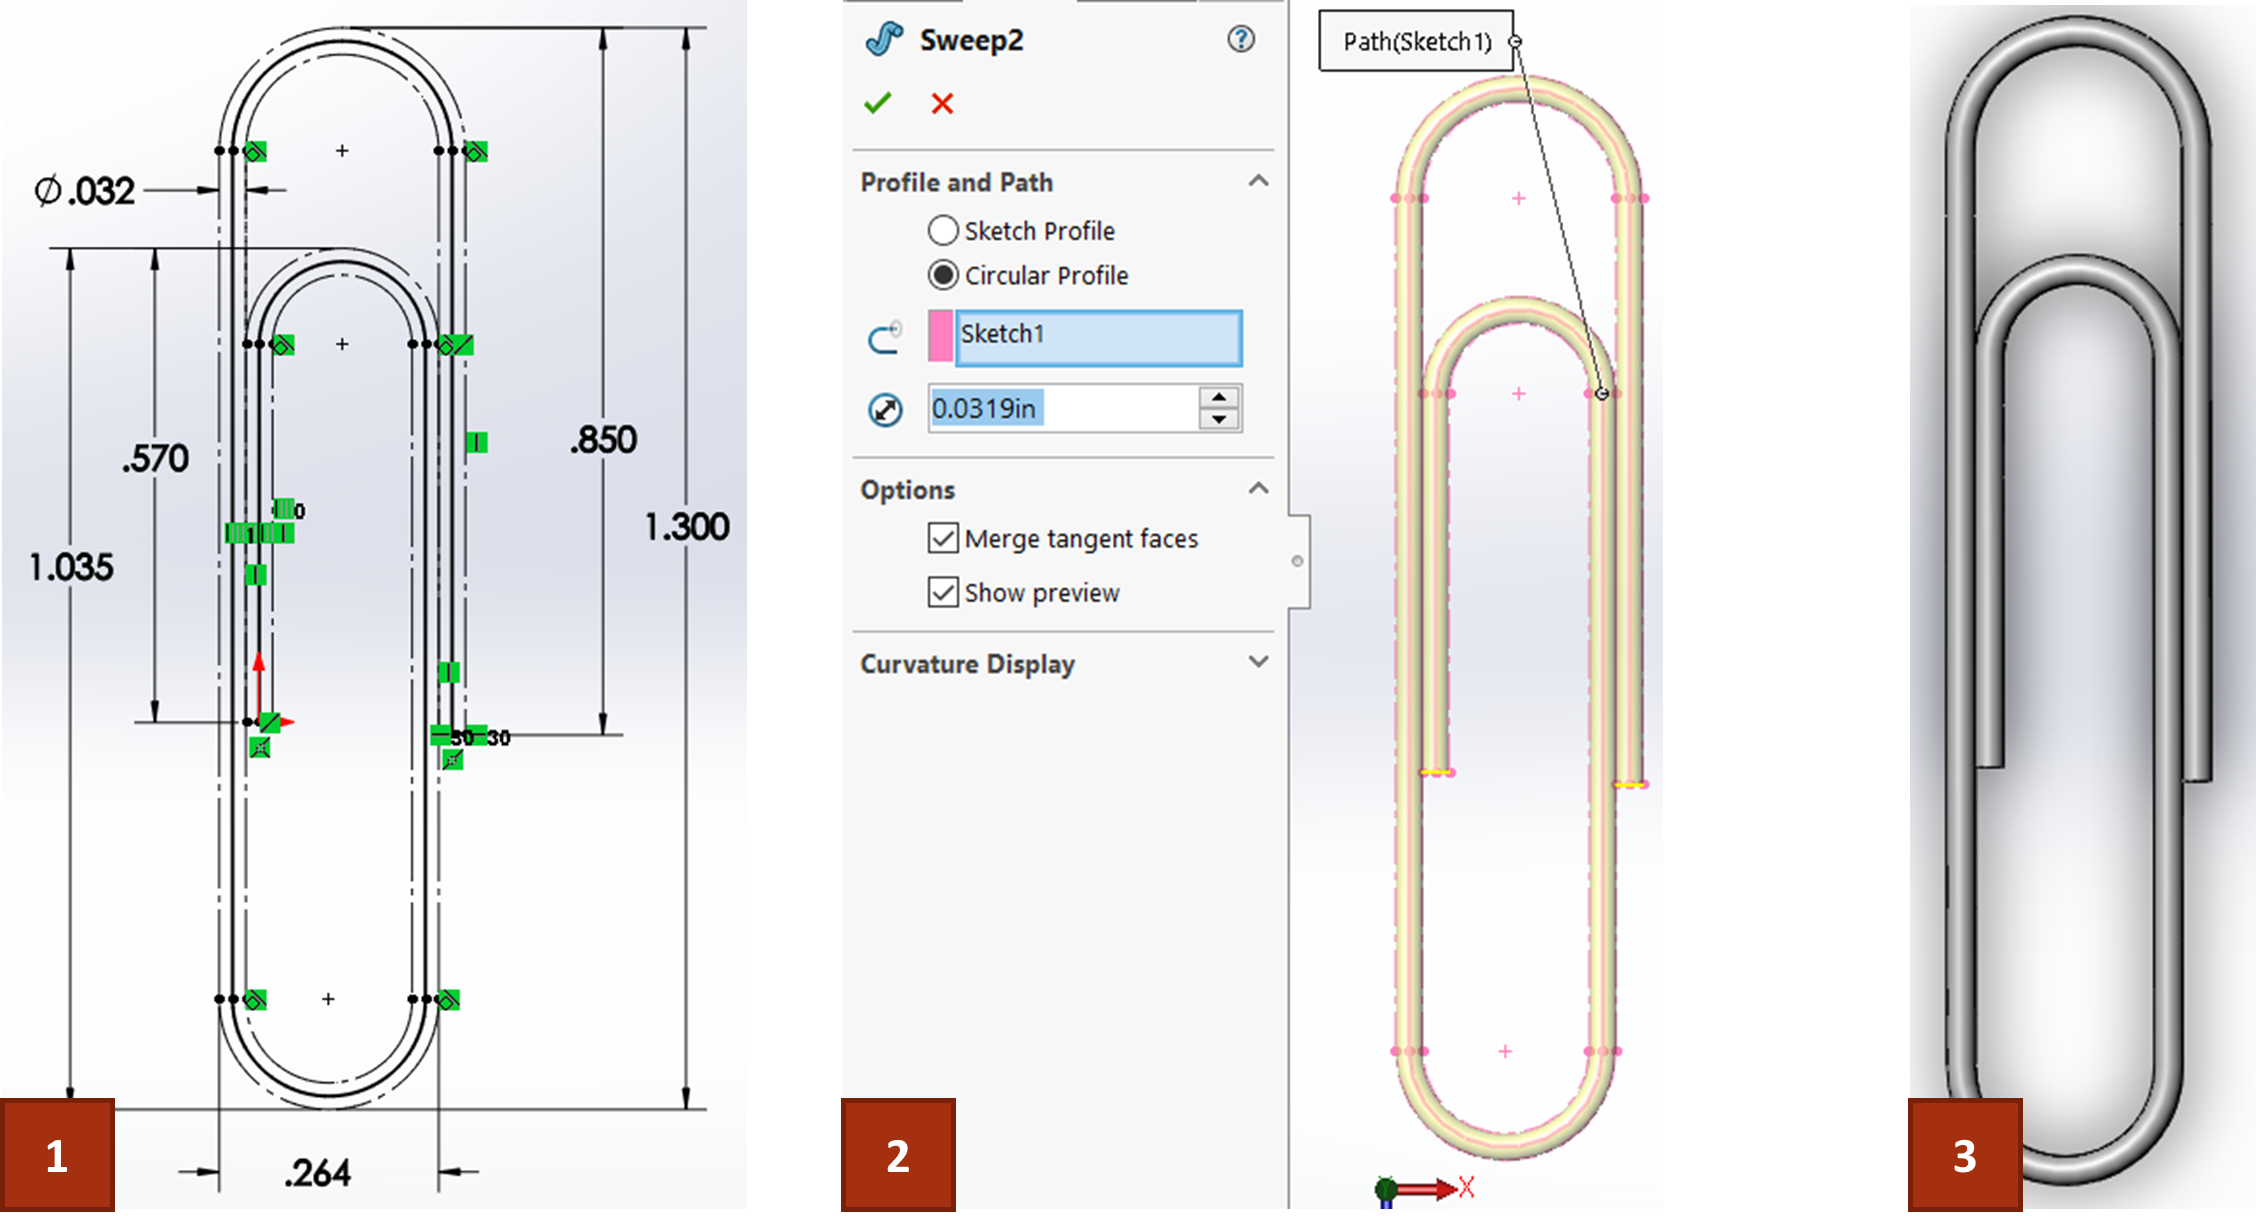
Doing a sweep with a circular path along a simple path is straightforward because circular profiles are built into the sweep tool. This makes it so this kind of feature only requires one sketch to create a new feature and doesn’t require any sketches when only modifying a feature (see SolidWorks Help: Creating Rods and Tubes with a Circular Profile). This type of feature would be common for parts made from wire, such as springs and paper clips, or solid cylindrical bar stock that is bent, such as rebar configurations.
To do this type of sweep, first sketch your path on the plane that will get you your desired orientation. A paper clip path sketch is shown above in figure 6.23 (construction lines were added to dimension the sketch based on the wire diameter of the steel used for the paper clip). Then, you must exit the sketch and choose the sweep option. In the property manager for sweep, select the “Circular Profile” option and click your path sketch for the path selection box. Finally set your size and confirm. If you expect your sweep to be all one piece, such as with the paper clip, then select the “Merge Tangent Faces” option.
Exercise 6.6 Circular Sweep
In this exercise, we will sketch a rough path sketch and sweep a circular profile along it. We won’t worry about fully defining the sketch in the video for the sake of time, but you are welcome to try and reproduce the definition shown in the paper clip path sketch.
- Sketch on a default plane a rough sketch of the paper clip path using the line and arc tools.
- Activate the Swept Boss/Base Tool and experiment with the settings to create a rough sweep of the paper clip.
Tubular Profile Along a Simple Path
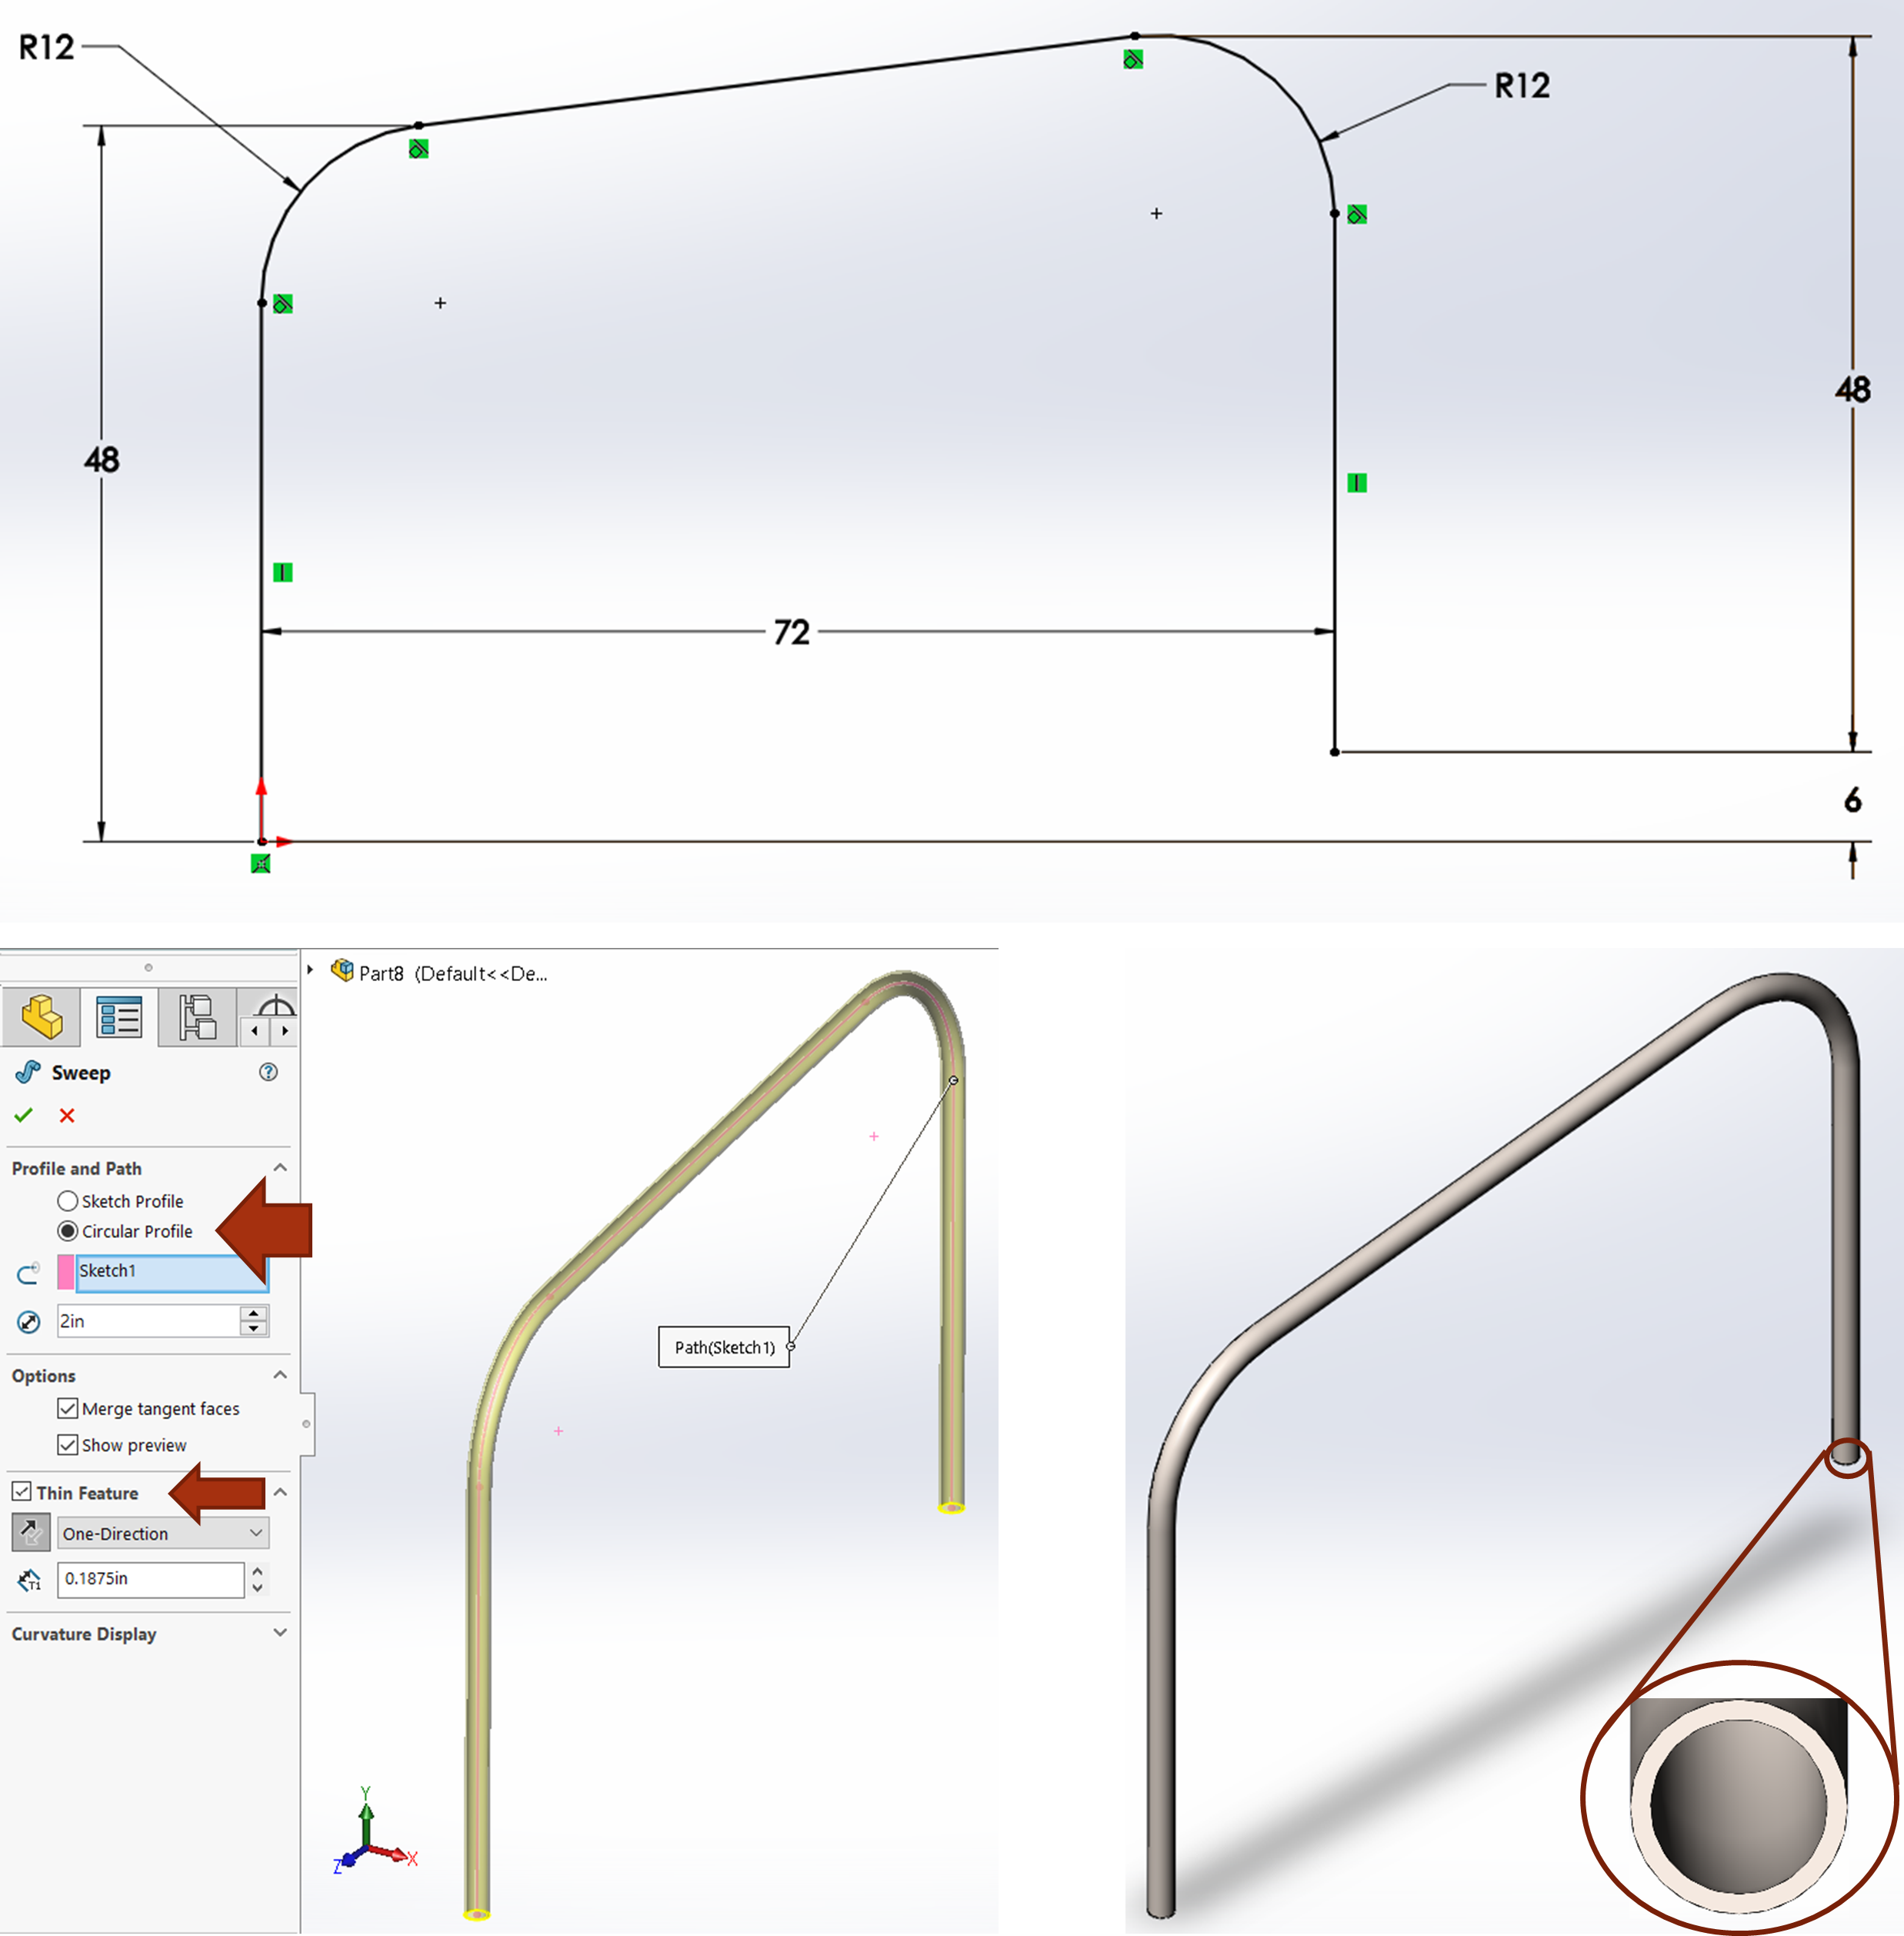
Doing a tubular profile along a simple path is 90% like that of a circular profile except the thin-feature option in the sweep command is employed. We can see this through the handrail example shown below that the steps are the same as the circular profile sweep: Create a simple path sketch on the plane you desire to achieve correct orientation, exit the sketch, sweep with the circular profile and thin-feature options checked.
Exercise 6.7 Tubular Sweep of Handrail
In this exercise, you will follow many of the same steps as with the circular sweep except with activating the Thin Feature option for the Swept Boss/Base to create the 2130008 Hand Rail.
- Open SolidWorks and start a new sketch on the Right Plane. Sketch the path of the handrail as shown in the drawing making sure that the arcs are tangent with the lines.
- Select the Sweep tool on the Features tab of the CommandManager and set the profile to circular profile and set the diameter to 2 inches.
- In the path selection box (highlighted blue) select your path sketch from the Graphics Area.
- Check the Merge Tangent Edges box and the Thin-Feature box.
- Set the Wall Thickness to .1875”, zoom in on one of the ends of the handrail and make sure the wall thickness is extruding outside the sketch. If not, click the reverse direction button and confirm.
- You can extrude the end plates for this handrail as well for some extra extrude practice.
- You should uncheck the “Merge Solids” option in your first extrude to keep the plates as separate bodies.
- You will then need to copy the body, constraining it to the secondary location so that no information is duplicated in your modeling.
- Ask your instructor/mentor for tips on doing this successfully and efficiently.
Custom Profile Along a Simple Path
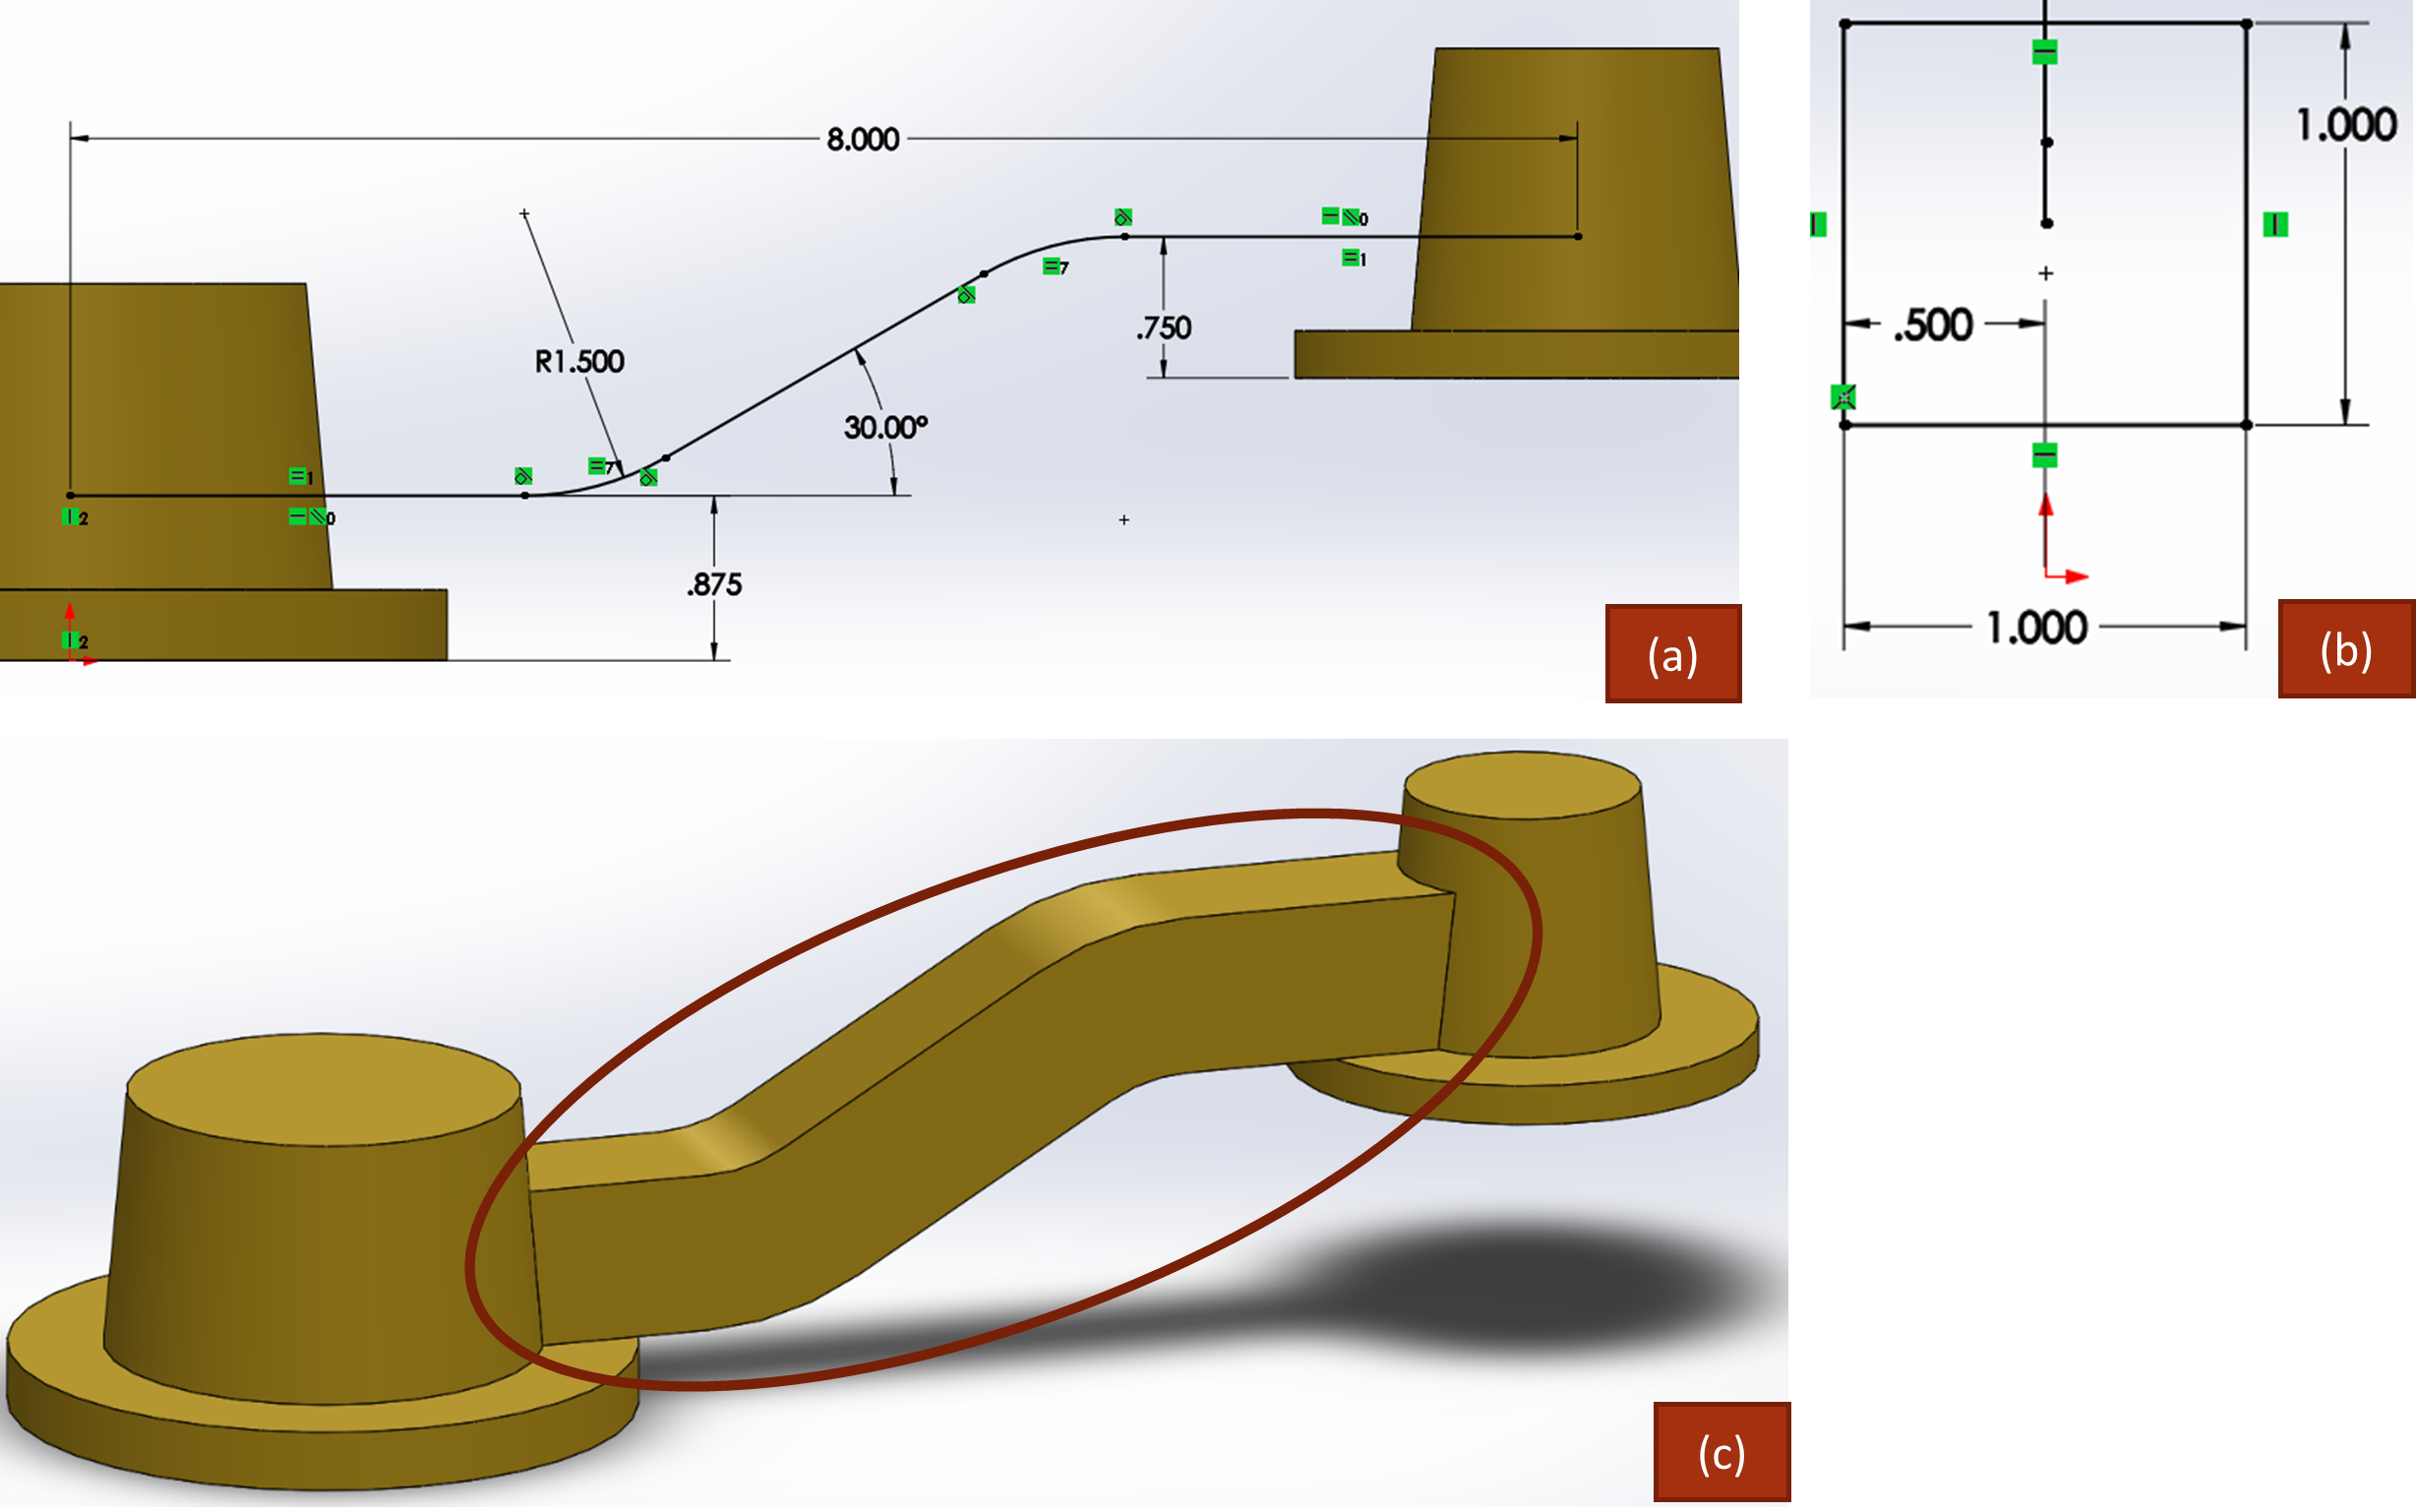
Creating a custom profile along a simple path allows you the most control over your sweep because you can make the profile any way you want and the path. However, there are more steps to doing this kind of sweep. This sweep requires two sketches: a profile sketch and a path sketch of which must be intersecting the profile sketch. You can make sure of this intersection using a new relation called the Pierce Relation.

The process of creating a swept feature with a custom profile sketch and a path sketch is first creating the path sketch and then exiting the sketch. Then you make your profile sketch making sure to add a pierce relation between the relevant line on the path sketch and the appropriate point on your profile sketch. Then you choose the Swept Boss/Base tool from the CommandManager, select your profile sketch for the profile selection box, your path sketch for the path section box, set up your settings and confirm.
Exercise 6.8 Custom Profile Sweep
In this exercise, you will create two separate sketches: one for the profile and one for the path and use the Swept Boss/Base command to sweep the profile along the path.
- Create a rough path sketch on the right plane.
- Create a rough profile sketch on the front plane and be sure to add the pierce relation between one of the points in the profile and the path.
- Use the Swept Boss/Base tool to sweep the profile along the path.
- Note that you can also use thin feature with this kind of sweep.
Profile Swept Along a Helical Path
A helix is a spiral in a 2 dimensional direction (see SolidWorks Help: Helix for more information). Examples of helixes in action are springs, threads, slinks, coils, oil grooves etc. You as a mechanical designer will most of the time use helixes for threads and springs. Within SolidWorks, there is a helix tool that allows you to automatically generate a 3D sketch of a helix for use in swept boss/bases (like with springs and coils) or swept cuts (like threads).
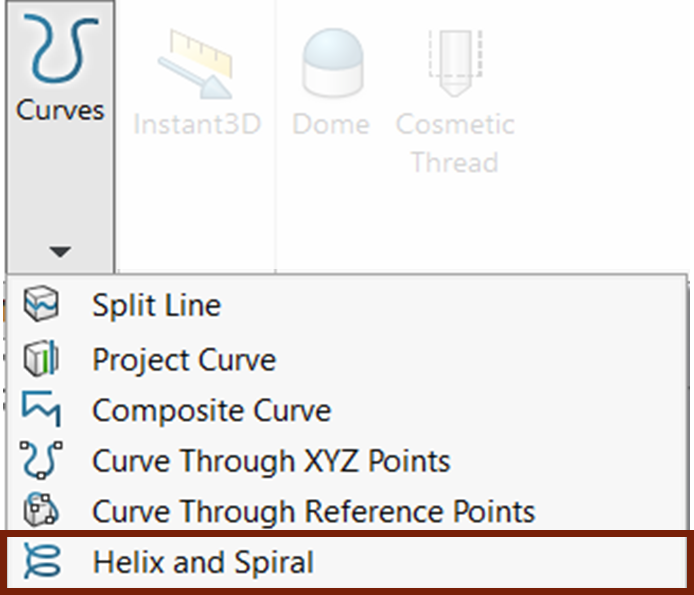
The helix and Spiral tool is located under the Curves dropdown on the features tab of the CommandManager. To create a helix, you first need a circular sketch, so the first step to creating the helix is starting a sketch on a plane that will represent the end of the helix. Then, you can go straight to the helix command to set your parameters for the helix.
When your helix is finished, if your profile is just circular, you go straight into the sweep command and proceed as you would for a circular profile along a simple path to complete your swept feature. If you require a custom path, you would create the path sketch, exit the sketch, and then proceed as you would for a custom profile simple path sweep.
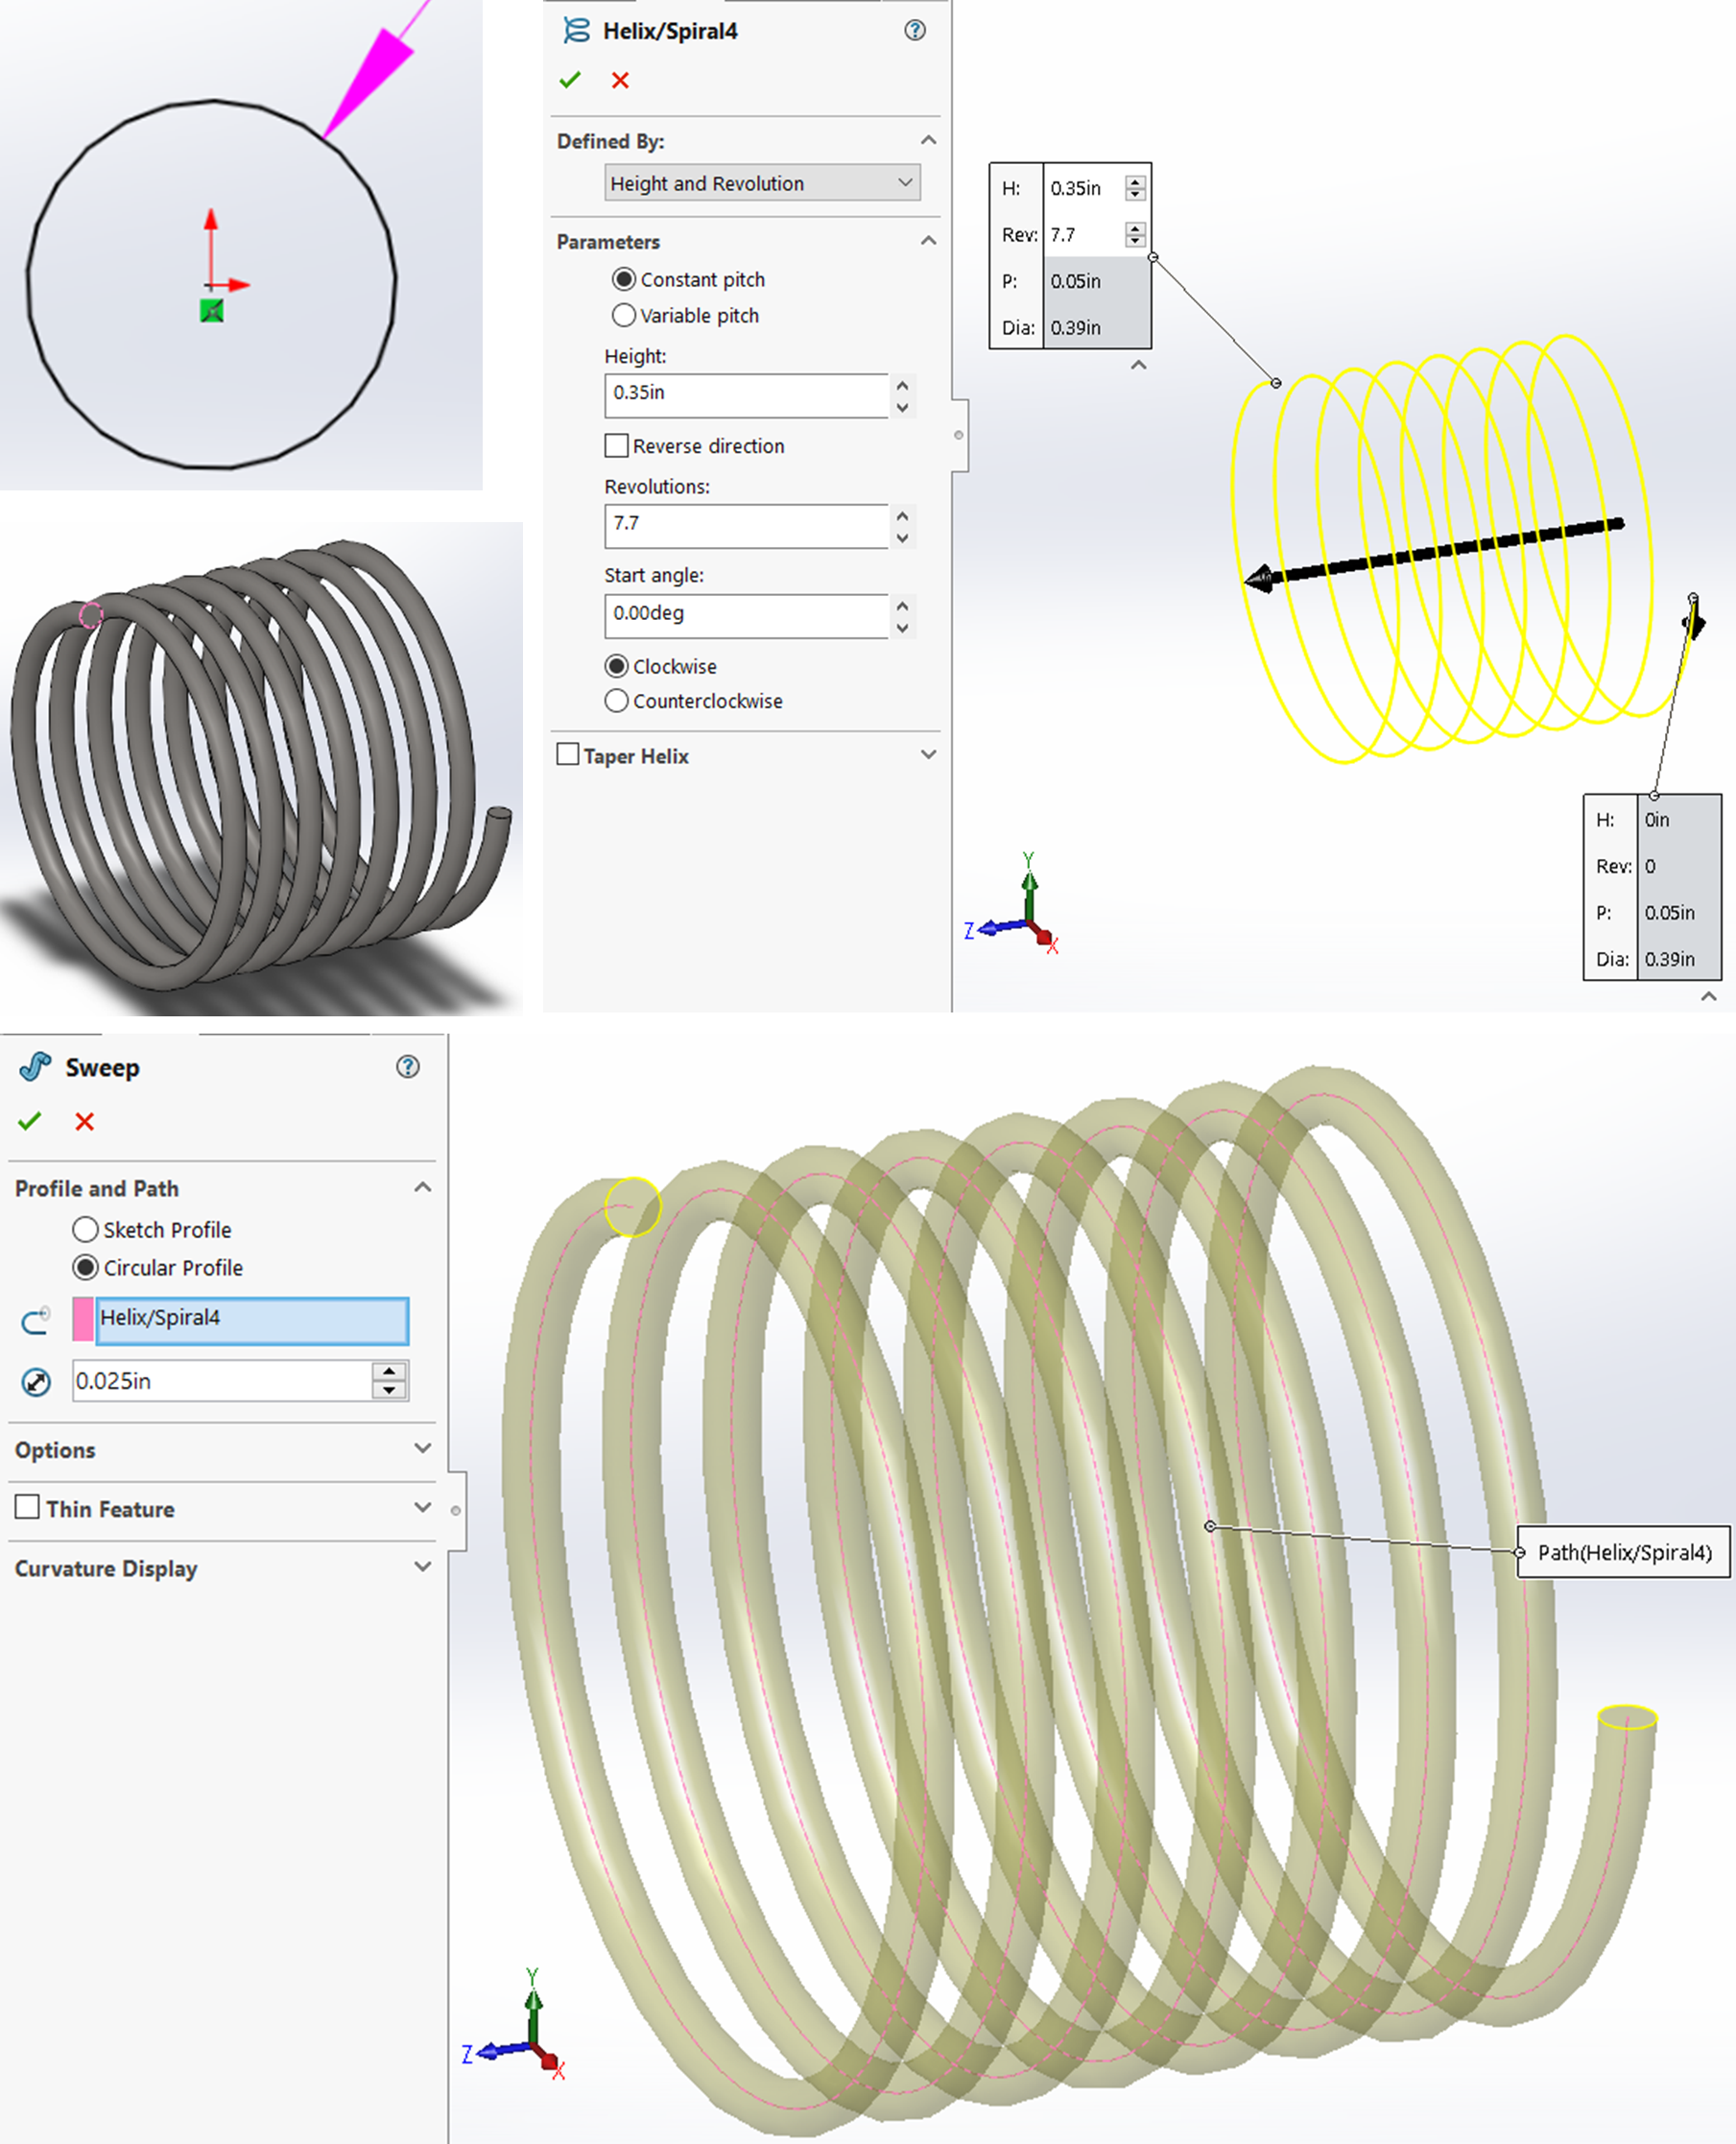
Exercise 6.9 Helical Sweep
In this tutorial, we will sweep a circular profile along a helical path using the helix creation tool to create CAE1008, an open-ground compression spring. Video tutorials are also available to accompany this written tutorial.
Create the Helical Spring
- Open SolidWorks, start a sketch on the front plane, and sketch a .3875 inch circle at the origin.
- Activate the Helix and Spiral command from the drop down of Curves from the CommandManager.
- Change the “Defined By” section to “Height and Revolutions”, set the height to .35”, the revolutions to 7.7, and the start angle to 0 degrees. Also, make sure that the rotation is set to Clockwise.
- Confirm the Helix/Spiral and go straight to the Swept Boss/Base tool on the Features tab of the CommandManager. Set the sweep to circular profile and click on the helix for the path. Change the diameter of the profile to .025 inches.
Ground Off Ends with “Cut with Surface
- Perform a “Cut with Surface” using the Front Plane to make the ground geometry on the bottom of the spring.
- Activate the reference point command from the reference geometry drop down on the features tab of the CommandManager.
- Click the end face of the end of the spring on the other side of the spring and confirm the reference point.
- Activate the reference plane tool from the reference geometry area and choose the front plane and the reference point as references. You may have to choose these from the Feature Manager flyout if you cannot see them from the Graphics Area.
- Confirm the reference plane, cut with surface again to ground off the end of this side of the spring just as was done on the first end. Set the material and save the part.
Sweep refers to extruding a 2D profile along a 2D or 3D path. See SolidWorks Help: Sweep.
A profile refers to the 2D geometric elements that make up a cross section. See SolidWorks Help: Profiles for potential Sweep Profiles.
Thin Feature allows you to apply a thickness to a profile. In traditional extrusions, the profile is usually an open contour however with sweep, the profile is a closed contour. See SolidWorks Help: Thin-Feature.
The pierce relation adds a constraint on a sketch point to intersect with a sketch line that is perpendicular to the originating sketch plane. See SolidWorks Help: Pierce Relation.

