Standard Mates

So how are parts “put together”? Well they fasten together, go into each other, become flush with each other, are pressed into each other, are allowed movement in specific directions, are made to touch in a specific way. There are all kinds of ways in which we put parts together, but how do we represent that in SolidWorks? The answer is through geometric constraints called Mates.
Parts within a SolidWorks assembly are constrained to one another through mates which are very similar to geometric sketch relations used in the sketch environment: coincident, concentric, tangent, distance dimension, angular dimension, etc. The most common mates in SolidWorks assemblies are coincident and concentric due to how often things are made to be flush or aligned with one another.
Mates are a command where you can add different mates to different part features such as faces, planes, edges, vertexes, axes, etc. The most robust way to apply mates is by applying them to default reference geometry, such as default planes or axes, that are linked to the design’s datum reference frame (a GD&T term). For more information on Mate Best Practices, see SolidWorks Help: Mate Best Practices linked here.
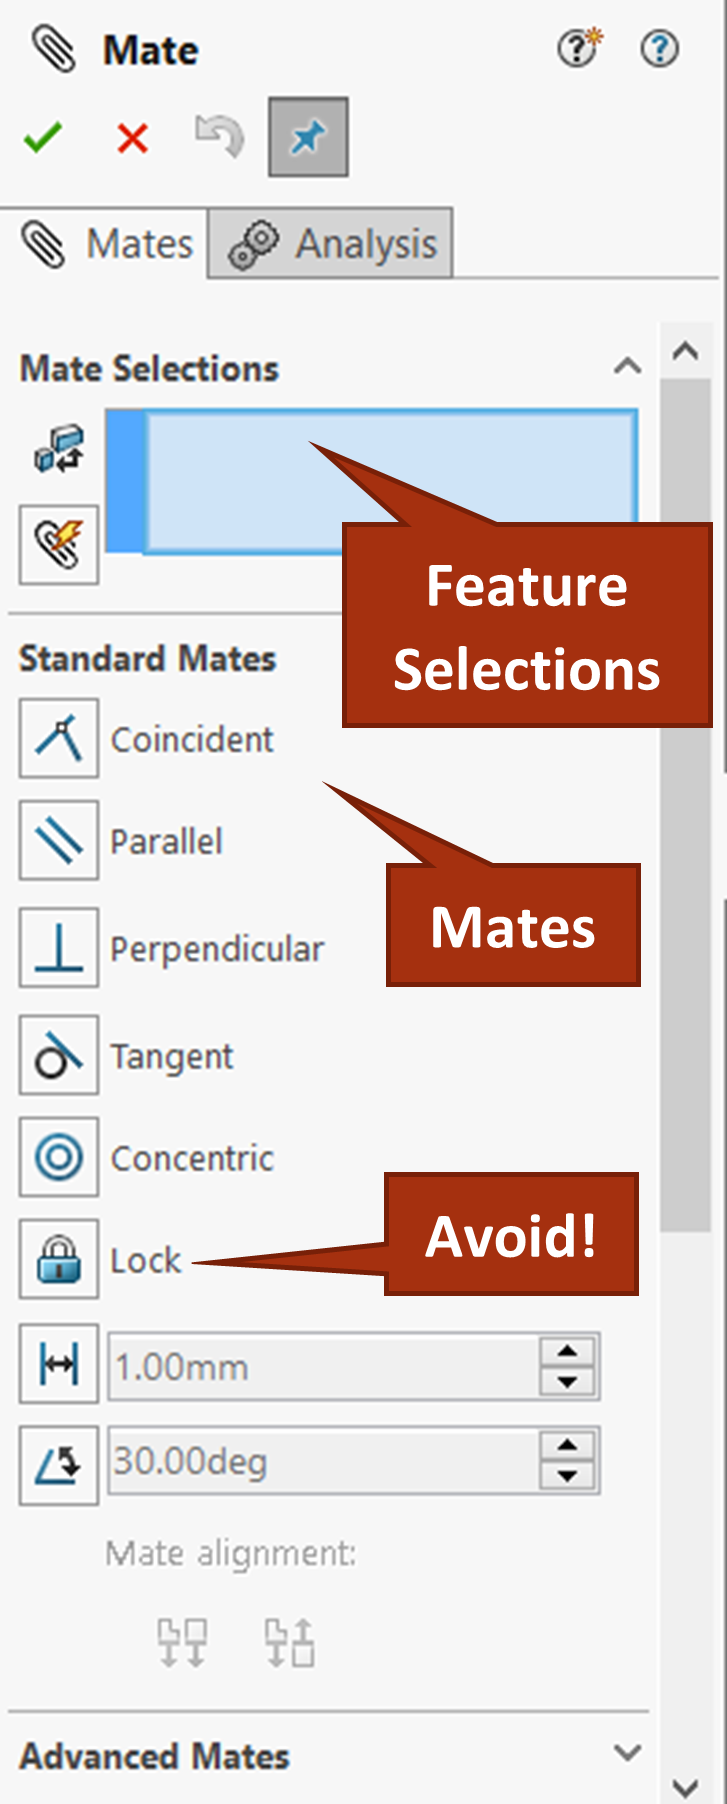
To apply mates, activate the mate command from the Assembly tab of the CommandManager, click on the features you want to add a mate between, and then verify your mate type. SolidWorks is usually great at knowing what kind of mate you want to add based on what you select so it will usually already be selected.
Another way to add mates more efficiently is through SmartMates which is more automatic. When moving a component from the feature you want to mate, hold down the ALT key on your keyboard and move your cursor to the mating part’s feature. When you release the mouse, you can verify and select the mate you desire if it wasn’t already selected.
Standard mates will be the ones you use most often and are shown by default when you activate the Mates Command. They appear in the Property Manager under the heading “Standard Mates”.
Coincident
The coincident mate is for bringing features, particularly faces/planes, together. When you want two or more faces or planes to be flush or lines up, use this mate. Select the two features you want to line up and coincident should automatically be activated. If needed, you can flip the alignment at the bottom of the Standard Mates section to make the alignment the correct orientation. When you activate different mates, a context toolbar also appears for verifying the mate type and flipping the alignment. This is to reduce mouse movement, so you don’t have to move your cursor all the way to the Property Manager.
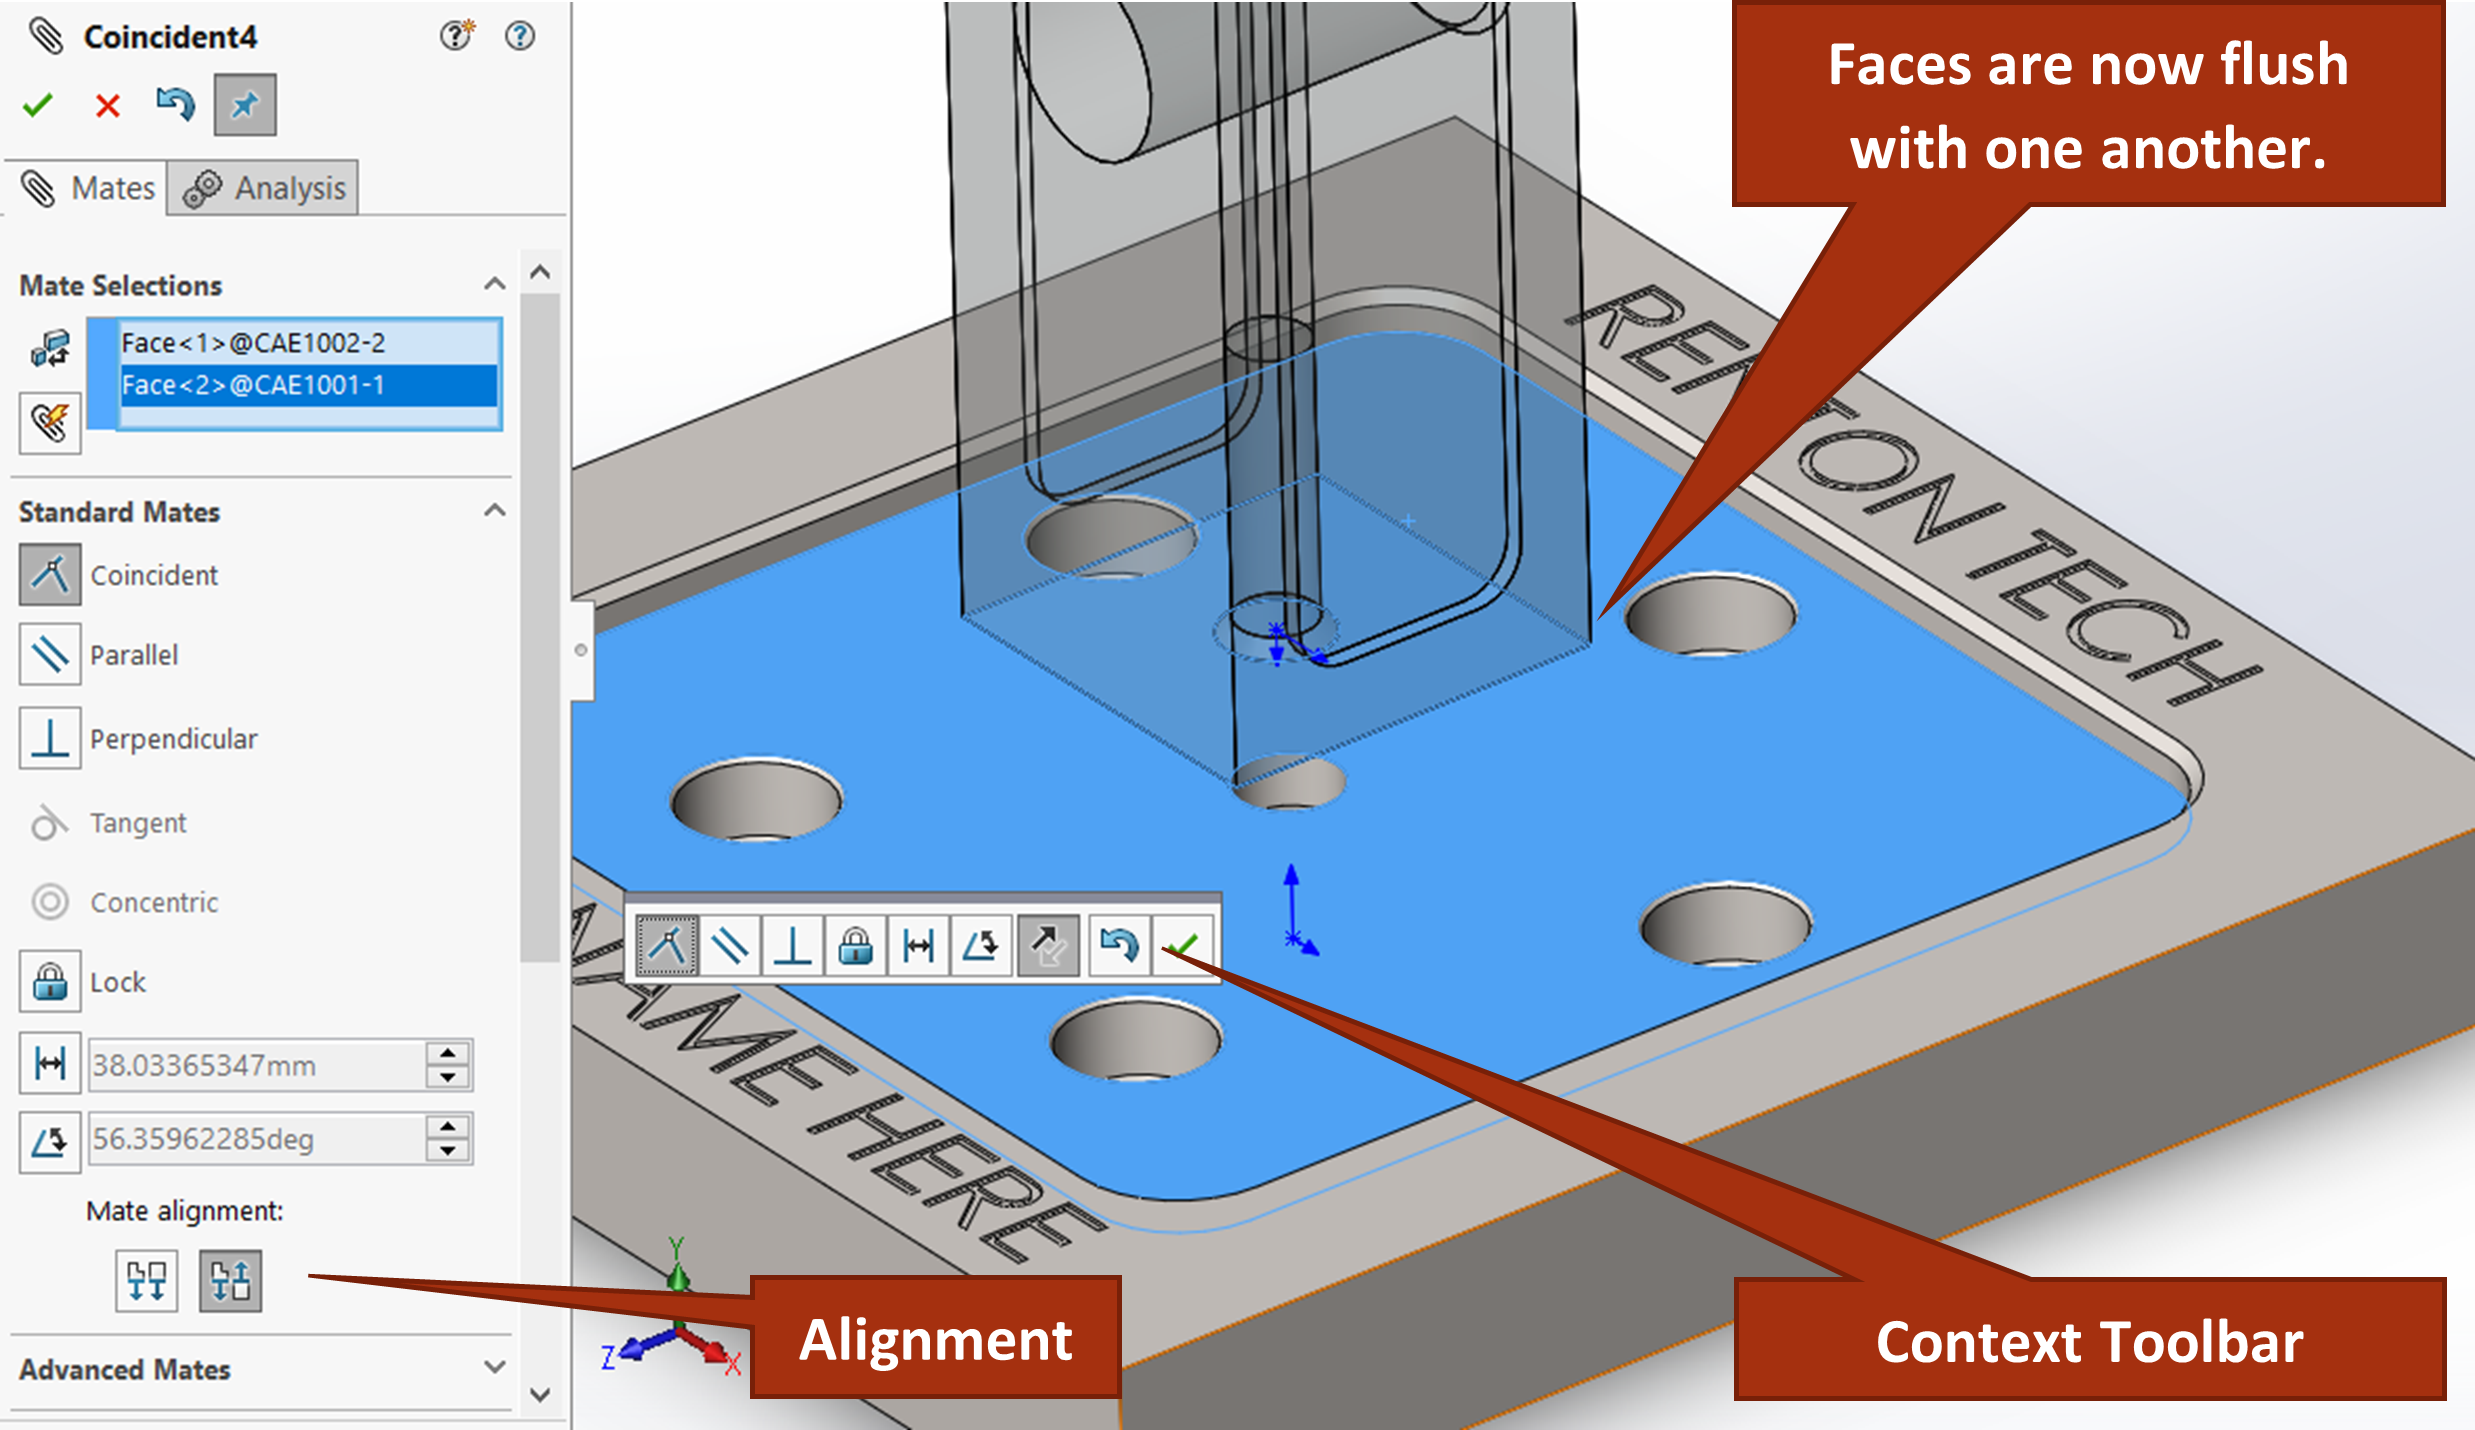
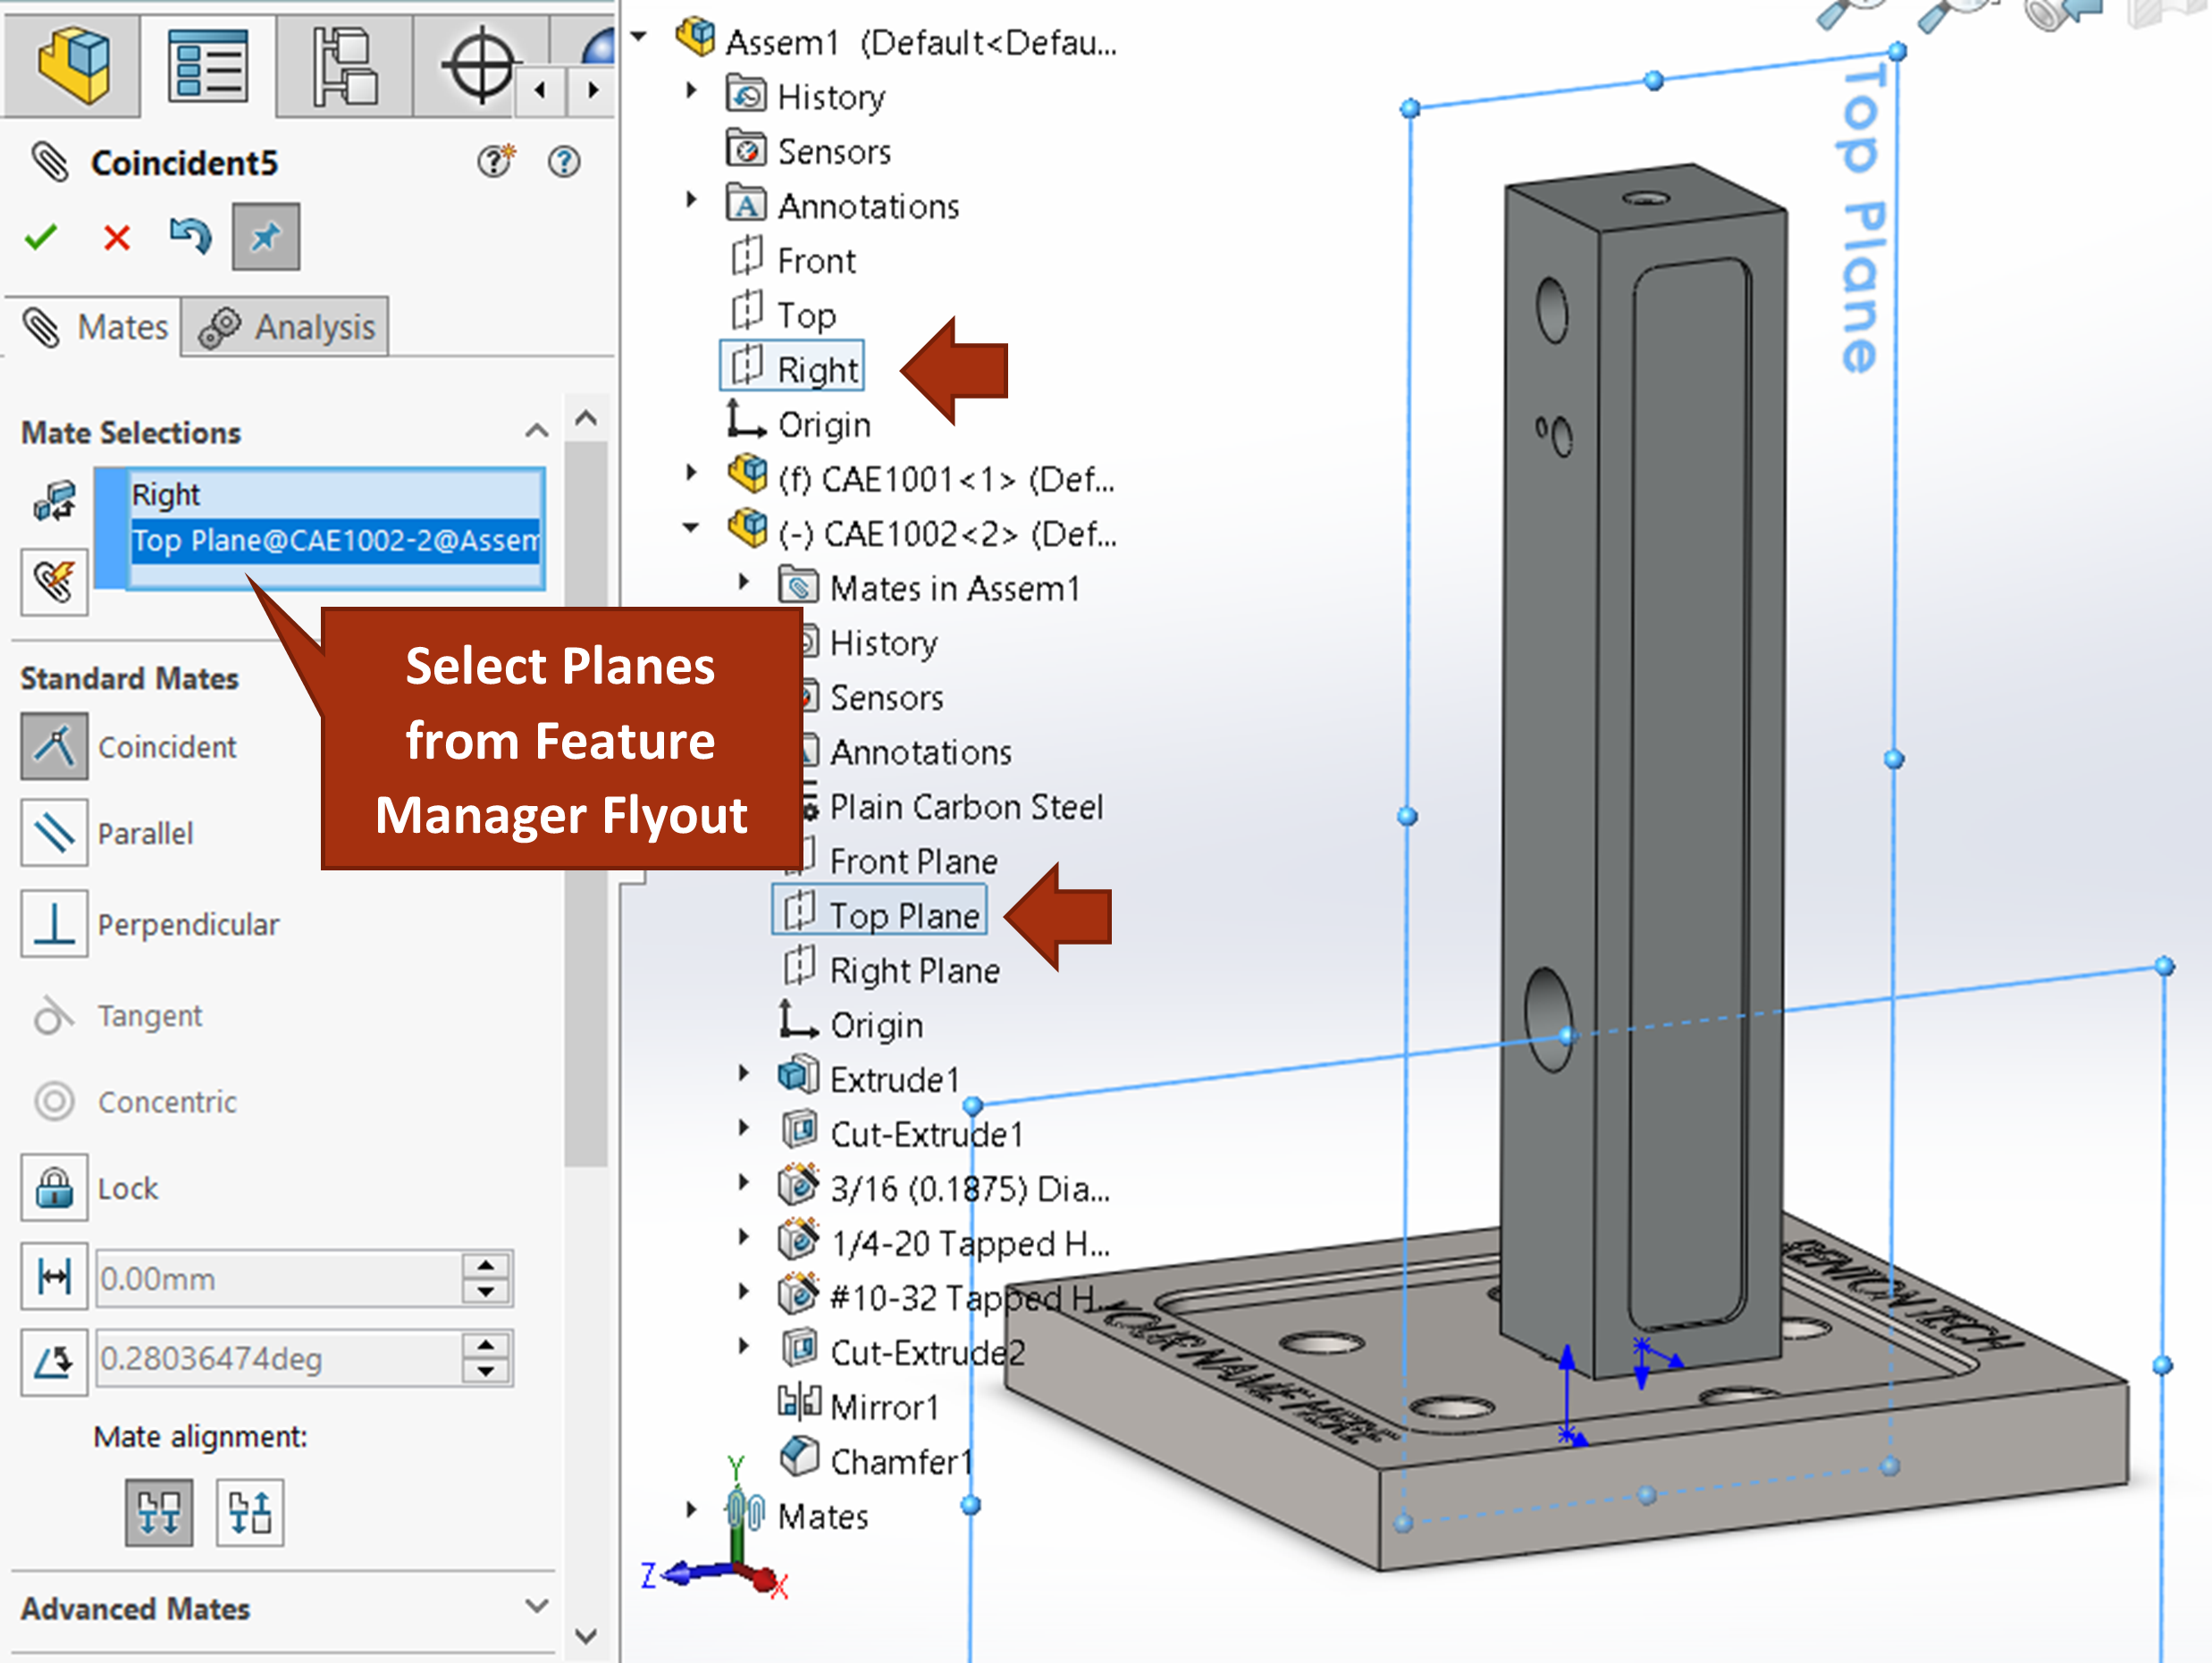
Exercise 7.2 Using Coincident Mates
In this exercise, we will continue with the CAE1000 assembly and add many of the coincident mates that are in the assembly for CAE1001, CAE1002, and CAE1003.
- Insert CAE1002 and CAE1003 into the assembly. Move and rotate parts into approximate location and orientation.
- Add coincident mates where applicable between the three parts:
- The top face of CAE1001 and bottom face of CAE1002.
- The Front Plane of CAE1002 and the Front Plane of the assembly.
- The Right Plane of CAE1002 and the Right Plane of the assembly.
- The back face of CAE1002 and the non-cut face of CAE1003.
Concentric
Concentric centers cylindrical features together: pins to holes, holes to holes, tapered shafts to tapered holes, etc. Concentric is used when the cylindrical feature is not lined up with the default planes of the part model (in terms of GD&T, it isn’t a datum feature).
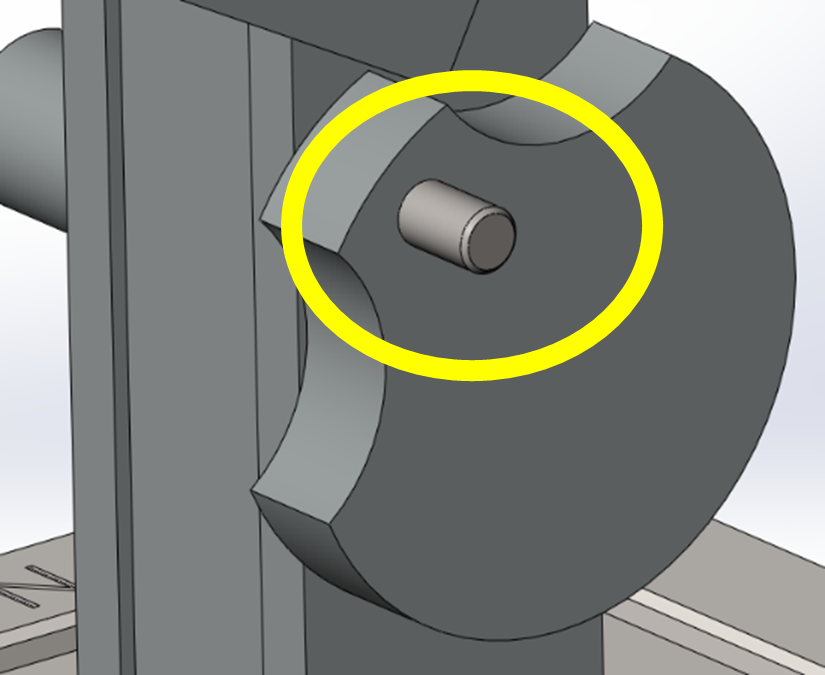
The Lock Rotation option is for when you are lining up press fit cylindrical features, fasteners, hubs fixed with a set screw, or other features you don’t intend to be free to rotate. You can check the Lock Rotation option to prevent rotation of the mate combination to better match design intent and to give more accurate results in motion studies and analysis. For example, in figure 7.7, the pin is intended to be press fit into the crank.
Like with Coincident, you can flip the alignment of concentric mates as well to ensure the features are oriented appropriately.
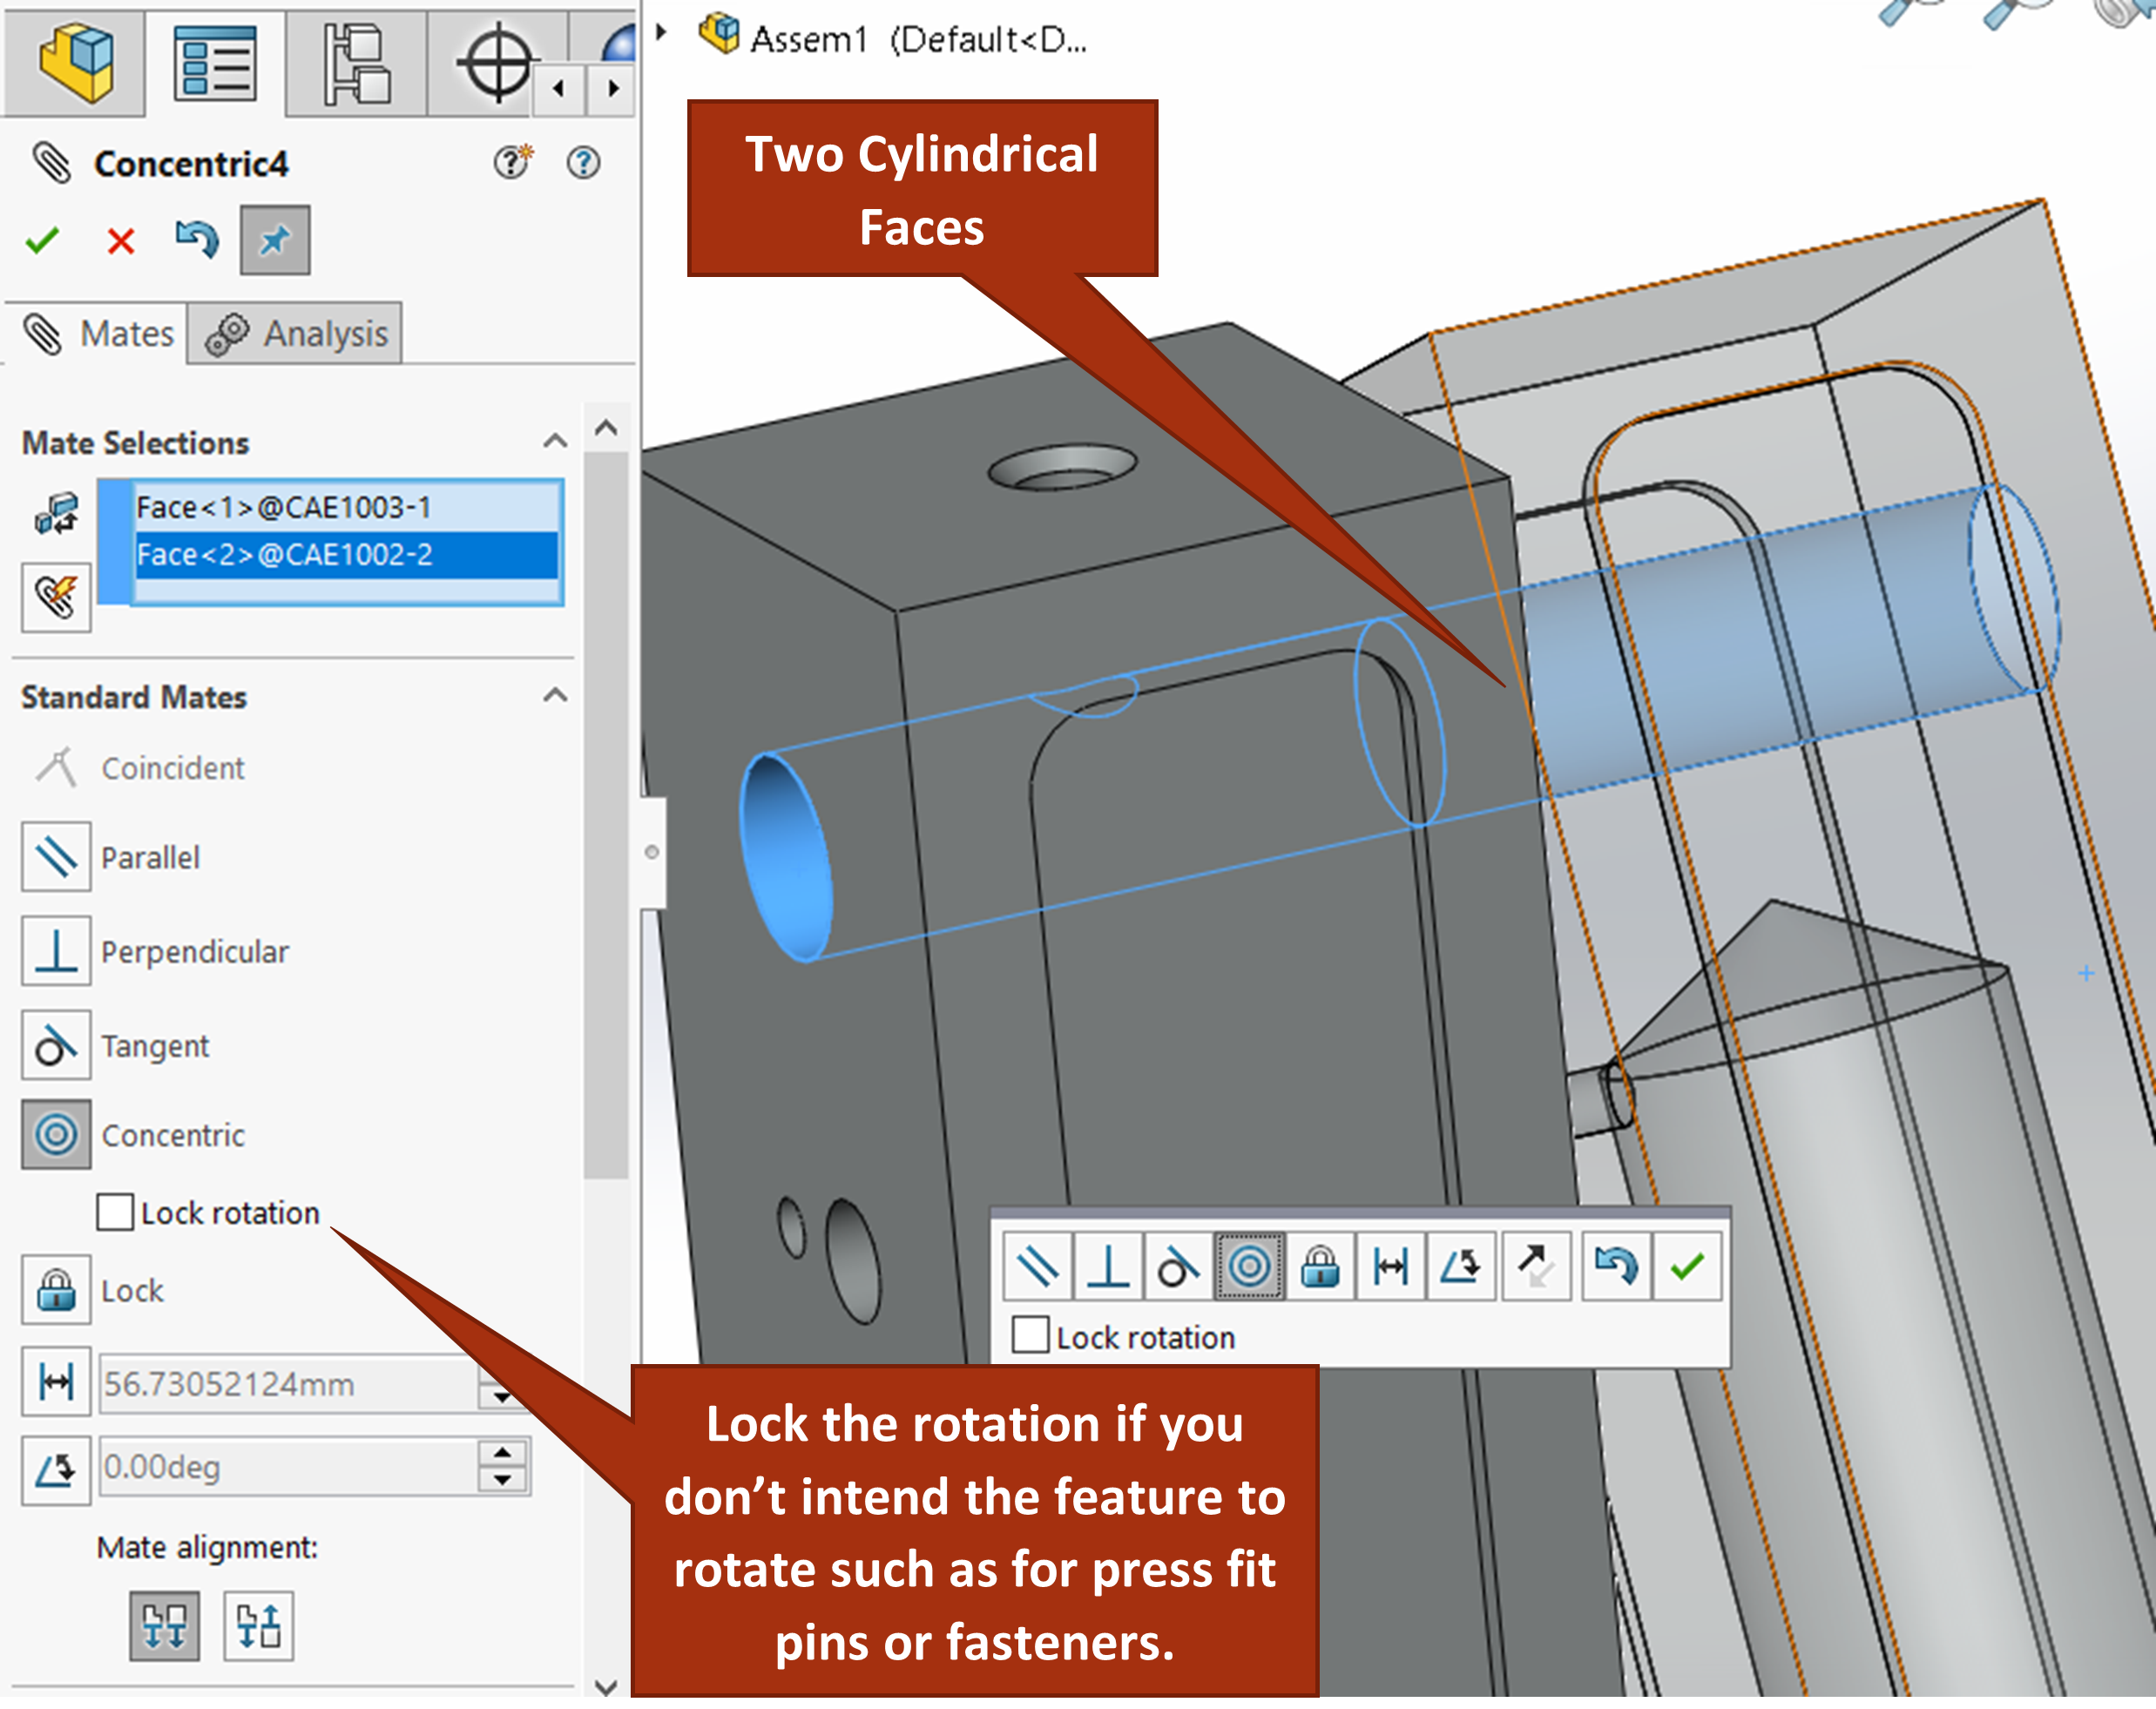
Exercise 7.3 Concentric Mates
Continuing to model the CAE1000 assembly, here we will add concentric mates where applicable to the rest of the parts of the assembly.
- Add a concentric mate between the top .3125″ hole of CAE1003 and the top matching hole of CAE1002.
- Insert the remaining components CAE1004, CAE1005, CAE1006, CAE1007.
- Add the concentric mates as are needed between the added in parts.
Parallel and Perpendicular
Parallel and Perpendicular mates will make planar or cylindrical features parallel or perpendicular as you can imagine. These two mates are very seldom used. Although it is perfectly acceptable to imagine a cylindrical feature perpendicular or parallel to a planar feature, SolidWorks will not allow parallel/perpendicular mates to be applied to planar and cylindrical faces together; you must do two or more planar features or two or more cylindrical features, not mix and match.
Tangent
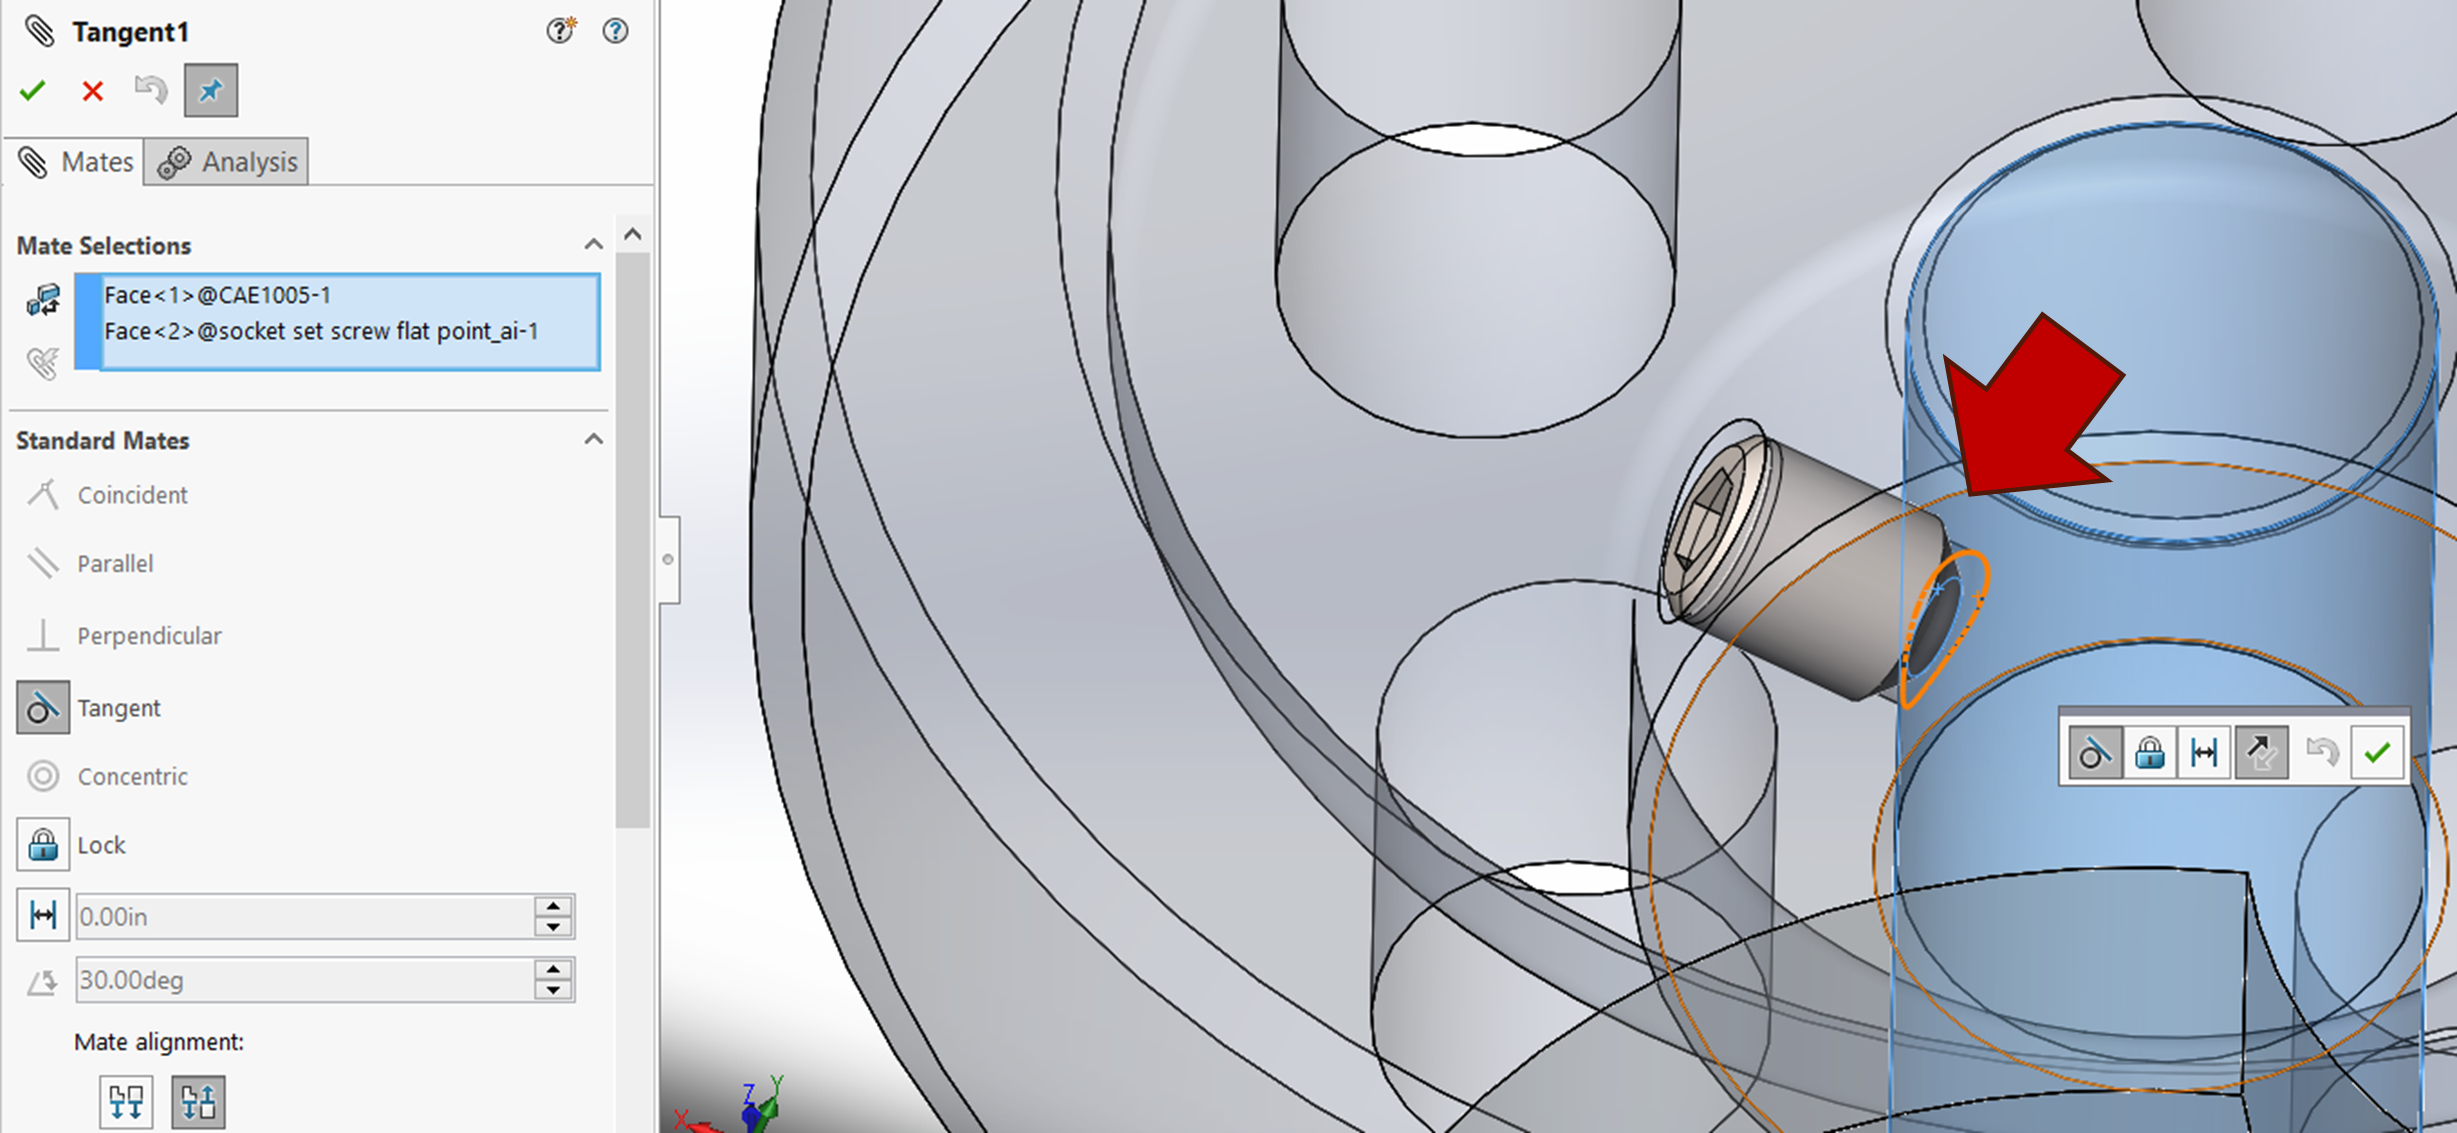
Tangent mates are used most often for touching planar features to cylindrical features together or for touching eccentric circles together. Some examples are pin/hole combos with lots of clearance and set screw ends onto cylindrical shafts. See the example below where a set screw bottom is being connected to a shaft using a tangent mate.
Distance and Angle
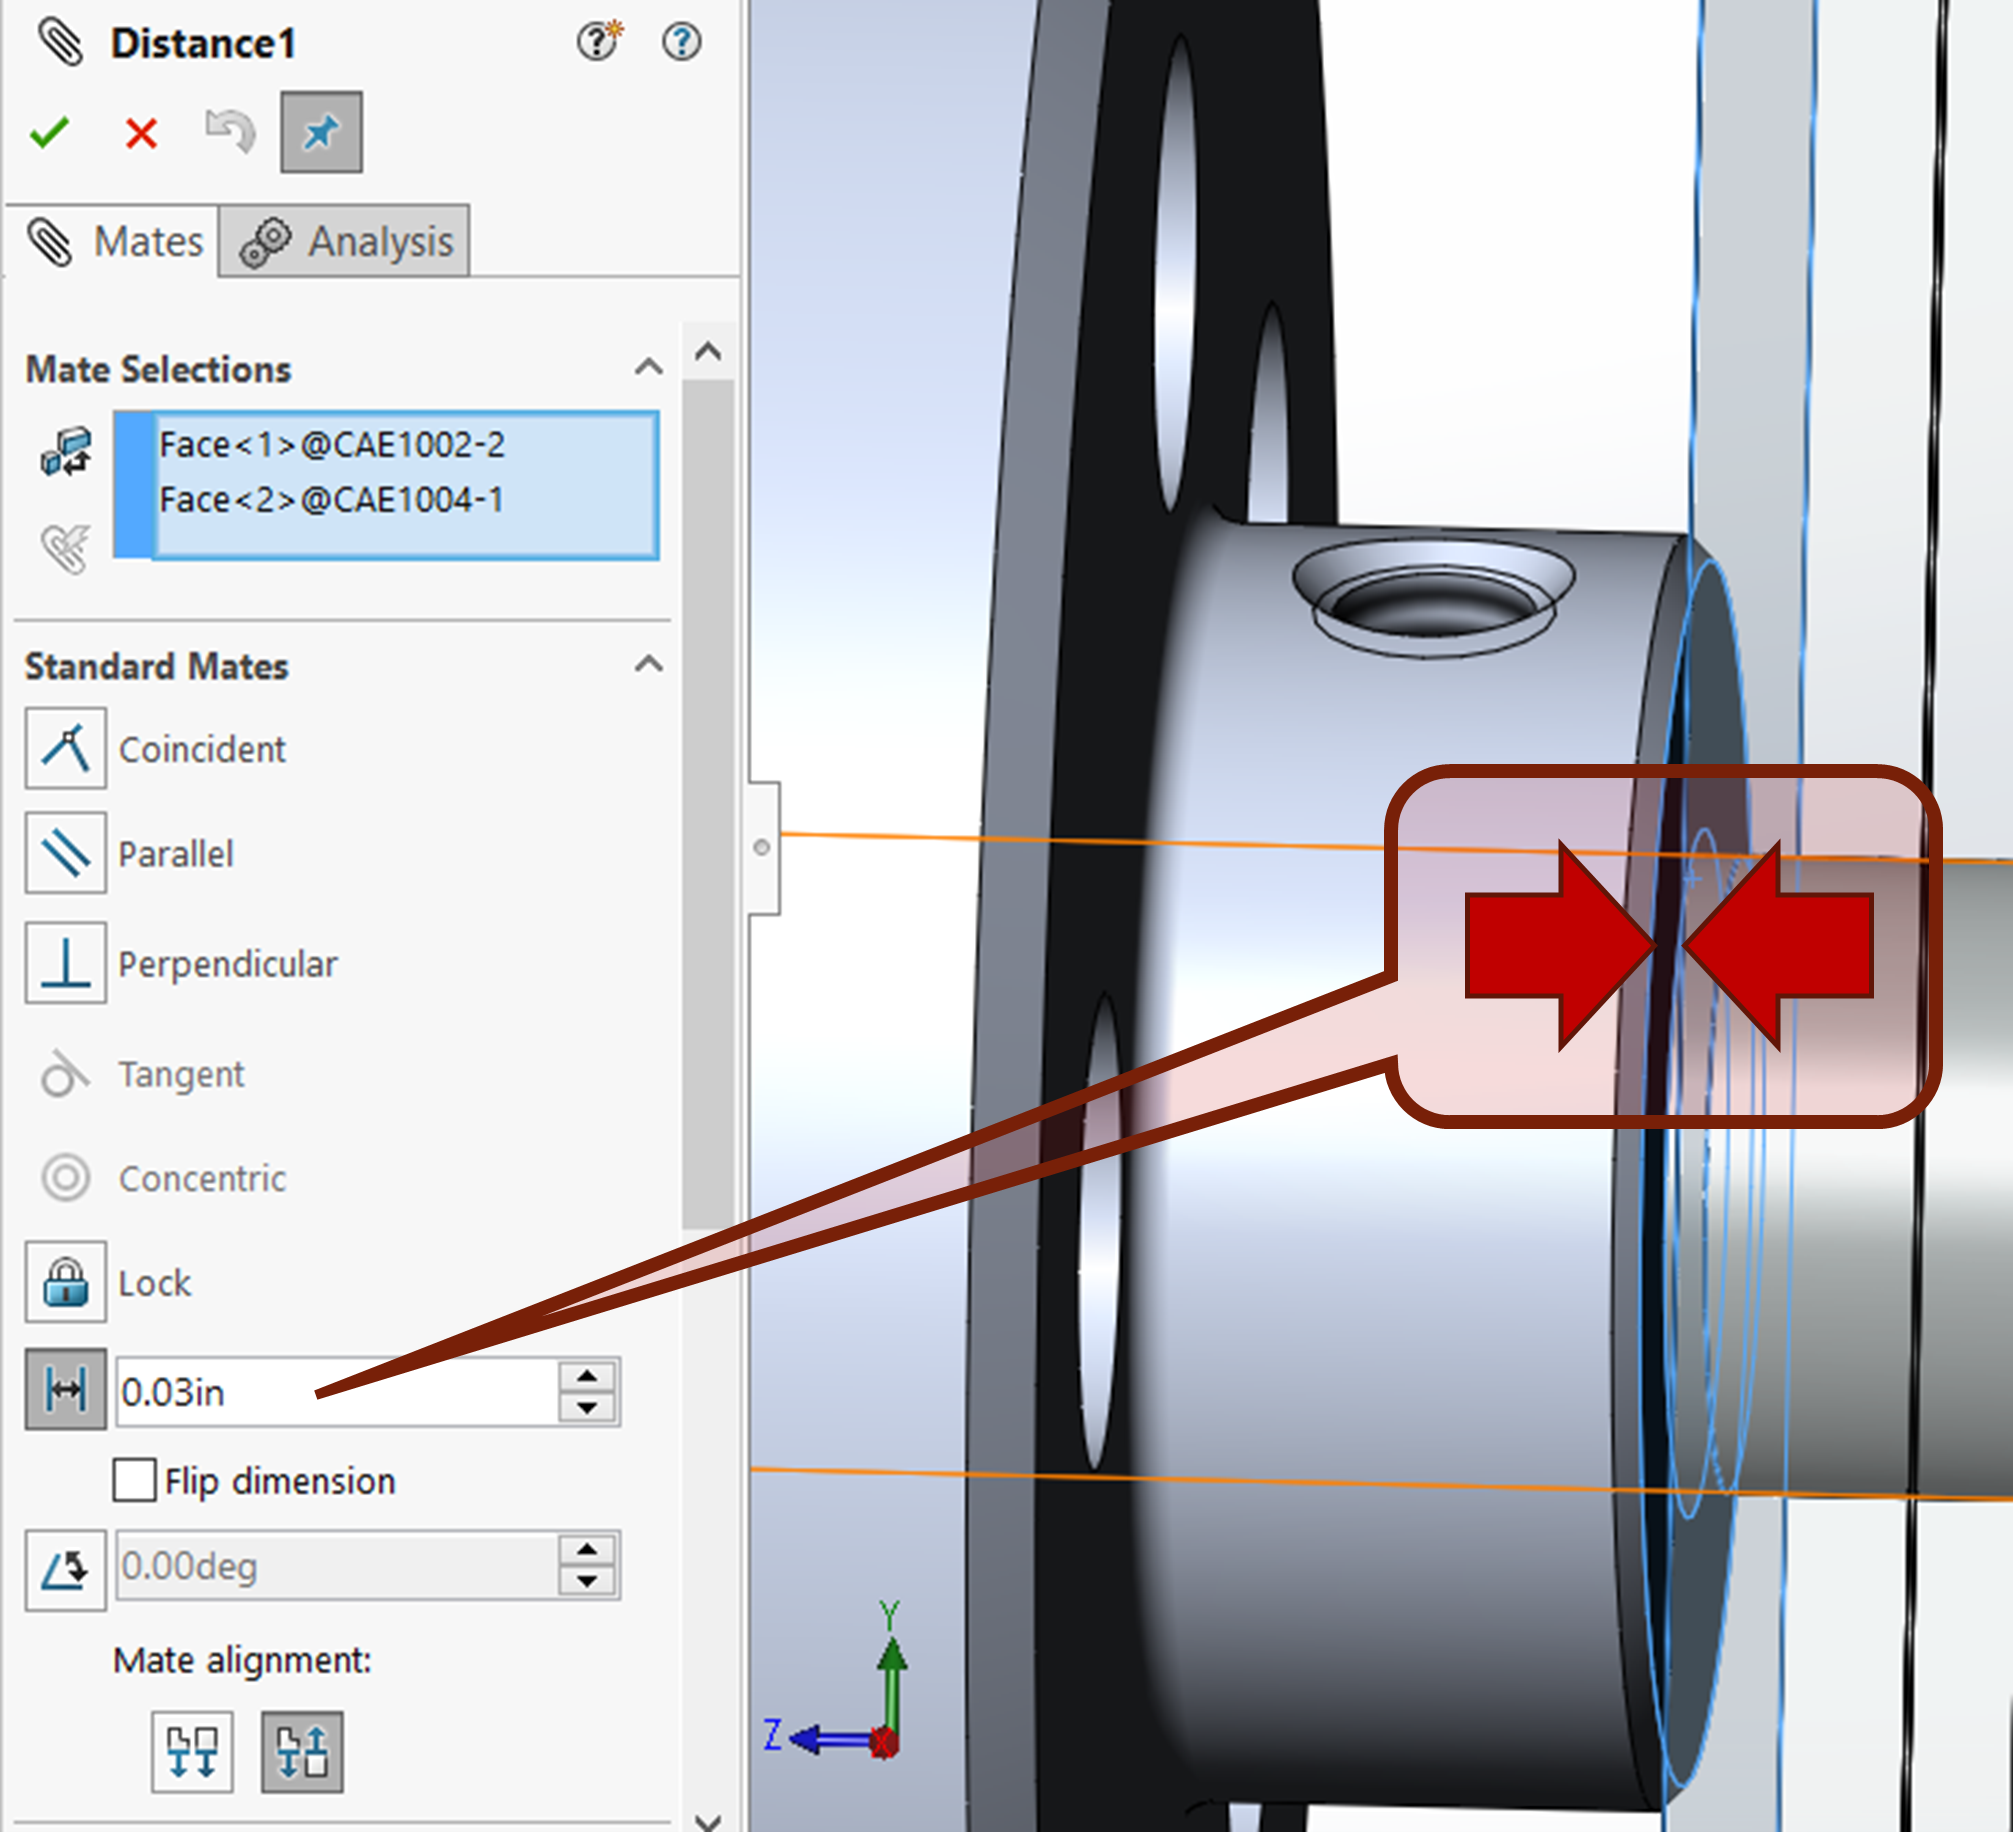
Distance mates and Angle mates are used to specify spaces between two features. In the figure below, you can see .030 inches being applied between two planar faces. The same can be done for angles. Distance and angular mates are popular for moving components (when a limit mate isn’t necessary).
Exercise 7.4 Distance Mate Between Planar Surfaces
In this exercise, still modeling CAE1000, you will add a distance mate between the planar face of the flywheel and the body of the compressed air engine. To add the mate, you will do the same procedure as for any other standard mate except input a distance when adding the mate that represents the amount you want the two faces spaced.
- Activate the Mate Command.
- Select the two faces to add a distance mate to.
- Choose the distance mate option from the context toolbar or the property manager, and input the distance where prompted.
- Add remaining parts and mates to the assembly with the exception of the fasteners (we will get to those).
Mates are the SolidWorks term for part constraints. They are how one part will constrain to another, much like the sketch constraints/relations you are used to. See SolidWorks Help: Mates.
An automated macro in SolidWorks that determines the best mate for two part entities that are held close to each other while holding ALT. It helps add mates faster. See SolidWorks Help: SmartMates.
The most basic mates such as coincident, concentric, tangent, distance and angle. These are used on the CSWA prevalently. See SolidWorks Help: Standard Mates.
The coincident mate refers to bring two planar surfaces flush or aligned with each other or a surface, edge, or vertex in contact with each other. See SolidWorks Help: Coincident Mate.
Concentric mates allow you to align the axis of a curved or cylindrical face with the axis of another. This mate is ideal for aligning holes and other curved faces. See SolidWorks Help: Concentric Mates.
Parallel and perpendicular mates are exactly as they sound: they allow you to set faces or edges parallel or perpendicular to each other. See SolidWorks Help: Parallel and Perpendicular Mates.
Tangent mates brings at least one cylindrical or curved face or edge in line with another face or edge. See SolidWorks Help: Tangent Mates.
The axes/centerlines of elements are not aligned.
Distance mates allow you to specify a set distance between model faces, edges, or vertices. See SolidWorks Help: Distance Mates.
Angle mates are like distance mates except you are specifying an angle between two planar faces, planes, or edges. See SolidWorks Help: Angle Mates.

