Chapter 8: Data imports
What We’ll Cover >>>
- Basic Data Sources
- Import Preparation
- Import From Database
- Import From CSV file
Basic Data Sources
Data analysis is the practice of cleaning, transforming, and analyzing raw data to acquire usable information so businesses can make informed decisions. Analysis can be performed with summary tables, charts, graphs, and other reporting tools. Data comes from many sources, including databases, surveys, quantitative research, human entry, collected, software use, etc. For years, data has been acquired and fed into databases, with more automated means directly capturing and pushing data into huge datasets. Pulling that raw data to that it can be used is part of what Excel can do.
Excel (PC & Mac), using PowerQuery, can grab data from huge databases, as well as basic imports from simpler databases and files. For bigger database work – like mySQL, web databases, Azure, JSON, and others, you may need connectors, components, and drivers (like ODBC) before Excel can identify and connect with the database you want to import tables from – and that is more the purview of working with databases and with the more advanced Excel PowerQuery, which this book does not cover. Since that can get fairly advanced, this chapter will focus on a couple of basics: comma-separated-values .csv file, and Access database .accdb.
With the rapid deployment of AI tools, especially Microsoft’s CoPilot, you will find that more intermediate-to-advanced Excel trainings will focus more on those tools. The point here, for this class, is that we will not be dealing with AI tools bit rather the basics. Also. Microsoft has been making changes in Excel’s Data Ribbon.

MedAttrib: author-generated. MS Excel Data ribbon.
Note: Unfortunately, MAC users cannot import data from an Access database because Microsoft does not have that capability programmed for the Mac OS. If you are working on a MAC for your class or at home, you won’t be able to do the Access DB activity.
Import Preparation
Now, we are going to grab some data from a non-Excel source instead of inputting it ourselves. This data will be from a small company, called Prisvard Tech. which has a focus on computing technology products. To offer a taste of Excel’s import capabilities, we will import some data from an Access database. Then we will do an import from a Comma Separated Values (CSV) file.
ACTION: Try Me activity
Let’s now work with an Excel file: Ch8–Import.xlsx. This is a dataset from Prisvard Tech, and it has almost no information in it. That’s because we are going to import the information from other files.
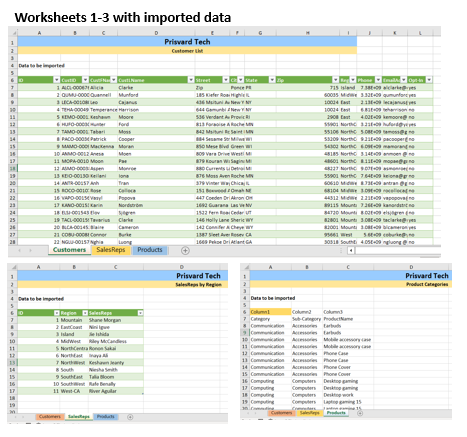
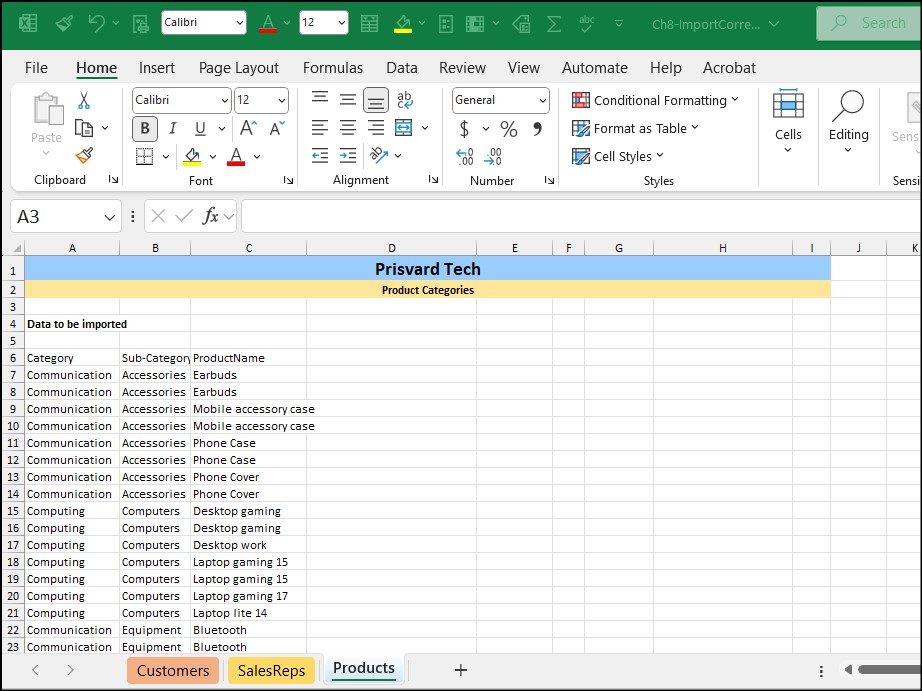
MedAttrib: author-generated. Chapter 8 Activity after imported data.
Save a copy of Ch8–Import.xlsx to your Examples folder. BEFORE you open it for work, you should also use your File Management utility to also grab a couple of other files from your DataFiles folder, and copy/paste these copies into your Examples folder. These two files are:
- Prisvard.accdb (an MS Access database, not for MAC users)
- Ch8-Import.csv (a comma-separated-values, for any user)
Then, open the Excel file Ch8–Import.xlsx for work. It currently includes a merged and centered Title Row with the name Prisvard Tech in it. It has a second pale yellow merged and centered row, which we will deal with a little later. Finally, it has one sheet named Sheet1. Let’s set this file up for our work. Your planned starting place for importing the data will be the already yellow-colored cell A6.
We will attempt to import customer data into the first, currently existing sheet. We will then import more data into a second sheet, referring to sales reps by region. Finally, we will import data into a third worksheet which refers to some products and categories. However, in order to have somewhere TO import, we need to make and name more worksheets, and for efficiency, we want the sheets to have the same format at the Customers’ sheet.
- Double-click the name tab of the first sheet and rename it Customers.
- Right-click on the sheet’s tab, and from the context panel, select Move or Copy.
- Put a checkmark in the box for Create a Copy.
- In the “Before Sheet” field, click (move to end).
- Click OK. You should now see a second sheet, named Customers (2).
- Then, follow the same process as above from the Customers sheet to make another copy of the sheet and copy it to the end so that you have a third sheet.
- The third sheet tab will read Customers (3).
- Rename the second sheet to SalesReps.
- Rename the third sheet to Products.
Let’s make the sheets stand out more by assigning a color to the worksheet tabs.
- Go back to the Customers worksheet tab, and right-click, then choose Tab color. In the offered palette, choose a medium orange.
- On the SalesReps tab, right-click, then choose Tab color, and choose a medium yellow.
- On the Products tab, right-click, then choose Tab color, and choose a medium blue.
We’ll finish prepping these worksheets for incoming data.
- In the Customers sheet, in cell A2, type Customer List. The cell is already merged and centered from cells A2 – I2.
- In the SalesReps sheet, in cell A2, type SalesReps by Region.
- In the Products sheet, in cell A2, type Product Categories.
- SAVE your work as you go: Keybind is CTRL S / Mac CMD S.
Import from Database
Now, we are going to grab some data from another source. It is also from Prisvard Tech. What we will do is a little importing of data from an Access database.
We are going to bring in a dataset from a database prepared in Microsoft Access. The file name is Prisvard.accdb and has a bunch of tables in it. We won’t need to have MS Access to actually open and work with, although in a job you would likely be able to work and get inside the database. Here we are simply going to pull data from the database and populate the Ch8–Import.xlsx Excel workbook with it.
- In the Ch8–Import.xlsx Excel file, go into the Customers worksheet, and click into Cell A6 (which has a medium yellow color in it). It is good to know where you would like your imported data to go.
- Look on the Data tab ribbon for the Get & Transform Data group.
- In the group, choose Get Data to see a dropdown menu of choices.
- Choose From Database, and then choose From Microsoft Access Database.
- Excel will open an Import Data window, which is essentially the same as the one we use when looking for a file. That is what we will do: look for the Prisvard.accdb file, which should already be in your Examples folder.
- Select the Prisvard.accdb file, and click Import.
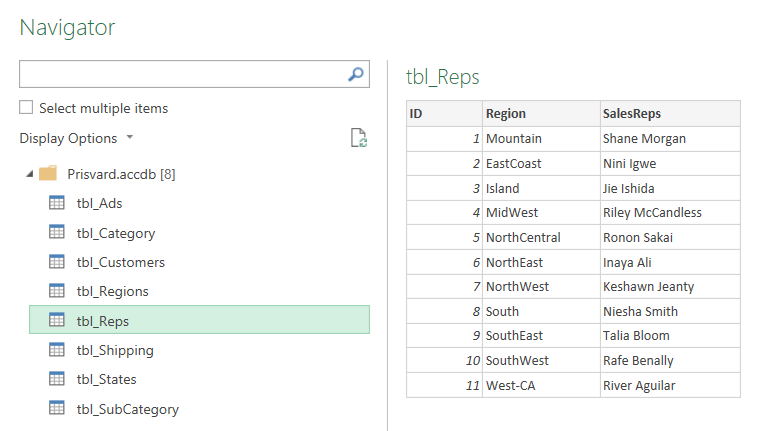
- On a Windows OS PC, Excel will “connect” with the database, and open a Navigator panel so that you can see the various items in the database. This database has only tables in it.
- We want to import information from only the tbl_Customers table. Select that one.
- The Navigator will then open a preview of the selected database table’s contents on its right-hand side.

MedAttrib: author-generated. MS Excel data importing Navigator with preview.
- Click the Load button.
- The Navigator panel for the database will disappear, and a new worksheet will have appeared in your Ch8-Import.xlsx file. Interestingly, the data will not have loaded into an existing worksheet where you clicked cell A6, but instead imported by creating a new worksheet.
- The default for Excel is for the use of default Query Load settings, which includes importing into a new worksheet. The default is also for Excel to detect column types and headers, which Excel loads as a table object rather than a plain dataset.
- In addition, the data that loaded will have imported as an already created Excel Table. We won’t be modifying this table here, but in Chapter 9. However, we can combine the table with the Customers worksheet. It is a bit of a pain, but keeping information collected and organized will help us later. ALSO, alongside the imported table, Excel will have opened a Queries & Connections panel, which we will ignore for now.
- In the new worksheet with the imported table, select all the cells in the table: cells A1-L251. Cut them, then move to the Customers sheet and place your cursor in cell A6.
- In the Customers worksheet’s yellow-colored cell A6, paste the table.
- Delete the now mostly empty tbl_Customers worksheet that was the imported info.
- SAVE your work as you go: Keybind is CTRL S / Mac CMD S.
Let’s get one more practice at importing from Access.
- In the Ch8–Import.xlsx Excel file, go into the SalesReps worksheet, and click into cell A6 (which has a medium yellow color in it).
- Again, look on the Data tab ribbon for the Get & Transform Data group.
- In the group, choose Get Data to see the dropdown menu of choices.
- Choose From Database, and then choose From Microsoft Access Database to get the Import Data window.
- Double-click the Prisvard.accdb file, which should already be in your Examples folder, which will bring up the Navigator again.
- In the Navigator, click once on the tbl_Reps in the list, which will preview a small table. Click Load, which will load the small table into another new Excel worksheet in our Ch8–Import.xlsx Excel file. Alongside the imported table, Excel will have again opened a Queries & Connections panel.
MedAttrib: author-generated. MS Excel data importing Navigator with tbl_Reps preview.
Before we clean up and get the newly imported table into the proper worksheet, let’s review the connections. Alongside the imported table, Excel will have opened a Queries & Connections panel, which we will now deal with.
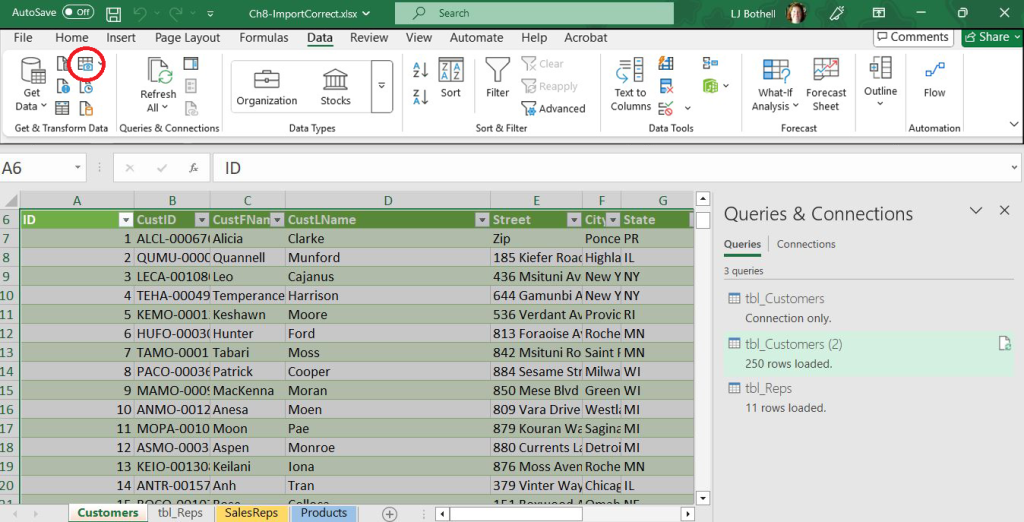
MedAttrib: author-generated. MS Excel Queries & Connections panel.
This Queries & Connections panel is a tool to let us know that there are linked connections in this workbook from another source. In this panel, we should see two items listed: tbl_Customers with 250 rows loaded, and tbl_Reps with 11 rows loaded. Note: In earlier versions, we would also see a second copy of tbl_Customers that represented the table/sheet we already deleted, but this should not show up now.
Both of the tables are linked to the database we imported them from. The information can be refreshed if changes are made to the database. We are not going to do that. At this time, we have to accept the existence of these links to an external file, which we can choose to ignore by later closing the Queries & Connections panel.
First, though, let’s discover if we can easily break the link. We can do this as we also cut and copy the tbl_Reps from its newly created worksheet into a position on our pre-formatted SalesReps worksheet.
- First, in the still-opened Queries & Connections panel, right-click the tbl_Reps in the list. In the dropdown menu, we do not see an option to break the link to the original database that the table was imported from. That is unfortunate, and seems kind of inefficient. Hmm. . .
- Second, let’s click on the actual table of sales reps in the tbl_Reps worksheet. When you click on it, the table behaves like other Excel inserted items – the activated table opens a contextual Table Design tab ribbon.
- In the Table Design ribbon, look at the External Table Data group. There is an available (not grayed out) button of a broken link named Unlink. Click on it.
- At the Warning that opens, stating “This will permanently remove the query definition from the sheet. Continue?,” click OK.
- This unlinks the table data from the database, so that even if the database is updated, this table will not be affected. This IS what we want,
- Close the Queries & Connections panel.
- Finally, in the tbl_Reps worksheet, cut the cells A1-C12, then paste them in the SalesReps worksheet in cell A6 (colored medium yellow).
- Then, delete the worksheet named tbl_Reps.
- SAVE your work as you go: Keybind is CTRL S / Mac CMD S.
Import from CSV file
Now, we are going to grab some data from another source. This is more Prisvard Tech info, saved into a raw format called comma separated values (CSV). This is like a text file, with no formatting except commas between “fields” of data like: LJ,Bothell,lbothell@shoreline.edu,Instructor,happy
- In the Ch8–Import.xlsx Excel file, go into the Products worksheet, and click into Cell A6 (which has a medium yellow color in it).
- Again, look on the Data tab ribbon for the Get & Transform Data group.
- In the group, this time choose the From Text/CSV button.
- The Import Data window will open so that you can look for the Ch8-Import.csv file in your Examples folder.
- Click the file name, then click Import.
- In the resulting pop=up window, we can see a 3 column table that Excel has interpreted based on a comma delineator.
- Click Load, and again, we’ll get a table imported in its own worksheet, named CH8-Import.
- The Queries & Connections window opens again, listing this new import.
Before Import when still a .csv file:
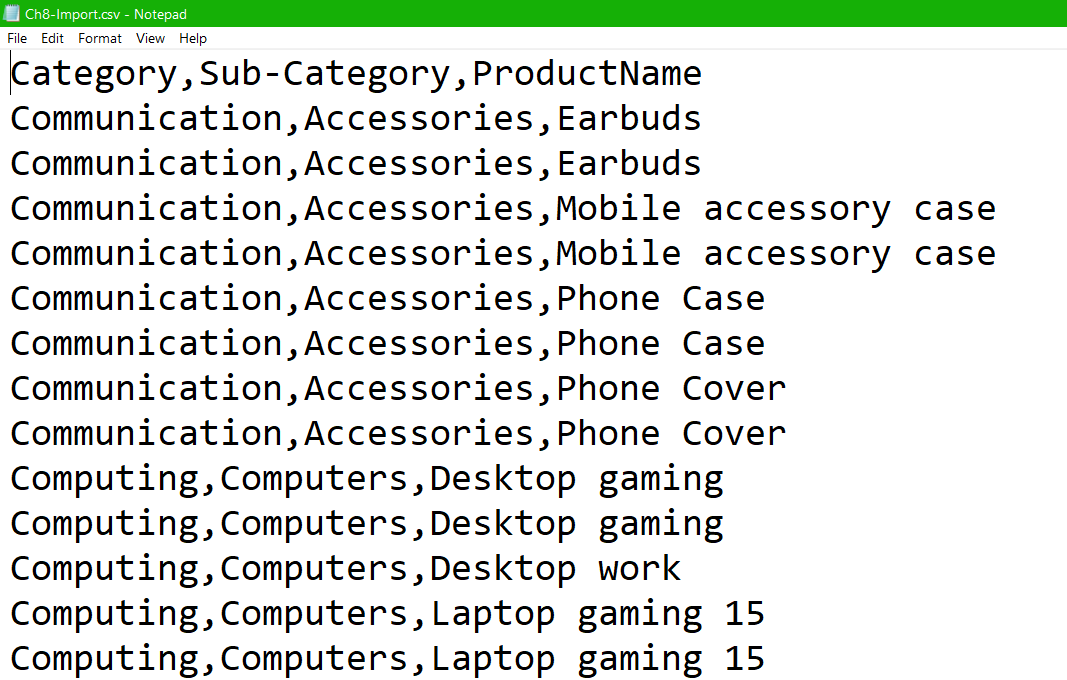
MedAttrib: author-generated. MS Excel CSV in raw format.
When using Excel Import of the .csv file:

MedAttrib: author-generated. MS Excel CSV import panel.
Given that we need to get this new table into the existing Products worksheet, let’s find out if we can break the link to the source in another way.
- In the CH8-Import worksheet, look at the imported table. Unlike the Access database imports, this table did not come in with a column of numbers before the first column of actual data. Second, notice that the header row reads only Column1, Column2, and Column3, even though the row below it does read column head names. We’ll have to fix those things later.
- Click anywhere in the table, and go to the Table Design ribbon’s External Table Data group. Click on the button of a broken link named Unlink, then click OK at the warning to unlink the table data from the database.
- In the CH8-Import worksheet, COPY the cells A1-C52, including the row reading Column1. Column2, etc.
- Right-click in the Products worksheet Cell A6 (colored medium yellow).
- On the dropdown menu, look at the Paste Options, and select Values. The data from the CH8-Import table will paste in without any Excel table format. Note: this Paste Values, which eliminates formatting, can not be done while the CH8-Import table was still actively linked to the CSV file.
- Once you paste in the values, then delete the row 6 that reads Column1. Column2, etc.
- Delete the CH8-Import worksheet that came from the CSV import.
- Close the Queries & Connections panel.
- Save and close your Excel file. We are done with it.
MedAttrib: author-generated. MS Excel CSV imported content after Paste Values.
